
Managing cloud infrastructure doesn’t always go smoothly for developers. Choosing which cloud provider to use, configuring the private and public networks, and the required security of the infrastructure aren’t easy tasks, and they consume research, documentation, and implementation time. In addition to that, in that process, many questions arise:
- What happens when you successfully configure everything for a specific environment (for example, development or staging) and it’s required to replicate it for a new one (let’s say RC or even production)?
- How can you guarantee and validate that your infrastructure is secure?
- How can you guarantee that both environments are equal?; How do you apply the same changes for all the environments when required?
- How do you easily identify which resources belong to each environment?
Some teams have a DevOps that can take care of the previous tasks, so developers don’t have to concern themselves. However, this role isn’t always covered in all projects, and the cloud-provisioning tasks fall into the developer’s hands. Whit that in mind, in Xmartlabs, we created an open-source terraform module (available on GitHub) to help the developers create, manage and maintain basic infrastructure in AWS.
Why Terraform?
Terraform is an open-source infrastructure as code tool developed and maintained by Hashicorp. Using Terraform, developers have the possibility of building, changing, and versioning infrastructure safely and efficiently in a programmatic way.
Why choosing Terraform instead of other solutions (CloudFormation, AWS, SDK, etc.)? Well, mainly because:
- Terraform is cloud agnostic: In this blog, we’ll show an example of basic infrastructure in AWS, but Terraform can be used against other cloud providers without much complexity. By choosing Terraform, we are not limiting ourselves to AWS, giving us the possibility of migrating to other providers if needed.
- Terraform isn’t a complex tool to use: Learning terraform in depth can be a complex task that requires training. Understanding all the concepts managed by Terraform, its good practices, and creating modules from scratch aren’t trivial tasks. However, if you have a module already built in Terraform (like the one we’re presenting today), the interaction with the tool isn’t complex, and you can understand it in no time.
- Terraform can be used to build complex solutions: The example explained here is a simple infrastructure that probably can be handled without any problems and with no infrastructure as code solution. We suggest managing it with Terraform from the start so you can scale it easily in the future if required.
- Terraform community: Like many of the open-source tools we use in Xmartlabs, the community behind Terraform is huge, and there are several blogs, tutorials, and forums that give support and explain in detail the solutions to possible problems.
- Terraform registry: One of the most useful resources that Terraform provides is the registry, where you can find well-documented and maintained built modules that can be used by your own modules.
What can we deploy with the Terraform Basic Infra module?
The implemented module defines a basic infrastructure in AWS that gives you all the resources required to give cloud provisioning to a basic application. Some of the apps we consider that belong to the category of a basic app are:
- Any single-page application.
- A simple backend (for example, built-in Node, Rails, Python, etc.) with a simple frontend (built in React, Vue, Angular, etc.)
- A simple backend for a mobile app.
- A simple multi-container app using docker-compose.
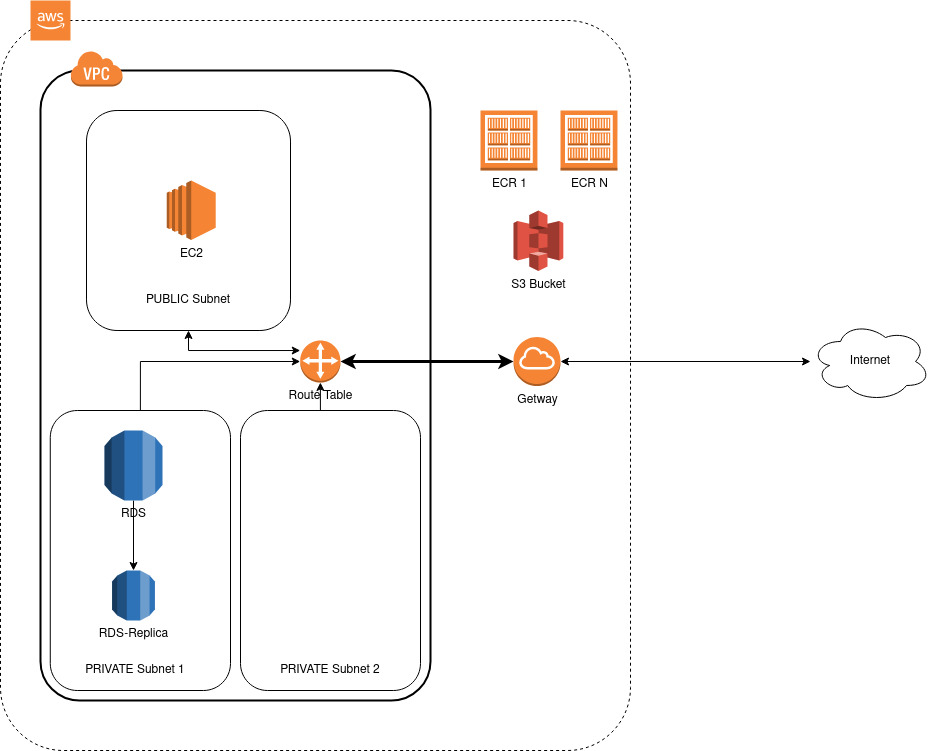
AWS provides several ways of creating infrastructure for this kind of application, such as Elastic Container Service (ECS), app runner, etc. The infrastructure that we’ll show here includes the following resources:
- An EC2 instance to deploy the code and run it
- An RDS instance (relational database)
- An S3 bucket
- Security and Networking resources (VPN, public/private subnets, API gateways, security groups, etc.)
One of the reasons why we chose these resources against others is that they give you multiple alternatives to deploy your code. You can dockerize your application if you want, but it isn’t mandatory. Moreover, most of the resources managed in this module are included in the AWS free tier, allowing you to deploy your solution without spending much money.
Project Structure
When you clone the open-source Terraform module repository from GitHub, you’ll see the structure of the project is the following:
environments: A folder that contains thetfvarsfiles with the values of the variables for each environment managed by Terraform. Later we’ll explain how to create and modify each file in this folder in more detail.modules: A folder that contains the terraform modules created by our team to better organize the resources managed in the basic infra module. As the official documentation defines, a module is a container for multiple resources that are used together. Modules can be used to create lightweight abstractions so that you can describe your infrastructure in terms of its architecture rather than directly in terms of physical objects. Following that philosophy, the created modules aremodule-cloudwatch: Module that creates a clodwatch log_group and an IAM instance profile with access to it. You can use this module to store your application logs.module-ec2-linux-web: Module that creates an EC2 instance where your application will runmodule-network-linux-web: Module that creates all the networking resources required to deploy infrastructure with a single EC2 machine with exposition to the internet. The created resources include:- A vpc
- A public subnet
- A security group with the rules to open ports 443, 80 and 22 to the whole world
- The API gateway and the route tables required to expose the previous subnet to the internet
module-network-linux-web-db: Module that creates the same resources that the previous module (module-network-linux-web), adding a connection between the database and the EC2 instance. That means:- 2 private subnets required to create the RDS instance
- A db security group exposing the db port to the VPC cidr
module-ecr: Module that creates a set of Elastic container Registers (ECRs) useful for docker image storage. This module is useful when your application is dockerized and you want to store multiple versions of the images.module-rd-db: Module that creates a database in RDS. Optionally, you can also configure a read replica for this database if needed.module-s3: Module that creates an S3 bucket. Optionally, you can also configure an IAM user with access to this bucket and access and secret key pair.
create_machine_script.tmpl: File with an init script example used in the EC2 machine initialization. In this file, you can configure the installation of all the tools required for your application.main.tf: Main Terraform module with the declaration of all the resources required for basic infrastructure. In that file, you will see exactly how the created modules are used by the main one. You probably won’t modify this module, but if required, here you can include new modules, modify current ones, etc.outputs.tf: Definition of the main modules outputs values. All the declared values that will be shown in the terminal after the Terraform commands are executed are on this file.provider.tf: File to configure the terraform provider (AWS account, bucket to store the Terraform state). Later, we’ll explain how to configure that file to use it in your project.varibles.tf: File to declare the variables used by the main module. The variables allow you to modify some parameters in the mentioned modules without changing any Terraform code. In this project, the variables were considered generic, which means that you can change them to easily adapt the infrastructure to your project needs and also manage multiple environments without needing to change any Terraform code.
Get Started
1 - Prerequisites
Before starting to use the module, you need to meet these requirements:
- An AWS account with billing enabled.
- Have installed the terraform client on your machine. You can do that by following the instruction provided in this link.
- Have installed the AWS client on your machine. You can do that by following the instructions provided here.
2 - AWS configuration
Before starting to type terraform commands in a terminal, some resources inside the AWS console must be manually created.
- IAM user: Required by Terraform to create and manage the resources. You can use any user with permission to manage resources in AWS (for example, the admin account). However, we suggest creating a new one (using that link) exclusively for Terraform usage for security reasons. We also recommend giving this user only programmatic access.
- S3 bucket for state file storage: One of the most important concepts related to Terraform is the state file. As documented in the official documentation, the “state file” is used to store the state of your managed infrastructure and configuration. This state is used by Terraform to map real-world resources to your configuration, keep track of metadata, and improve performance for large infrastructures. By default, the state file is stored locally in a file called
terraform.tfstate, but it can also be stored remotely, which works better in a team environment. We’ll use an S3 bucket to store the state file. Considering that the bucket’s names are globally unique, we recommend naming this bucket as{account-id}-tfstatebecause it’s rarely occupied, has contents of your account’s id, and the fact that there is where tfstate is allocated makes it intuitive.
- EC2 Key Pair: to have ssh access to the EC2 instance created (to deploy your code, for example), you’ll need an RSA key pair. If you want, you can import an already created pair (for example, your personal ones) into AWS and configure the access to the EC2. We recommend creating a new pair instead of using an existing one. You can easily do it from the AWS console in this link. Make sure to create this key in the same region as the rest of your infrastructure (otherwise, you won’t be able to use it) and store the .pem file in a secure place.
3 - Cloning the repository
At this point, you are ready to clone/copy the repository content and configure it for your project. There are several approaches to doing it. You can create a new repository to handle the infrastructure; you can create a folder (and name it something like infra ) in an already created repository and copy the content inside or even copy the files in a not versioned folder.
Our suggestion is to version the infrastructure code in a repository (a new one or a folder in an existing one). Following this approach, you’ll be able to edit the infrastructure following the good practice of code development (for example, using PRs and code reviews) in a shared way. Moreover, all the resources managed in the main module are designed to keep the secrets and private information secure.
4 - Configuring the provider
Once you have a template copy, you can configure it for your specific solution. Before changing anything, you must configure your machine's AWS client. A detailed guide about this tool and how to configure it is here; a short explanation about configuring the AWS client is: executing the following commands in a terminal:
aws configure set aws_access_key_id <AWS_ACCESS_KEY_ID>
aws configure set aws_secret_access_key <AWS_SECRET_ACCESS_KEY>
aws configure set region <REGION>
where the parameters AWS_ACCESS_KEY_ID and AWS_SECRET_ACCESS_KEY are related to the created IAM user for Terraform, and the REGION is the AWS region chosen for your project.
Once the client is properly configured, you need to edit the provider.tf file and change the state bucket for the name of the created one. If you follow the suggestion made in this blog, you only need to change the string <your-account> with your AWS account identifier. For example, if your account id is 111111111111, your provider file should be:
terraform {
  required_version = ">= 0.12.0"
  backend "s3" {
    bucket = "111111111111-tfstate"
    key    = "terraform.tfstate"
    region = "sa-east-1"
  }
}

terraform {
  required_providers {
    aws = {
      source  = "hashicorp/aws"
      version = "~> 4.9.0"
    }
  }
}

provider "aws" {
  region  = var.region
}
If everything is configured correctly, you should be able to run the init command without no problem:
terraform init
The init command is required by Terraform to initialize all the modules required for your solution. You need to execute it the first time you copy the code in your solution or if, for some reason, you change some modules.
5 - Managing environments
One of the purposes of this template is to provide similar infrastructure to multiple environments. It can be handled in several ways; the approach that we suggest is using Terraform workspaces. Using workspaces, you have the possibility of storing multiple state files in the same backend (in that case, the created S3 bucket). The idea is to create a workspace per environment and select it before executing any command related to it.
terraform workspace new <environment>
terraform workspace select <environment>
The workspaces are also stored in the S3 bucket, meaning that everyone in the project with access to it will have access, allowing your team to collaborate. The command to list all the environments is:
terraform worskpace list
6 - Parametrizing the environments variables
For you to create and manage the infrastructure for a specific environment, you need to set the variables for it. You must create a specific file for each environment where you will set these values and overwrite the default ones. The structure of the project suggests keeping these files in the environments directory. There’s an example file (example.tfvars) that you can copy, rename, and edit for each environment. Be sure to review the variables.tf file to see if you’d like to override any other defaults.
Some considerations that you need to keep in mind when you are configuring these values:
- Take care of duplicated names for the resources. If you put the same name in multiple environments, you’ll have issues at creation time. To avoid this situation, the module comes with a variable called
create_prefix_for_resourcesthat appends the prefix'{var.project}_{var.env}'before each resource name. It’s also useful to identify the environment (or even project) that each resource belongs. Our suggestion is to keep this variable set in True. - The EC2 module has a variable called
key_namethat needs to have the RSA key name created before. You can share the same key between multiple environments, but we suggest creating a specific one per environment to reduce vulnerabilities. - In the EC2 module, there’s a variable called
amiidthat can be a little bit difficult to understand if you don’t have experience working with AWS. An Amazon Machine Image (AMI) is a supported and maintained image provided by AWS that provides the information required to launch an instance (definition extracted from the official documentation). The available AMI ids vary based on the region that you’re using. If you have doubts about which AMI to use, you can take a look at this link. - The database password is a secret that can’t be stored in this file because it will become a vulnerability. The implemented rds module is integrated with the AWS secret manager to avoid that situation. The procedure to create that secret is:
- Go to the secret management page on your AWS console: https://console.aws.amazon.com/secretsmanager/home
- To create your secret click the
Store a new secretbutton. - Select “Other type of secret”
- Define the keys and values. Make sure you use the exact keys, or Terraform won’t be able to find the values. For the RDS Database, you’ll need:
username: the username to connect to the RDS DB.password: the password to connect to the RDS DB. Be sure to use a secure password.
- Click “Next” and then define the secret name.
- You can choose whatever secret name you want. Our suggestion is to name it following this pattern
<project>/<environment>/db-credentials - It’s recommended that you have one secret for each environment.
- You can choose whatever secret name you want. Our suggestion is to name it following this pattern
- Remember the secret name and update your variables file with the correct secret.
- Click “Next”
- Do not choose to rotate the secrets.
- Once the process ends, click “Store,” and your secret will have been created.
7 - Review what you did
Now that everything is configured, you can check the “plan” that Terraform will apply. In the plan, you’ll see all the resources that will be created, modified, and destroyed in your AWS account. If it’s the first deployment of the infra, you’ll only see new resources, and maybe this command won’t look useful for you. However, when you are editing existing infrastructure, it will help you to review the changes before applying them. The command to display the plan is:
terraform plan --var-file=environments/<environment>.tfvars
Make sure you’re pointing to the correct environment.
8 - Apply
Once you have checked that everything fits your needs, you are ready to apply the plan and impact those changes in the AWS account. That can be easily done with the command:
terraform apply --var-file=environments/<environment>.tfvars
After executing this command, you can go to the AWS console dashboard and see how all the resources were created.
9 - Destroy
If for some reason, you want to destroy the created environment, you can do it by executing the command.
terraform destroy --var-file=environments/<environment>.tfvars
Considerations
Some considerations that you need to take care of:
- Check the cost of the resources you’re creating. If you are not careful, you can get substantial billing at the end of the month related to your AWS infrastructure. Most of the resources used in this script belong to the free tier, so it should be free during the first year. However, if you’re using big machines, customs AMIs or large discs, your infrastructure may not comply with the free tier requirements, and you will be billed for some of the resources.
- Don’t manage any Terraform-created resources from the AWS console dashboard. If you do it, these changes will not be reflected in the state file, generating conflict when you apply a new change with Terraform. If you need to change something in any of the resources, you can only apply the change with Terraform and in the tfvars file.
What’s next
After following this tutorial, you’ll have all the resources required to deploy your basic app in AWS without needing complex manual configuration in the AWS dashboard. You’ll have the possibility of accessing the EC2 instance with SSH and deploying your code there. Suppose you need to modify some environment attribute (for example, increase the storage of the disc attached to the EC2 instance). In that case, you only have to edit the corresponding variable in the var file and run the plan and apply commands again. In that case, you will see only the required changes in the terminal. You can also replicate an environment if required to create a new workspace and a var file.
If you learn a bit more about terraform, you can also edit the current modules, create new ones to create resources that are not covered by this basic module or even create more complex solutions (such as ECS clusters).
We hope this blog and the code in the repository help you easily create AWS infrastructure and avoid some of the common issues that our team has faced in the past. Any contribution to the repository is welcome.