
This year the Google I/O conference was canceled, so I think it's a good time to talk about one of Jetpack's biggest Architecture component introduced last year, the Android Navigation Component.
The aim of this series of posts is to talk about two important items that will help you decide on whether to use this library or not:
- The expectations and conclusions of using it for more than 9 months.
- Some tips and helper classes that are very helpful if you do want to start using it (next post).
What were we expecting from a new navigation library?
That was the first question that came to my mind when we first thought about using it. There are a bunch of navigation libraries in existence for Android, and at that moment we already had a solid navigation architecture based on the Router pattern, so, what were we expecting from it?
- A library that's easy to integrate and debug.
- A library that could provide us with a better understanding of the app's main flows and features.
- Share data between views easily.
- A good integration between all of Jetpack's Components.
What did we find?
The integration is very easy, you can follow Android's documentation and check the sample projects upon doing it.
After the integration, you'll have to define the app's main navigation graph, one of the most important components of this library.
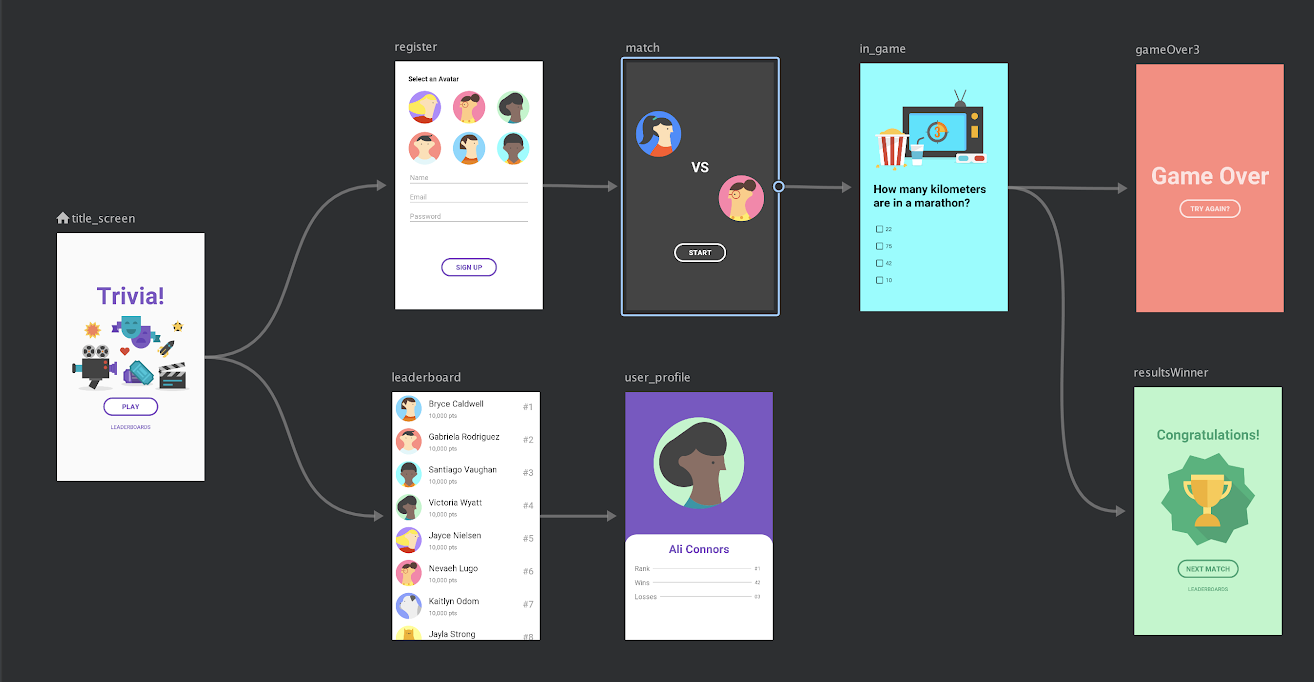
The graph is stored in a simple XML file, where the nodes are the app's screens (fragments, dialogs, etc) and the actions are the edges that allow for navigating between nodes. Each node is able to declare arguments, which ends up being data shared within the navigation flow.
I found the nav graph extremely useful, with two key advantages:
- You can see the whole app flow represented as a navigation graph. It's useful not only for you but especially for new colleagues joining your project.
- The ability to define nested graphs, which are graphs that will be included by other graphs. So that you can define a specific app flow part in a nested graph to work with small diagrams and be able to handle complex app flow.
The login is a common example for both items: suppose that the login epic is a complex flow that contains a login screen, a register screen, and a terms and conditions screen. If you add all of these screens to your main graph, it'll make it grow too fast -risking its future maintainability- so I recommend including a login subgraph instead. Using this approach I found some advantages: the main graph is easier to understand and you can also re-utilize a given flow in multiple places in the app. We know that re-utilization is an excellent pattern: if you have to change something, you will do it just once.
One disadvantage we found is related to how Android Studio stores the graph nodes position.
These are saved in a huge and complex .idea/navEditor.xml file.
If you want to save the positions of all graphs nodes -in order for the graph to be consistent among your team, for instance- you need to track this file and include it in your repo.
Sometimes this file will be randomly corrupted and you'll lose the positions of all nodes.
If that is your case, you can check out the last valid file and it'll be fixed.
Moreover this file suffers from an awful lot of git conflicts, so it's a bit tedious to maintain it.
As I commented before, you can share data between the nodes (screens) using arguments. The navigation component includes a Gradle plugin that has a pretty self-explanatory name: Safe Args. That's really good because you can share arguments in a safe way and you don't have to care about the ugly key-value bundle used up until now.
Although I mentioned that sharing data in that way is good, we found that sharing data among nested graphs is not safe yet, since we have to declare these arguments and if we forget the app crashes in runtime. This is something likely to improve in a future version.
Debug and test your app
The navigation component is also a very useful asset when it comes to debugging and testing work-in-progress (WIP) features easily in your app.
It let us start the app on a particular screen and this is useful during development because we don't even need to navigate manually.
In order to launch a particular screen we change the startDestination property and set up its default arguments in the navigation graph if needed.
This way, when you run the app for the next time, this internal screen will be opened right away, awesome right?
On the other hand, debugging the graph status is a bit hard, not being able to know what's the current graph path.
To solve this issue we created a cool tool to log the current path, which I'll introduce in the next post.
The library includes a testing module, which lends a helping hand when testing your app's navigation logic. Although I didn't get to use it a lot, I found it useful and easy to use whenever I had to.
Jetpack & Android Architecture Components

I will now talk about one of the most important points of this library, its integration with other Android Architecture Components. Android Architecture Components are libraries that help you design robust, testable, and maintainable apps. ViewModel is probably one of the most important components, in particular for new apps.
All graphs have an associated lifecycle scope, so that you can create ViewModels associated to the graph's scope. That means that you can share data through the screens using a ViewModel that's associated with a graph.
Let me explain it with an example: suppose that you have an app that has a big register flow. It contains a screen with personal information, another screen for your picture, another for your address, and so on. A fine approach here would be to define a register nested graph. As you can see, all screens have a piece of information that should be combined in the end. We have two options to accomplish that: either create a lot of arguments on each screen to share all of the information or just use a shared ViewModel. Using the second approach, it will be cleaner while at the same time resulting in both easier to handle and less verbose. All screens will store their specific data in the graph’s ViewModel, and at the end the last screen will combine the data to create the needed entity. As the ViewModel is associated to the graph’s lifecycle, when the flow finished it will be deleted.
Bonus
In the previous sections I talked about the most important points of this component. However, there are two more features worth mentioning.
The first one is deep-linking. Implementing deep linking was never easier, we just need to specify them in the navigation graph by adding a deeplink XML tag. Furthermore, we can deep link from a push notification by creating an explicit intent and open exactly the section that you want.
The second one, it's how easy transitions can be implemented. We just need to write a few lines of code to add transitions between fragments. Additionally, a couple of months ago Material released the motion system, a set of transition patterns that help users understand and navigate an app.
You can easily integrate these smooth transitions in your app by using the navigation library.
Conclusion
In this post we covered the most important advantages when using Android Navigation Component. App UI and flow are essential parts in all applications and a graphical representation helps everyone clearly understand how it works. If you want to quickly implement and maintain your app UI and navigation, Android Navigation Component is the way to go.