In this post I'm going to write about my experience and the problems I faced when setting up Xcode Server for CI and automatic deployment to iTunes Connect at Xmartlabs. I'm going to let you know how I could solve some problems hoping it may help somebody in the same situation.
There are a lot of blogs that explain how to set up Xcode Server, create an integration bot, and explore the results on Xcode (issue tracking, tests code coverage, etc). However, when you try to make something more sophisticated, you may encounter some errors and it will be difficult to find resources for a solution.
Why did we have our own CI server?
Well, almost everybody knows the benefits of having a CI server; it can automatically analyze code, run unit and UI tests, build your project among some other valuable task. If something goes wrong, it will notify the results to people that may have introduced the issue. Xcode bot tracks all new issues of each integration as well as solved ones. For new issues, the bot will display a range of commits where the issue may have introduced. Moreover, we no longer need to deal with deployment provisioning profiles and certificates allowing anyone on the team to easily release a new version of the app.
In short, this allows the programmer to spend more time on app development and less on app integration and deployment. Meanwhile it ensures the code has certain minimum quality level.
Setting up Xcode server
The guide Xcode Server and Continuous Integration Guide from Apple will give you a good introduction on how to setup and use Xcode Server. We recommend that you read the guide first because we are not going too deep into the basics of setting up Xcode Server.
Cocoapods & Fastlane
Once we have installed the Server app and enabled Xcode service, we have to install Cocoapods and Fastlane. Fastlane will help us with many common tasks that are necessary for building a project and uploading the app to iTunes Connect.
To prevent permissions issues we will install all the gems only for the builder user using gem install --user-install some_gem. Additionally we need to create a symlink to access the Cocoapods and Fastlane binaries in order to access them when our bot is running.
Before starting, include the ruby bin folder to builder's path by adding the line below to the files ~/.bashrc and ~/.bash_login:
# It may change depending on the ruby's version on your system
export PATH="$PATH:/var/_xcsbuildd/.gem/ruby/2.0.0/bin"
Now let's install these gems:
$ sudo su - _xcsbuildd

$ gem install --user-install cocoapods
$ pod setup
$ ln -s `which pod` /Applications/Xcode.app/Contents/Developer/usr/bin/pod

$ gem install --user-install fastlane
$ ln -s `which fastlane` /Applications/Xcode.app/Contents/Developer/usr/bin/fastlane
Emails & Notifications
A nice Xcode Server feature has the ability to send an email to selected people depending on the integration result. For example, if the integration fails because the project is not compiling, or some tests are not passing, the bot will send an email to the last committers notifying that the build has been broken.
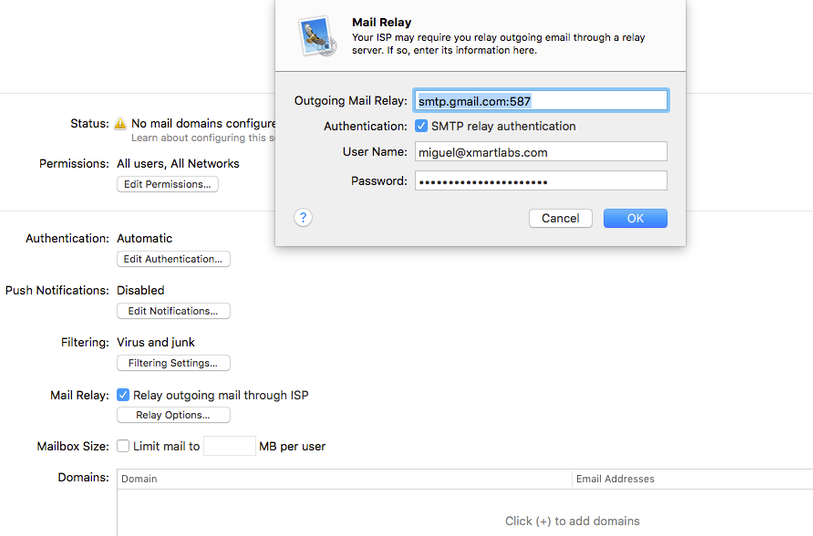
Since we use a Gmail account to send emails, we had to change the settings on the Mail service on Server app.
First enable the Mail service on Server. Then check the option Relay outgoing mail through ISP. On the Relay option dialog you have to put smtp.gmail.com:587 in Outgoing Mail Relay, enable authentication and enter valid credentials. That's all you have to set up for your Server to send the email using your Gmail account.
Creating the bots
Now that we have our Xcode server up and running, it's time to create our Xcode bots. At Xmartlabs, we set up two different bots for each Xcode project.
Continuous Integration bot
Indented to make sure the project builds properly and code analysis, Unit & UI tests pass accordingly. This bot is triggered automatically each time a pull request is merged into develop branch. Committers will be notified if something goes wrong.
We can create the bot by following these simple steps:
- Within Xcode project, select menu option Product > Create Bot.
- Follow the creation wizard, it is not too hard to complete. You may encounter some difficulties when setting git credentials. We opted to create a ssh key and use it for our bots. So we ended up selecting Existing SSH Keys and using the same key for all our bots.
- Integrate it and see if everything is OK.
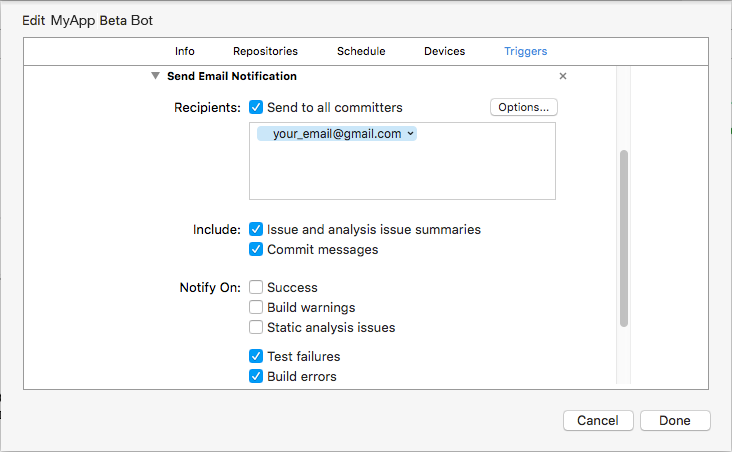
Something cool is that the email will be sent to all committers that may have introduced the issue and you can specify additional receivers.
Deployer bot
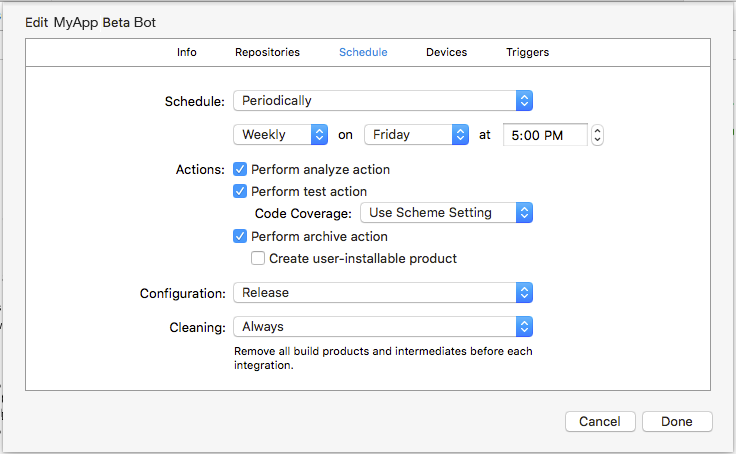
The second bot is in charge of building and uploading the app IPA to iTunes Connect. It will also be responsible for creating and pushing a new git tag using the most recent code base. We're going to use Fastlane to achieve this.
Normally we configure it to run on demand or weekly schedules since we usually need to release beta versions once a week.
Certificates & Private keys
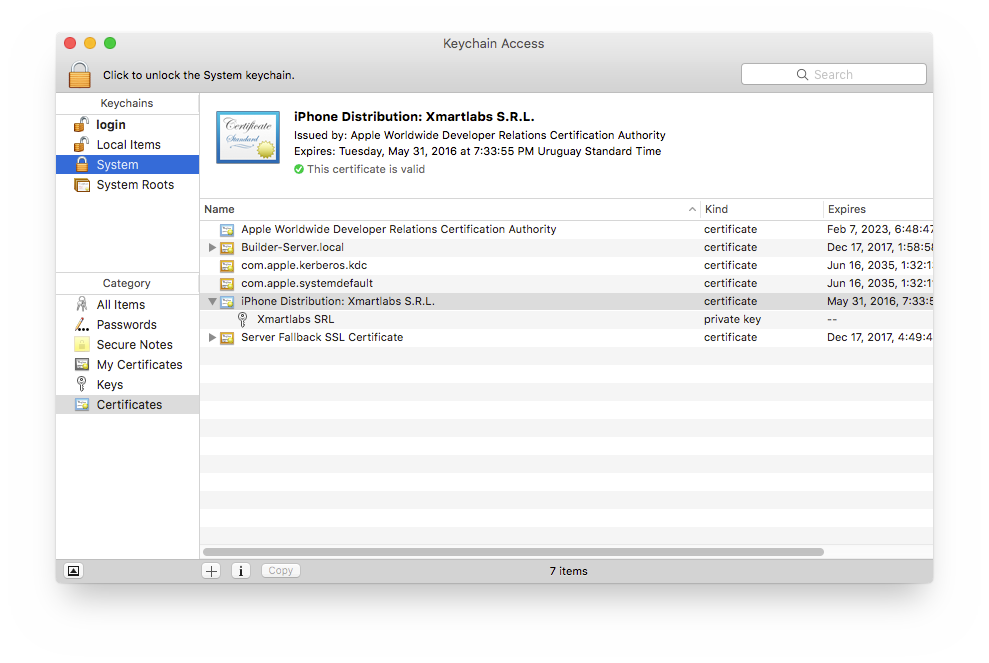
We have to ensure that distribution/development certificates and their associated private key are installed on the System Keychain.
To build the IPA, we have to put required provisioning profiles in the folder below since bots run on its own user _xcsbuildd and search provisioning profiles in this folder:
/Library/Developer/XcodeServer/ProvisioningProfiles
Before integration script
Xcode integration allows us to provide a before and a after integration script.
Before our Deployer Bot starts integrating, we have to perform some tasks which will be run from a triggered command:
- Increase build number
- Download required provisioning profiles
- Install the correct versions of the libraries used by the project
Fastlane tools will look for useful information at Appfile file to deploy the lanes such as Apple ID and application Bundle Identifier. Code snippet below illustrates how Appfile could looks like:
app_identifier "<MY_APP_BUNDLE_ID>" # The bundle identifier of your app

apple_dev_portal_id "<[email protected]>"  # Your Apple email address
itunes_connect_id "<[email protected]>"

# You can uncomment the lines below and add your own
# team selection in case you are on multiple teams
# team_name "<TEAM_NAME>"
# team_id "<TEAM_ID>"

# To select a team for iTunes Connect use
# itc_team_name "<ITC_TEAM_NAME>"
# itc_team_id "<ITC_TEAM_ID>"
Downloading and configuring provisioning profiles is done by Fastlane sigh tool. Its usage is really straightforward, just set up the Appfile correctly and it'll do the rest.
The before_integration lane is defined in the Fastfile file as shown below:
lane :before_integration do
  # fetch the number of commits in the current branch
  build_number = number_of_commits

  # Set number of commits as the build number in the project's plist file before the bot actually start building the project.
  # This way, the generated archive will have an auto-incremented build number.
  set_info_plist_value(
    path: './MyApp-Info.plist',
    key: 'CFBundleVersion',
    value: "#{build_number}"
  )

  # Run `pod install`
  cocoapods

  # Download provisioning profiles for the app and copy them to the correct folder.
  sigh(output_path: '/Library/Developer/XcodeServer/ProvisioningProfiles', skip_install: true)
end
number_of_commitsandcocoapodsare Fastlane actions. BothAppfileandFastfilefiles must be within afastlanefolder in the root directory of your project.
If we run fastlane before_integration, it will connect to iOS Member Center and download the profiles for the app indicated by its bundle id in the Appfile. Additionally, we have to send the password to fastlane. To make this work with Xcode bots, we pass it through the environment variable FASTLANE_PASSWORD:
$ export FASTLANE_PASSWORD="<APPLE_ID_PASSWORD>"
$ fastlane before_integration
Initially we attempted to use Keychain to pass the passwords to Fastlane
sighbut it doesn't work, for further info about this see here.
We will modify the deployer bot by adding a before trigger command on the Triggers tab, that will execute before_integration lane.
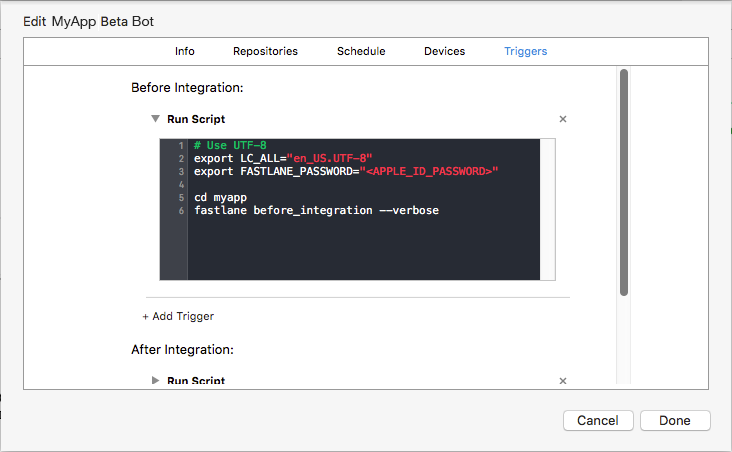
Note that before calling
fastlane, we are moving tomyappfolder which is the git remote repository name. Triggers run in the parent project folder.
After integration script
After the bot finishes integrating the project, we will be able to access the created archive file, export it as an IPA file and upload it to iTunes Connect. We're going to create an additional lane which be in charge of uploading the IPA to iTunes Connect and also creating a git tag.
Let's start simple without taking care of the upload to iTunes Connect for now:
lane :after_integration do
  plistFile = './MyApp-Info.plist'

  # Get the build and version numbers from the project's plist file
  build_number = get_info_plist_value(
    path: plist_file,
    key: 'CFBundleVersion',
  )
  version_number = get_info_plist_value(
    path: plist_file,
    key: 'CFBundleShortVersionString',
  )

  # Commit changes done in the plist file
  git_commit(
    path: ["#{plistFile}"],
    message: "Version bump to #{version_number} (#{build_number}) by CI Builder"
  )

  # TODO: upload to iTunes Connect

  add_git_tag(
    tag: "beta/v#{version_number}_#{build_number}"
  )

  push_to_git_remote

  push_git_tags
end
Now we are going to export the IPA from the archive file created by the bot during the integration. We do this by running the command xcrun xcodebuild in the after_integration lane. Additionally, we're going to upload the IPA to iTunes Connect using Fastlane deliver tool. See details below:
lane :after_integration do
  plistFile = './MyApp-Info.plist'

  # ...

  ipa_folder = "#{ENV['XCS_DERIVED_DATA_DIR']}/deploy/#{version_number}.#{build_number}/"
  ipa_path = "#{ipa_folder}/#{target}.ipa"
  sh "mkdir -p #{ipa_folder}"

  # Export the IPA from the archive file created by the bot
  sh "xcrun xcodebuild -exportArchive -archivePath \"#{ENV['XCS_ARCHIVE']}\" -exportPath \"#{ipa_path}\" -IDEPostProgressNotifications=YES -DVTAllowServerCertificates=YES -DVTSigningCertificateSourceLogLevel=3 -DVTSigningCertificateManagerLogLevel=3 -DTDKProvisioningProfileExtraSearchPaths=/Library/Developer/XcodeServer/ProvisioningProfiles -exportOptionsPlist './ExportOptions.plist'"

  # Upload the build to iTunes Connect, it won't submit this IPA for review.
  deliver(
    force: true,
    ipa: ipa_path
  )

  # Keep committing and tagging actions after export & upload to prevent confirm the changes to the repo if something went wrong
  add_git_tag(
    tag: "beta/v#{version_number}_#{build_number}"
  )

  # ...

end
We are not using the bot to create the IPA file because it is not available yet during trigger execution time. We are not using gym either because of the Keychain restriction problem.
Supporting multiples targets
Typically our projects have production and staging application targets. Fastfile file will require different lanes for each target that we want to upload to iTunes Connect. We need to modify the Appfile file to set up the correct app identifier depending on each lane:
for_platform :ios do
  for_lane :before_integration_staging do
      app_identifier "com.xmartlabs.myapp.staging"
  end

  for_lane :after_integration_staging do
    app_identifier "com.xmartlabs.myapp.staging"
  end

  for_lane :before_integration_production do
      app_identifier "com.xmartlabs.myapp"
  end

  for_lane :after_integration_production do
    app_identifier "com.xmartlabs.myapp"
  end
end

apple_dev_portal_id "<[email protected]>"
itunes_connect_id "<[email protected]>"

# team_name "<TEAM_NAME>"
# team_id "<TEAM_ID>"
Setting up apple_dev_portal_id and itunes_connect_id allows us to use different accounts for fetching profiles and uploading to iTunes Connect respectively.
Finally, after some refactor, the Fastfile file may looks like as shown below:
require './libs/utils.rb'

fastlane_version '1.63.1'

default_platform :ios

platform :ios do
  before_all do
    ENV["SLACK_URL"] ||= "https://hooks.slack.com/services/#####/#####/#########"
  end

  after_all do |lane|
  end

  error do |lane, exception|
    reset_git_repo(force: true)
    slack(
      message: "Failed to build #{ENV['XL_TARGET']}: #{exception.message}",
      success: false
    )
  end

  # Custom lanes

  desc 'Do basic setup, as installing cocoapods dependencies and fetching profiles, before start integration.'
  lane :before_integration do
    ensure_git_status_clean

    plist_file = ENV['XL_TARGET_PLIST_FILE']

    # This is a custom action that could be find in the libs/utils.rb
    increase_build_number(plist_file)

    cocoapods
    sigh(output_path: '/Library/Developer/XcodeServer/ProvisioningProfiles', skip_install: true)
  end

  desc 'Required tasks before integrate the staging app.'
  lane :before_integration_staging do
    ENV['XL_TARGET_PLIST_FILE'] = './MyAppStaging-Info.plist'
    before_integration
  end

  desc 'Required tasks before build the production app.'
  lane :before_integration_production do
    ENV['XL_TARGET_PLIST_FILE'] = './MyApp-Info.plist'
    before_integration
  end

  desc 'Submit a new Beta Build to Apple iTunes Connect'
  lane :after_integration do
    branch = ENV['XL_BRANCH']
    deliver_flag = ENV['XL_DELIVER_FLAG'].to_i
    plist_file = ENV['XL_TARGET_PLIST_FILE']
    tag_base_path = ENV['XL_TAG_BASE_PATH']
    tag_base_path = "#{tag_base_path}/" unless tag_base_path.nil? || tag_base_path == ''
    tag_link = ENV['XL_TAG_LINK']
    target = ENV['XL_TARGET']

    build_number = get_info_plist_value(
      path: plist_file,
      key: 'CFBundleVersion',
    )
    version_number = get_info_plist_value(
      path: plist_file,
      key: 'CFBundleShortVersionString',
    )

    ENV['XL_VERSION_NUMBER'] = "#{version_number}"
    ENV['XL_BUILD_NUMBER'] = "#{build_number}"

    tag_path = "#{tag_base_path}release_#{version_number}_#{build_number}"
    tag_link = "#{tag_link}#{tag_path}"
    update_changelog({
      name: tag_path,
      version: version_number,
      build: build_number,
      link: tag_link
    })

    ENV['XL_TAG_LINK'] = "#{tag_link}"
    ENV['XL_TAG_PATH'] = "#{tag_path}"

    sh "git config user.name 'CI Builder'"
    sh "git config user.email '[email protected]'"

    git_commit(
      path: ["./CHANGELOG.md", plist_file],
      message: "Version bump to #{version_number} (#{build_number}) by CI Builder"
    )

    if deliver_flag != 0
      ipa_folder = "#{ENV['XCS_DERIVED_DATA_DIR']}/deploy/#{version_number}.#{build_number}/"
      ipa_path = "#{ipa_folder}/#{target}.ipa"
      sh "mkdir -p #{ipa_folder}"
      sh "xcrun xcodebuild -exportArchive -archivePath \"#{ENV['XCS_ARCHIVE']}\" -exportPath \"#{ipa_path}\" -IDEPostProgressNotifications=YES -DVTAllowServerCertificates=YES -DVTSigningCertificateSourceLogLevel=3 -DVTSigningCertificateManagerLogLevel=3 -DTDKProvisioningProfileExtraSearchPaths=/Library/Developer/XcodeServer/ProvisioningProfiles -exportOptionsPlist './ExportOptions.plist'"

      deliver(
        force: true,
        ipa: ipa_path
      )
    end

    add_git_tag(tag: tag_path)

    push_to_git_remote(local_branch: branch)

    push_git_tags

    slack(
      message: "#{ENV['XL_TARGET']} #{ENV['XL_VERSION_NUMBER']}.#{ENV['XL_BUILD_NUMBER']} successfully released and tagged to #{ENV['XL_TAG_LINK']}",
    )
  end

  desc "Deploy a new version of MyApp Staging to the App Store"
  lane :after_integration_staging do
    ENV['XL_BRANCH'] = current_branch
    ENV['XL_DELIVER_FLAG'] ||= '1'
    ENV['XL_TAG_BASE_PATH'] = 'beta'
    ENV['XL_TARGET_PLIST_FILE'] = './MyApp Staging-Info.plist'
    ENV['XL_TARGET'] = 'MyApp Staging'
    ENV['XL_TAG_LINK'] = 'https://github.com/xmartlabs/MyApp/releases/tag/'

    after_integration
  end

  desc "Deploy a new version of MyApp to the App Store"
  lane :after_integration_production do
    ENV['XL_BRANCH'] = current_branch
    ENV['XL_DELIVER_FLAG'] ||= '1'
    ENV['XL_TARGET_PLIST_FILE'] = './MyApp-Info.plist'
    ENV['XL_TARGET'] = 'MyApp'
    ENV['XL_TAG_LINK'] = 'https://github.com/company/MyApp/releases/tag/'

    after_integration
  end
end
Notes about previous Fastfile file:
- Defines two
before_integrationlanes for both production and staging environments in order to setup the correct app identifiers using theAppfile. - Build, git, and deploy actions are encapsulated in the
after_integrationlane. This allow us to have production and staging lanes that, basically, will setup some parameters and invoke the internalafter_integrationlane. ensure_git_status_cleanwill check if the bot's working folder has changes and will fail in such case. This will ensure that the bot’s working copy is exactly the same to the remote repository files. As we are changing local files on ourafter_integrationlane, if something went wrong we'll want to reset all of them. So we added the actionreset_git_repoin theerrorblock.- The command
xcrun xcodebuild -exportArchiverequires a configuration file specified with the option-exportOptionsPlist. We created the fileExportOptions.plistwithinfastlanefolder and its content is similar to:
<?xml version="1.0" encoding="UTF-8"?>
<!DOCTYPE plist PUBLIC "-//Apple//DTD PLIST 1.0//EN" "http://www.apple.com/DTDs/PropertyList-1.0.dtd">
<plist version="1.0">
<dict>
        <key>teamID</key>
        <string><TEAM_ID></string>
        <key>method</key>
        <string>app-store</string>
        <key>uploadSymbols</key>
        <true/>
        <key>uploadBitcode</key>
        <true/>
</dict>
</plist>
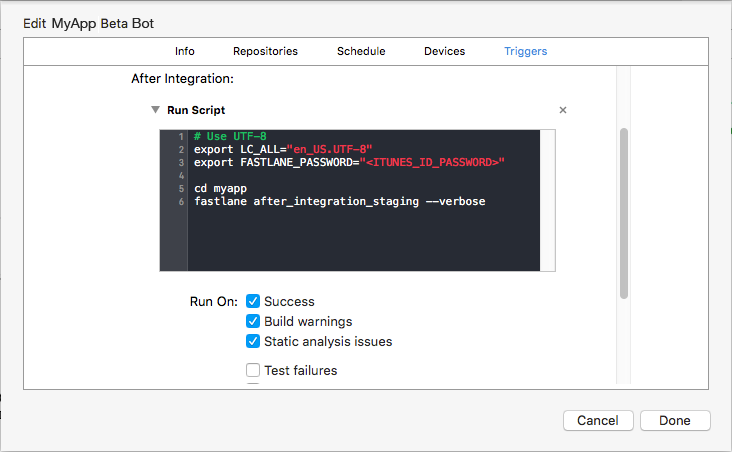
As the last step, add a new after integration trigger that executes our after_integration_staging lane:
You can find a template for the Fastlane files shown before in this github repo Fastlane CI files
Troubleshooting
During our process of setting up Xcode Server, we faced many drawbacks and issues that weren't easy to solve, mainly because we couldn't find any information on the web. We decided to make a comprehensive list so it can be help anyone in the same situation.
Attempting to Developer password to Fastlane tools
sigh will attempt to store the password in the keychain and try to access it later if no password is provided, but this doesn't work when running sigh from a bot's trigger since the triggers commands have no access to bot user's keychain.
We tried by unlocking it before running sigh as shown below without luck:
# Try to unlock the keychain to be accessed by fastlane actions
$ security -v unlock-keychain -p `cat /Library/Developer/XcodeServer/SharedSecrets/PortalKeychainSharedSecret` /Library/Developer/XcodeServer/Keychains/Portal.keychain

# Will download profiles using sigh
$ fastlane before_integration_staging
On the output log appears next messages:
security: SecKeychainAddInternetPassword <NULL>: User interaction is not allowed.
Could not store password in keychain
We simply couldn't access the keychain when running Fastlane. We opted to just save the password as a system environment variable.
CocoaPods is not able to update dependencies
[!] Unable to satisfy the following requirements:
SwiftDaterequired byPodfileSwiftDate (= 3.0.2)required byPodfile.lock
NOTE: dependencies seems to be OK in Podfile, it might be a permissions error when pods try to update its repo folder in the user's folder.
We ended up deleting CocoaPods and installing it as a described above:
$ sudo rm -fr /var/_xcsbuildd/.cocoapods

$ sudo su - _xcsbuildd
$ gem install --user-install cocoapods
$ pod setup
$ ln -s `which pod` /Applications/Xcode.app/Contents/Developer/usr/bin/pod
Fastlane - Sigh & Gym cannot access to keychain
That's all, they cannot access to keychain. Seeing this message (or similar) when running gymor sigh is the symptom:
security: SecKeychainAddInternetPassword <NULL>: User interaction is not allowed.
- They cannot access stored login password, you must pass the password through env variables to
sighusingFASTLANE_PASSWORD. gymcannot access to distribution certificates installed in keychain, so make the IPA usingxcrun xcodebuildinstead ofgym.
Certificates & private keys
Ensure that:
- They must be installed in System keychain so Xcode Bot can access them.
- On the keychain app, change certificates and private keys Access Control allowing
codesignandsecuritybinaries to access them.
Cannot select Xcode in Server app
After updating Xcode to version 7.2.1 we were able to select it on Server app, then Xcode service was disabled. When we tried to select the correct Xcode app there was a dialog saying "You must agree to the terms of the xcode software license agreement" was shown. We found the solution on an Apple Forum thread Can not choose Xcode in Server App - "You must agree to the terms...", running next command will allow you to select Xcode on Server app:
$ sudo /Applications/Xcode.app/Contents/Developer/usr/bin/xcscontrol --initialize
IPA not available
The IPA built by the bot is copied to this path after the build finishes:
/Library/Developer/XcodeServer/IntegrationAssets/$XCS_BOT_ID-$XCS_BOT_NAME/$XCS_INTEGRATION_NUMBER/$TARGET_NAME.ipa
But it's not available at the time that bot's after integration trigger is running.
XCS_ARCHIVE not defined
The env variable XCS_ARCHIVE is defined only when the bot is set to perform the archive action.
Using a custom ssh key
To commit changelog changes and a build number bump we need to have access to the repo from _xcsbuildd's shell. If you prefer use SSH to access the git server you will need to add a valid key in the builder user .ssh folder. Note that this key should not have a passphrase set. Otherwise, the trigger will ask you to enter the shh key password stopping its process until you enter it.
- Log in as
_xcsbuildd:$ sudo su - _xcsbuildd - Copy a valid ssh key to
~/.ssh. - Modify
~/.bash_loginin order to automatically add your custom key to ssh agent:$ echo 'eval "$(ssh-agent -s)"' >> ~/.bash_login $ echo 'ssh-add ~/.ssh/id_rsa_github' >> ~/.bash_login - Determine which key should be used to access git repo by changing
~/.ssh/configfile, for example add next lines:Host github.com HostName github.com IdentityFile ~/.ssh/id_rsa_github
This will also be helpful to fetch git submodules.
Invalid Signature. A sealed resource is missing or invalid.
If the upload to iTunes Connect fails with an error similar to "Invalid Signature. A sealed resource is missing or invalid.", it may happen because the export archive command (xcodebuild command) is not receiving the option -exportOptionsPlist. i it up and the path to the file is OK. The full error message is:
parameter ErrorMessage = ERROR ITMS-90035: "Invalid Signature. A sealed resource is missing or invalid. Make sure you have signed your application with a distribution certificate, not an ad hoc certificate or a development certificate. Verify that the code signing settings in Xcode are correct at the target level (which override any values at the project level). Additionally, make sure the bundle you are uploading was built using a Release target in Xcode, not a Simulator target. If you are certain your code signing settings are correct, choose "Clean All" in Xcode, delete the "build" directory in the Finder, and rebuild your release target. For more information, please consult https://developer.apple.com/library/ios/documentation/Security/Conceptual/CodeSigningGuide/Introduction/Introduction.html