
The purpose of this post is to explain how to debug an annotation processor in the context of any Android Studio (or IntelliJ) project. It is common that you may want to know what is happening in your codebase with certain behavior of the code, generated by a library (or by your own code!). You could debug a test of the annotation processor, but on the contrary you want to run it with your code, and not waste time simulating the exact same behavior. The IDE, albeit being great, places some barriers along the way, so tips are a salvation here.
Files and breakpoints
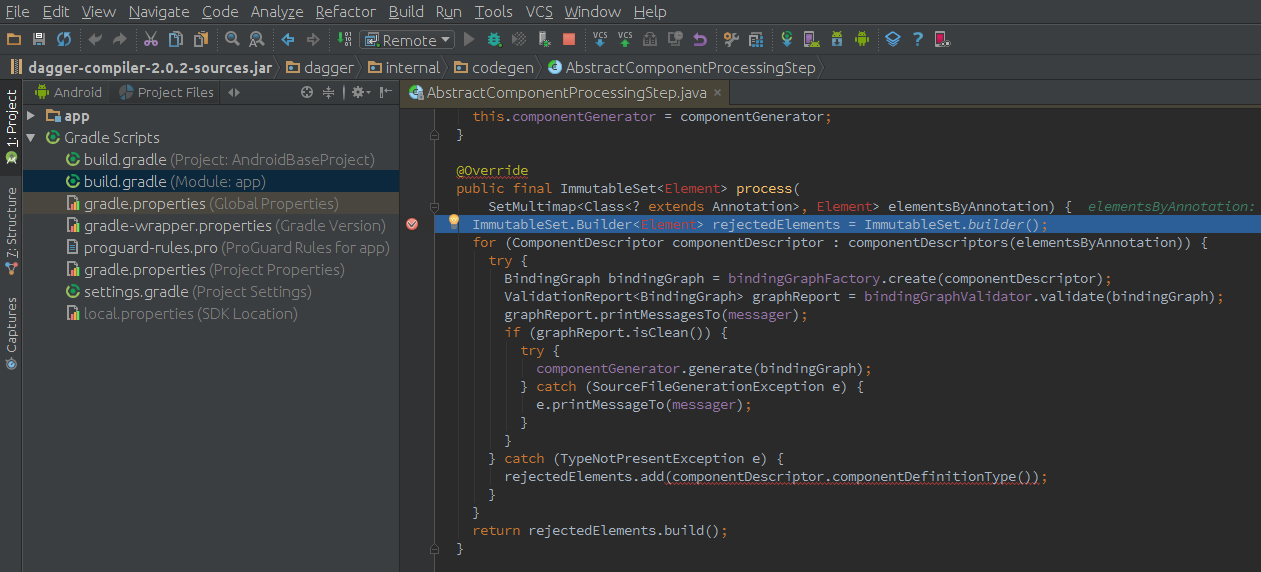
Suppose you want to debug the Dagger 2's annotation processing. For instance, you want to inspect what's happening in the process method, in AbstractComponentProcessingStep class. So you would put a breakpoint inside of it, but where is the file? If you applied the apt configuration and you search using the IDE with Search Everywhere (Double ⇧ in Mac OS or Double Shift instead) or with Go to Symbol (⌘ ⌥ O in Mac OS or Ctrl + Alt + Shift + N), you will not find it. That's because the IDE doesn't look at the files of the libraries included with the apt configuration.
The intuitive solution would be to just open this file with the IDE. So the location of its JAR if you use Gradle should be something like:
~/.gradle/caches/modules-2/files-2.1/com.google.dagger/dagger-compiler/2.0.2/1170f75c1ce293f80755bbc9fcd60e0765022bd0/dagger-compiler-2.0.2.jarFor some libraries you have a jar that includes the sources too (generally with a -sources prefix in the file name), which is friendlier. So you would open the class files inside of it and let the IDE show the Java code. Nevertheless, breakpoints will not work here. You need to open the file as any other library file.
If you observe, the IDE opens the library's files like entering inside the JARs, like in:
~/.gradle/caches/modules-2/files-2.1/com.google.dagger/dagger-compiler/2.0.2/db4a4d81343e9c959230053e15f7149f9ca88243/dagger-compiler-2.0.2-sources.jar!/dagger/internal/codegen/AbstractComponentProcessingStep.javaBy the way, the exclamation mark is part of the syntax of the JAR URL and together with the slash is a way to navigate the files inside. Maybe if we open the files this way we can debug them. However, I have found no manner to do this (and if you know, please tell me!). The workaround for this is to change the dependency to another type,
providedfor example:
provided 'com.google.dagger:dagger-compiler:2.0.2'Then, after syncing Gradle, you will find its symbols within the IDE.
Debugging
So, how do we debug the annotation processing steps? This is not natively supported by the IDE.
Remember that annotation processing occurs during the compilation phase. However, normal debugging uses The Java Debugger (jdb), which works once the code is compiled and generated. So we need to debug the compile phase. How can we do this? We need to handle it with the build tool we are using. In the case of Gradle, we can set the options in the GRADLE_OPTS environment variable, or simpler with the flag -Dorg.gradle.debug=true. This option enables the remote debugging in the port 5005 and will suspend the process until a debugger is attached (see the docs for more info). With Maven we can do this with mvnDebug.
The task we aim to debug is usually named compileDebugJavaWithJavac. If you use flavors, the name is something like compileFlavorDebugJavaWithJavac. Remember to do a clean run to ensure the task is carried out, and not skipped due to the fact of being up to date. Also, be sure not to use the Gradle Daemon, otherwise this won't work. The command you have to run is more or less the following:
./gradlew --no-daemon -Dorg.gradle.debug=true :app:clean :app:compileDebugJavaWithJavacNext we need to connect the IDE to the debugger. To do this, we need to create a Run/Debug Configuration for remote debugging. We first click in the menu Run, then Edit Configurations.... Where it says Remote click in the add icon. Choose a name for this configuration and set the port to 5005. Then just click OK.

Then you can debug this configuration with the IDE and it will automatically connect to the Gradle task, which will start running. Afterwards, it will work as an usual debugger, stopping in the set breakpoints and suspending the execution there.
Note that the IDE will mark some classes as not found, as they are not in the classpath.
If you have any comments or tips, please drop them! Recall that this is something IntelliJ is currently not supporting, but may do in the future and so this could get outdated.