Eureka is a framework used to build forms in iOS, which has more than 1.000.000 downloads! In case you’re not familiar with it, you can start by reading Introducing Eureka iOS form library written in pure Swift or visit Eureka's GitHub page, where you’ll find all it’s latest changes.
We’re very happy to announce that version 4.0 of Eureka, which includes support to Swift 4, is now available! This version doesn’t include new features, the latest bug fixes (like memory leaks) and new features that you’ve been asking for, were included in the 3.0 version.
Wanna know all the details about them?
- Multivalued section
- Usage of nib file for all rows
Multivalued section
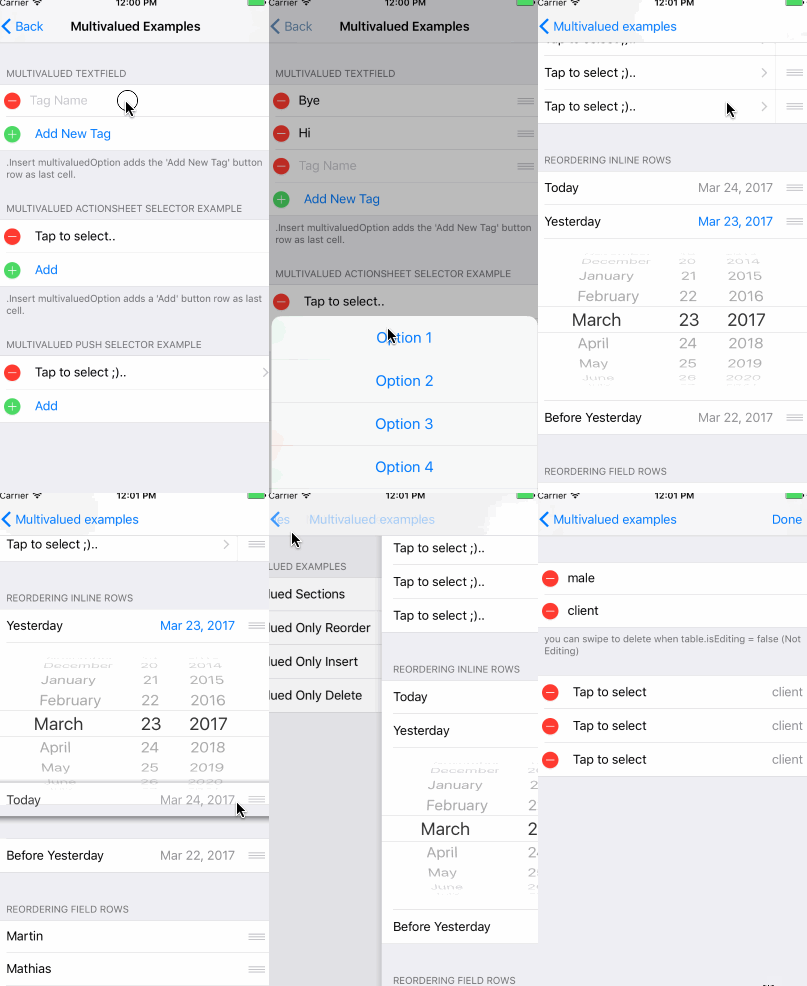
How many times have you desired to create a section where the user would be able to insert, move or delete rows? Like a contacts library or a calendar with different event priorities, or anything that you can imagine!
The idea of this feature is to allow us to easily create sections with insertable, deletable and re-orderable rows.

How to use it?
In order to create a multivalued section we have to use MultivaluedSection type, instead of the regular Section type. MultivaluedSection extends Section and has some additional properties to configure the multivalued section behavior.
form +++
    MultivaluedSection(multivaluedOptions: [.Reorder, .Insert, .Delete],
                       header: "Multivalued TextField",
                       footer: ".Insert adds a 'Add Item' (Add New Tag) button row as last cell.") {
        $0.addButtonProvider = { section in
            return ButtonRow(){
                $0.title = "Add New Tag"
            }
        }
        $0.multivaluedRowToInsertAt = { index in
            return NameRow() {
                $0.placeholder = "Tag Name"
            }
        }
        $0 <<< NameRow() {
            $0.placeholder = "Tag Name"
        }
    }
The previous code snippet shows how to create a multivalued section. In this case we wanted, delete and reorder rows as the multivaluedOptions argument indicates.
You can find an usage example in the Eureka project.
Usage of nib file in all the rows
Before Eureka’s 3.0 version in order to change the layout of a cell we had to create a custom row as a subclass of an existent row, without taking into account that maybe what we needed was a really small change.
On the other hand, if the modification implied changing fonts and colors, we had to use the methods defaultCellUpdate and defaultCellSetup on the type of the row, in order to be able to modify them.
But what if we had to do major changes? If the changes were in the layout (like constraints), we had to create a custom row.
Eureka 3.0 introduced an easier way to do it! Now it’s possible to modify the layout of a row without having to create a custom one. We decided to make some changes which allow the usage of a nib file to create your own row style, and layout. This is a big change for all Eureka users!
Of course sometimes it’s not enough to modify an existing row, because there are a lot of changes to make on it, so in that case we need to create a custom row. If this is your case, check out some already existing custom rows here: EurekaCommunity.
How to use it?
In a few steps you can modify layout constraints or add some custom UI components to an existent row. For example... imagine that you want to use an Eureka row, but you want to have some extra components; just follow this steps:
- Create a nib file
- Add all the UI components that you need
- Connect the outlets to your cell class
- Convert your cell class to a subclass of NameRow (for example)
You’re already set! You now have a row with everything that’s included in Eureka, and all the extra components that you want, with no need to create a new custom row!
Where to go from here
We hope that the new Eureka’s features make the usage of this library more enjoyable and productive! As always, if you found our article useful and want to suggest some new features or just need some help, contact us. Also feel free contribute with this library.
