
Some days ago, we released the introduction to create custom rows for Eureka, now we are going to go deeper and see how to build a complex row.
Note: for those who are starting, I strongly recommend reading Creating your own rows for Eureka first.
The row we are going to build will allow the user to create strong passwords. The developer will be in charge of defining (and implementing) the concept of password strength and also the reactive view to provide feedback of it.
Motivation
We will support the following features:
- Show password strength while typing.
- Provide hints in order to help the user create a valid password.
- Provide a button to hide/show the password.
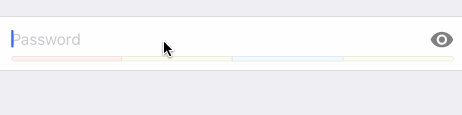
Final product
The result will be a row (as you can see below) which has a strength function and a way to let the user know how strong his password is.
Architecture
Before start coding, since we want our row to be as reusable as we can, we should think about the architecture that will empower this…

As you may have learned from our previous post, any custom row in Eureka will have a Row and Cell as primary components, in this case, GenericPasswordRow and GenericPasswordCell will map with those respectively. For the customizable UI side, we will be adding a custom nib file (which you can replace or use our default one). On the other hand, we will have a PasswordValidator component that will be responsible for the password validation process, here is where you (as a programmer) could be as creative as you want.
As any custom row of Eureka we will have our Row and Cell as primary components, in this example, GenericPasswordRow and GenericPasswordCell respectively. Then, we are adding a custom nib file as the Design component and the PasswordValidator component as the "brain" of the password validation process.
PasswordValidator
Let's take a look over the first component of this row:
protocol PasswordValidator {

    var maxStrength: Double { get }
    var strengthLevels: [Double: UIColor] { get }
    func strengthForPassword(password: String) -> Double
    func hintForPassword(password: String) -> String?
    func isPasswordValid(password: String) -> Bool

}
This protocol should specify all what's needed to determine the UI state for any given password. Most of this methods are self-explanatory so we won't go further there but don't worry, we'll cover them through the following example. So, let's get started with the actual implementation!
Let's create our custom password validator called MyPasswordValidator with the following rules:
- At least a lowercase letter
- At least a number
- At least an uppercase letter
- At least 6 characters.
Pretty basic, don't you think? We could check if you are using part of your email in your password but maybe some other time... ¯\(ツ)/¯
First of all, we need to somehow model a certain rule and since Swift's structs are awesome (don't you like getting a memberwise initializer for free?):
public struct PasswordRule {

    let hint: String
    let test: (String) -> Bool

}
It will hold a test closure to specify whether or not the password satisfies that rule and an associated hint in order to guide the user.
Then, we could implement our validator like this:
public class MyPasswordValidator: PasswordValidator {

    // For any given password, the strength will be in the [0.0, 4.0] range.
    public let maxStrength = 4.0

    // This property should hold key points of strength an its associated color.
    // It should be read as follows:
    //    - "From 0.0 to <1.0 strength values" -> color A
    //    - "From 1.0 to <2.0 strength values" -> color B
    //    - "From 2.0 to <3.0 strength values" -> color C
    //    - "From 3.0 to  4.0 strength values" -> color D
    public let strengthLevels: [Double: UIColor] = [
        0: UIColor(red: 244 / 255, green: 67 / 255, blue: 54 / 255, alpha: 1), // A
        1: UIColor(red: 255 / 255, green: 193 / 255, blue: 7 / 255, alpha: 1), // B
        2: UIColor(red: 3 / 255, green: 169 / 255, blue: 244 / 255, alpha: 1), // C
        3: UIColor(red: 139 / 255, green: 195 / 255, blue: 74 / 255, alpha: 1) // D
    ]

    // Our rules
    let rules: [PasswordRule] = [
        PasswordRule(hint: "Please enter a lowercase letter") { $0.satisfiesRegexp("[a-z]") },
        PasswordRule(hint: "Please enter a number") { $0.satisfiesRegexp("[0-9]") },
        PasswordRule(hint: "Please enter an uppercase letter") { $0.satisfiesRegexp("[A-Z]") },
        PasswordRule(hint: "At least 6 characters") { $0.characters.count > 5 }
    ]

    // In this example, each passing rule sums 1 to the password strength
    public func strengthForPassword(password: String) -> Double {
        return rules.reduce(0) { $0 + ($1.test(password) ? 1 : 0) }
    }

    // Here, we return the first failing rule hint.
    public func hintForPassword(password: String) -> String? {
        return rules.filter { !$0.test(password) }.map { $0.hint }.first
    }

    // Password will be valid only when reaching the `maxStrength` value
    public func isPasswordValid(password: String) -> Bool {
        return strengthForPassword(password) == maxStrength
    }

}
GenericPasswordRow
Our row will just hold a PasswordValidator and a placeholder for our password textfield. Since the Rows in Eureka must be final classes, we always try to encapsulate all the logic in a another class (like _GenericPasswordRow) and then create our final class, which conforms to RowType, by inheriting from there. This allow us to create another row by subclassing the _GenericPasswordRow class.
public class _GenericPasswordRow: Row<String, GenericPasswordCell> {

    public var passwordValidator: PasswordValidator = DefaultPasswordValidator()
    public var placeholder: String? = "Password"

    public required init(tag: String?) {
        super.init(tag: tag)
        displayValueFor = nil
        // The cellProvider is what we use to "connect" the nib file with our custom design
        // GenericPasswordCell must be the class of the UITableViewCell contained in the GenericPasswordCell.xib file
        cellProvider = CellProvider<GenericPasswordCell>(nibName: "GenericPasswordCell")
    }

    public func isPasswordValid() -> Bool {
        return value.map { passwordValidator.isPasswordValid($0) } ?? false
    }

}

public final class GenericPasswordRow: _GenericPasswordRow, RowType { }
Design
As we mentioned earlier, we will also provide our custom design in GenericPasswordCell.xib. Using IB we will create a UITableViewCell with the following views:
- textField: UITextField
- visibility button: UIButton
- password strength view: subclass of PasswordStrengthView
- hint label: UILabel

Thinking ahead a little bit, we need to design this cell having in mind that the hintLabel will be toggling its hidden state depending on the return values of func hintForPassword(password: String) -> String? (whether being nil or not) on the passwordValidator instance of our GenericPasswordRow.
Again, trying to be as generic as possible, we introduce the PasswordStrengthView here. The idea is that you can easily replace this strength view by subclassing this class:
class PasswordStrengthView: UIView {

    func setPasswordValidator(validator: PasswordValidator) { }
    func updateStrength(password password: String, animated: Bool = true) { }

}
and implementing your desired behavior in those methods. In this implementation we'll be using the DefaultPasswordStrengthView. We are not going to explain the details of this implementation but basically, once the setPasswordValidator(...) function gets called, we are adding subviews to generate the "empty state" drawing the strength ranges and their colors (since we know the validator to access this information):
and then, every time updateStrength(...) function gets called (while the user is typing) we use the validator to calculate the actual strength and then update the strength view.

GenericPasswordCell
Finally we need to create our cell class, and set it as the class of the UITableViewCell in the GenericPasswordCell.xib file.
This is probably the biggest piece of code of this blog, so take it slow. Try to read carefully the code comments in order to follow
the general idea and be able to have a better understanding of the implementation.
import Foundation
import Eureka

public class GenericPasswordCell: Cell<String>, CellType {

    // Outlets to be connected with our nib file views.
    @IBOutlet weak var textField: UITextField!
    @IBOutlet weak var visibilityButton: UIButton?
    @IBOutlet weak var passwordStrengthView: PasswordStrengthView?
    @IBOutlet weak var hintLabel: UILabel?

    // Computed property in order to access to the properties of our Row
    var genericPasswordRow: _GenericPasswordRow {
          return row as! _GenericPasswordRow
    }

    // Tuple holding the images to be used on the visibilityButton
    public var visibilityImage: (on: UIImage?, off: UIImage?) {
        didSet {
            setVisibilityButtonImage()
        }
    }

    // Since we will be updating the cell height depending on the hidden
    // state of the hintLabel, we need to have two height values available
    // and set the `height` closure of Eureka's cells with those.
    public var dynamicHeight = (collapsed: UITableViewAutomaticDimension, expanded: UITableViewAutomaticDimension) {
        didSet {
            let value = dynamicHeight
            height = { [weak self] in
                self?.hintLabel?.hidden == true ? value.collapsed : value.expanded
            }
        }
    }

    // Cell's constructor
    public required init(style: UITableViewCellStyle, reuseIdentifier: String?) {
        super.init(style: style, reuseIdentifier: reuseIdentifier)
    }

    // MARK - Overrides

    // Here we will setup our cell's behavior and style.
    public override func setup() {
        super.setup()

        // custom dynamic height for the design at GenericPasswordCell.xib
        dynamicHeight = (collapsed: 48, expanded: 64)

        // ....

        // set the validator to the strength view in order to
        // give it the chance to layout itself accordingly
        passwordStrengthView?.setPasswordValidator(genericPasswordRow.passwordValidator)
    }

    override public func update() {
        super.update()

        // in this override we need to map our row value
        // to the actual view that holds it.
        textField.text = genericPasswordRow.value
        textField.placeholder = genericPasswordRow.placeholder
    }

    // MARK - Callbacks

    public func togglePasswordVisibility() {
        textField.secureTextEntry = !textField.secureTextEntry
        setVisibilityButtonImage()

        // workaround to update cursor position
        // see http://stackoverflow.com/questions/14220187/uitextfield-has-trailing-whitespace-after-securetextentry-toggle
        let tmpString = textField.text
        textField.text = nil
        textField.text = tmpString
    }

    public func textFieldDidChange(textField: UITextField) {

        // every time the textfield changes we
        // need to update our row value.
        genericPasswordRow.value = textField.text

        // update strength
        updatePasswordStrengthIfNeeded()

        formViewController()?.tableView?.beginUpdates()
        // this updates the height of the cell.
        // In fact, it calls the 'height' closure.
        formViewController()?.tableView?.endUpdates()

        // with a little delay in order to wait for the
        // height change to take place, we animate the alpha
        // of the hintLabel to appear smoothly.
        UIView.animateWithDuration(0.3, delay: 0.2, options: [], animations: { [weak self] in
            guard let me = self else { return }
            me.hintLabel?.alpha = me.hintLabel?.hidden == true ? 0 : 1
        }, completion: nil)

        // just in case that the cell gets partially covered
        // by the keyboard when it 'expands' we need to perform
        // the minimum scroll movement to make it full visible.
        if let indexPath = row?.indexPath() {
            UIView.animateWithDuration(0.3, delay: 0, options: .AllowUserInteraction, animations: { [weak self] in
                self?.formViewController()?.tableView?.scrollToRowAtIndexPath(indexPath, atScrollPosition: .None, animated: false)
            }, completion: nil)
        }
    }

    // MARK - Helpers

    private func setVisibilityButtonImage() {
        visibilityButton?.setImage(textField.secureTextEntry ? visibilityImage.on : visibilityImage.off, forState: .Normal)
    }

    public func updatePasswordStrengthIfNeeded(animated animated: Bool = true) {
        guard let password = textField.text else { return }

        // notify to the strength view the current password
        passwordStrengthView?.updateStrength(password: password, animated: animated)

        // update hint label using the validator
        let hint = genericPasswordRow.passwordValidator.hintForPassword(password)
        hintLabel?.text = hint
        hintLabel?.hidden = hint == nil || password.isEmpty
    }

}
Usage
You can use this row like any other in your FormViewController
import UIKit
import GenericPasswordRow
import Eureka

class ViewController: FormViewController {

    override func viewDidLoad() {
        super.viewDidLoad()

        form +++ Section()
            <<< GenericPasswordRow() {
              $0.passwordValidator = // your custom validator
              $0.placeholder = "Create your password"
            }
    }
}
Again, you can see all the source files in GenericPasswordRow github and run a simple example from there. The code is in Swift 2 syntax so it will break if you are on Swift 3.
Customization
There are several ways to change this custom row. You should be able to reuse all of the implemented logic and just replace the design (with another nib file). Also, providing a custom implementation of the PasswordValidator protocol should be pretty much straightforward (not being annoying to the user is the hard part). What follows should be used as a guideline to customize as much as you want or even extend the current functionality.
-
Providing a custom password validator.
form +++ Section() <<< GenericPasswordRow() { $0.passwordValidator = // your custom validator } -
Creating another nib file to provide a different design component and connecting outlets to the
GenericPasswordCellclass. This is a very important feature, you can literally change the entire design of this row having the same functionality (for free!). Check this instructions to get it done.GenericPasswordRow.defaultRowInitializer = { $0.cellProvider = CellProvider<GenericPasswordCell>(nibName: "MyPasswordCell") }or
final class MyPasswordRow: _GenericPasswordRow, RowType { required init(tag: String?) { super.init(tag: tag) cellProvider = CellProvider<GenericPasswordCell>(nibName: "MyPasswordCell") } } -
Subclassing
DefaultPasswordStrengthVieworPasswordStrengthViewto provide a different strength view bar. -
Subclassing
_GenericPasswordRoworGenericPasswordCell.public final class MyGenericPasswordRow: _GenericPasswordRow, RowType { // add properties, methods, override, etc }or
public class MyGenericPasswordCell: GenericPasswordCell {
    // add properties, methods, override, etc
}
Where to go from here
I hope it has served as a good example of the potential of Eureka's rows. You can get as complex as you want while being flexible and scalable at the same time. Also, there are lots of customization points on this row so we can't wait to see what you can create!.
We've been publishing reusable custom rows at EurekaCommunity. If you have created a custom row and think that it could be reused then you could share it by creating a repository at EurekaCommunity. If you plan to do this, drop a mail to me or anyone at Xmartlabs to get access to the EurekaCommunity organization.