
It's been almost a year since Eureka's first release and many developers have been using it since then. We are thankful for all the valuable support and contributions received.
If you are not familiar with what Eureka is and how to create forms with it then you should start by reading Introducing Eureka iOS form library written in pure Swift or heading over to Eureka's GitHub page.
Eureka includes many rows that can be used to create forms but we will almost always need a row that has not been implemented yet. Eureka was designed so that you can add your own rows the same way the default rows were created. You just have to define a row and its cell and start using it.
Some of the custom rows we have created include a GooglePlacesRow which uses the Google Places API to suggest a location to the user and a SuggestionRow which is a generic abstraction of the previous row. These rows are published at EurekaCommunity which is a GitHub organization for Eureka's custom rows. You can also see some custom rows in the Examples project of Eureka like a WeekDayRow, a FloatLabelRow and a LocationRow which lets the user select a location from a Map.
Sometimes we just want to add or change the functionality of an already existing row. In that case we normally subclass that row to implement our features.
One thing that we realized is that many developers struggle when creating custom rows in Eureka, but doing this easily was one of the main factors behind Eureka's design. That is why we decided to provide a guide on how to do this with a simple example to help you get started.
We will create a UserInfoRow which will display an image and some labels representing user profile data. Sometimes we have a two-or-more-step registration process in which the user enters some basic information at first and then goes to a new screen to enter advanced information. In these cases we sometimes show a summary of the previously entered profile data. We will create a row to show such information.
This example has been updated for Swift 3 syntax.
In this example we will use a simple struct User defined like the following:
struct User: Equatable {
var name: String
var email: String
var dateOfBirth: Date
var pictureUrl: URL?
}
func ==(lhs: User, rhs: User) -> Bool {
return lhs.email == rhs.email
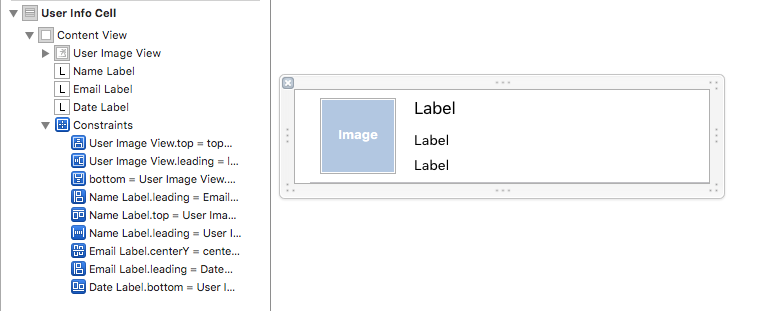
}We will create the UserInfoCell using interface builder and designing the table view cell in a nib file. We could also create it programatically, but it is much simpler to use a nib file.
So, we created the following nib file containing an UITableViewCell. Then we added an UIImageView and three UILabels to cell's contentView. The cell will show the picture of the user and the user's name, email and date of birth.
After adding the necessary constraint the cell looks like this:
Now we have to create two classes: UserInfoRow and UserInfoCell. Let's see the UserInfoCell first, it must be a subclass of the generic type Cell and its value will be of the type User we defined before:
Note: All cells have to be final and conform to the
CellTypeprotocol.
final class UserInfoCell: Cell<User>, CellType {

    @IBOutlet weak var userImageView: UIImageView!
    @IBOutlet weak var nameLabel: UILabel!
    @IBOutlet weak var emailLabel: UILabel!
    @IBOutlet weak var dateLabel: UILabel!

    required init(style: UITableViewCellStyle, reuseIdentifier: String?) {
        super.init(style: style, reuseIdentifier: reuseIdentifier)
    }

    required init?(coder aDecoder: NSCoder) {
        super.init(coder: aDecoder)
    }
We have already added the outlets for our nib file which we have to connect. Now let's create the UserInfoRow:
Note: Eureka rows also have to be final and they must conform to RowType protocol
final class UserInfoRow: Row<UserInfoCell>, RowType {
    required init(tag: String?) {
        super.init(tag: tag)
        cellProvider = CellProvider<UserInfoCell>(nibName: "UserInfoCell")
    }
}
In the first line we say that our row will have a value of type User and its cell will be a UserInfoCell.
Then we defined the required init method, which we have to implement to conform to the RowType protocol, and we specify that we want our cell to be created by loading it from the nib file named "UserInfoCell". If our cell did not rely on a nib file and we wanted to create it programmatically then we do not have to specify a cellProvider.
Our UserInfoRow is ready. But the UserInfoCell still needs some customization. Let's start by setting some styles to our labels in the setup() method.
Remember:
setupwill be called after the cell is instantiated whileupdatewill be called each time the cell is refreshed, specifically from thecellForRowAtIndexPathof the FormViewController's tableView. Therefore, in thesetupmethod we should put code that shall be executed once to set up our cell. On the other hand, theupdatemethod should include the code that depends on external variables that (may) change over time like the value of the row for example.
override func setup() {
    super.setup()
    // we do not want our cell to be selected in this case. If you use such a cell in a list then you might want to change this.
    selectionStyle = .none

    // configure our profile picture imageView
    userImageView.contentMode = .scaleAspectFill
    userImageView.clipsToBounds = true

    // define fonts for our labels

    nameLabel.font = .systemFont(ofSize: 18)
    emailLabel.font = .systemFont(ofSize: 13.3)
    dateLabel.font = .systemFont(ofSize: 13.3)

    // set the textColor for our labels
    for label in [emailLabel, dateLabel, nameLabel] {
        label?.textColor = .gray
    }

    // specify the desired height for our cell
    height = { return 94 }

    // set a light background color for our cell
    backgroundColor = UIColor(red:0.984, green:0.988, blue:0.976, alpha:1.00)
}
But we also have to set the user information to our labels. This will be done in the update method as this is information that could change.
In this case, the user information will not change but in general it is good practice to update the labels of the cell on each update as the value of the row could possibly change
So let's add an update method:
override func update() {
super.update()
// we do not want to show the default UITableViewCell's textLabel
textLabel?.text = nil
// get the value from our row
guard let user = row.value else { return }
// set the image to the userImageView. You might want to do this with AlamofireImage or another similar framework in a real project
if let url = user.pictureUrl, let data = try? Data(contentsOf: url) {
userImageView.image = UIImage(data: data)
} else {
userImageView.image = UIImage(named: "placeholder")
}
// set the texts to the labels
emailLabel.text = user.email
nameLabel.text = user.name
dateLabel.text = UserInfoCell.dateFormatter.string(from: user.dateOfBirth)
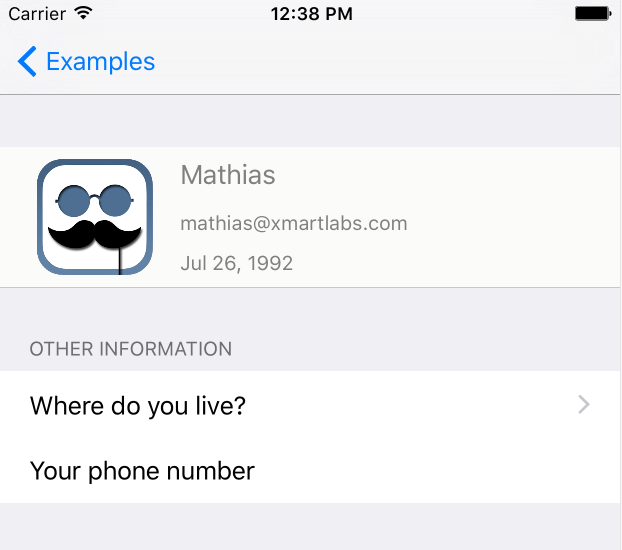
}Now this is pretty much everything. We can now use our row in any Form. For example, we added a new UserRegistrationViewController to Eureka's examples and then added a UserInfoRow and two other rows:
class UserRegistrationViewController: FormViewController {

    override func viewDidLoad() {
        super.viewDidLoad()

        form +++ Section()
            <<< UserInfoRow { row in
                row.value = User(name: "Mathias",
                                 email: "[email protected]",
                                 dateOfBirth: Date(timeIntervalSince1970: 712119600),
                                 pictureUrl: URL(string: "http://lh4.ggpht.com/VpeucXbRtK2pmVY6At76vU45Q7YWXB6kz25Sm_JKW1tgfmJDP3gSAlDwowjGEORSM-EW=w300"))
        }

        +++ Section("Other information")
            <<< LocationRow {
                $0.title = "Where do you live?"
            }
            <<< PhoneRow {
                $0.title = "Your phone number"
        }
    }
}
And this is the result:
You can see the source files in this gist. The code has recently been updated to Swift 3.
Where to go from here
This is just a very simple row without user interaction. I hope it helps and encourages some readers to create their own custom rows. But the potential is much greater. We can create really awesome rows with much more functionality, some of them have been published at EurekaCommunity. If you have created a custom row and think that it could be reused then you could share it by creating a repository at EurekaCommunity. If you plan to do this, drop a mail to me or anyone at Xmartlabs to get access to the EurekaCommunity organization.