

In this post I'll walk you through the Continuous Integration and Deployment set up used by Xmartlabs iOS team. We will configure Fastlane and Bitrise to automate the app release process to TestFlight.
Why Continuous Integration and Deploy? It is a well-known technique, widely adopted by agile engineering teams. It's main benefits are: a) Reduce waste. You can free up time by automating repetitive and time-consuming tasks, b) Improve build quality. We can use automated tests to detect defects and regressions earlier in the development process, or use a linter to check compliance with coding standards c) Be more agile and boost team morale in the process (this is the killer benefit if you ask me). The team is prone to release more often because it's cheaper and less cumbersome, you can get product feedback earlier so you reduce risks and can adjust to deliver more value, users and other stakeholders are happier, team motivation improves.. you get the idea.
What's Fastlane
Fastlane is an open-source platform that both simplifies and speeds up the development process by automating development workflows. It also has Continuous Integration support through different CI platforms including Bitrise, CircleCI, Jenkins, and TravisCI.
What's Bitrise
Bitrise is a Continuous Integration and Delivery (CI/CD) Platform as a Service (PaaS), focused in mobile app development.
This blogpost is not intended to explain the products or underlaying concepts in detail. We will focus on the configuration and set up process instead. If you want to know more about each tool, we recommend their websites and official documentation.
How do we optimize our integration and release process?
In the following sections we will configure a development workflow that goes like this:
- A new PR is opened.
- The repo is cloned and build steps are run in the CI server. A new release based on the latest PR is built and signed. In our case we also fetch external dependencies from Cocoapods.
- The test suite is executed against the new build.
- Optionally, the new build is released to beta testers through TestFlight.
- We get notified (and can check the status in our Git management tool of choice) at every step of the process.
How to set up fastlane in an iOS project
We'll assume you have already installed Fastlane on your computer. If not, you can follow the Fastlane documentation and then come back to this section.
From your terminal, navigate to your iOS project's directory and run:
fastlane initThis will automatically generate several Fastlane config files, with the most important being Fastfile, which is the file that stores the configuration where you'll see different lanes. Each lane is there to automate a different task, such as screenshots, code signing, or pushing new releases.
We can add as many lanes as we need. Each lane automates a development process and can be run through the command fastlane <lane_name>.
So, let's create a test lane in order to run unit tests by running fastlane test.
desc "Runs all the tests"

lane :test do
  xctest(
    clean: false,
    code_coverage: true,
    scheme: "xmartlabs",
    workspace: "xmartlabs.xcworkspace",
    destination: "name=iPhone 11,OS=13.4"
  )
end
xctest is a built-in fastlane action available to everyone that uses Xcode command line tools and runs Xcode tests.
So now we are able to run our iOS project tests by running fastlane tests.
Now our next goal is to automatically trigger this lane whenever any developer opens a pull request in our git remote repository. To accomplish so we are going to use Bitrise which allows us to do continuous integration and continuous delivery as a service.
In short, Bitrise allows the developer to define workflows, a sequence of tasks that run one at a time until one fails or all completes. Bitrise also provides triggers that execute a workflow whenever a git tag, pull request or push is performed on a remote git repository.

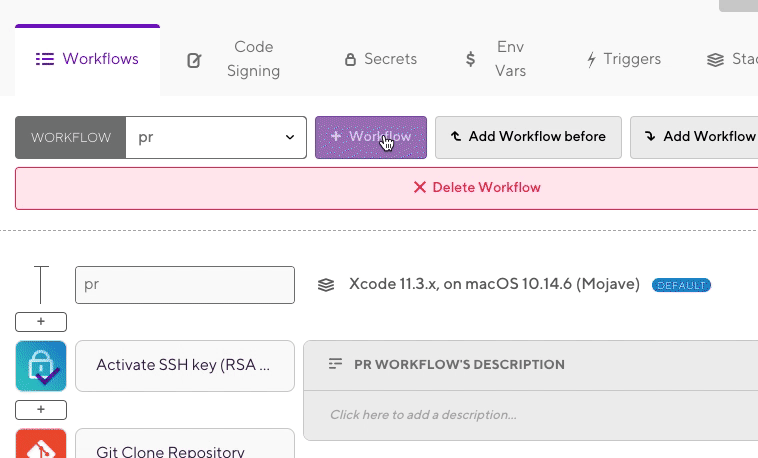
We still need to define our pr workflow that should run fastlane tests. Bitrise provides the computer hardware with basic configuration and setup like Xcode and CocoaPods and some other tools. We only need to define the sequence of tasks that belong to the workflow.
The first step is to clone the repository for which Bitrise already provides a task named Git Clone Repository.
We also have to install any needed tool not provided by default in Bitrise environment stack. It could be a missing functionality or we might need another version of a particular tool. Even though Fastlane is part of the Bitrise stack, I'm using a newer version of it so I'm gonna install it. We will also update the cocoapods repo. We can do so by adding a new step to the workflow that runs a script named 'Do anything with Script step'.
Below you can see the content of the script.
#!/usr/bin/env bash
# fail if any commands fails
set -e
# debug log
set -x

# write your script here
gem update cocoapods
pod repo update

set -ex
gem install fastlane --version 2.142.0 --no-document
After this, we need to run our Fastlane lane, Bitrise also provides a Workflow task to accomplish this named fastlane where we only need to specify the name of our already defined lane (which is test).
Here is the entire workflow already created in Bitrise.

At this point, the test lane will be executed whenever a pull request is created/updated. Cool right? Bitrise integrates with GitHub/Bitbucket and many other git solutions to indicate if everything goes well or not.
Another automated task we strongly use is the release of new versions. Basically we send a new build to TestFlight whenever a new tag (named <version_*>) is created in . As we said Bitrise provides us with push, pull request and tag triggers, this time we are going to use a tag trigger.
Let's create the Bitrise testflight workflow first.
The most important task to set up the Bitrise workflow is running the release_appstore lane, all the rest are tasks dedicated to cloning the repo, and setting up the environment (same as pr workflow).
Now let's see how to implement the fastlane release_appstore lane...
lane :release_appstore  do

  build_type = "AppStore"
  build_app_id = ENV["APP_BUNDLE_ID"]
  build_sign_team_id = ENV["APP_SIGN_TEAM_ID"]
  build_sign_profile_name = ENV["APP_APPSTORE_SIGN_PROFILE_NAME"]
  build_sign_certificate_name = ENV["APP_APPSTORE_SIGN_CERTIFICATE_NAME"]

  build_folder = Time.now.strftime("%Y.%m.%d-%H.%M.%S+") + Random.rand(20).to_s
  build_derived_data_path = "./fastlane/builds/#{build_type}/#{build_folder}/derived_data/"
  build_output_path = "./fastlane/builds/#{build_type}/#{build_folder}/artifacts/"
  build_output_name = "xmartlabs_" + build_type

  # `automatic_code_signing` configures Xcode's Codesigning options.
  automatic_code_signing(
    use_automatic_signing: false,
    path: "xmartlabs.xcodeproj",
    team_id: build_sign_team_id,
    profile_name: build_sign_profile_name,
    code_sign_identity: build_sign_certificate_name,
    targets: ["xmartlabs"]
  )

  #`cocoapods` runs pod install for the project.
  cocoapods(
    try_repo_update_on_error: true
  )

  #`build_ios_app` Easily build and sign your iOS app.
  build_ios_app(
    workspace: "xmartlabs.xcworkspace",
    configuration: "Release",
    scheme: "xmartlabs",
    clean: true,
    output_name: build_output_name,
    output_directory: build_output_path,
    derived_data_path: build_derived_data_path,
    build_path: build_output_path,
    include_bitcode: true,
    include_symbols: true,
    export_options: {
      compileBitcode: false,
      uploadBitcode: false,
      uploadSymbols: true,
      signingStyle: "manual",
      method: "app-store",
      teamID: build_sign_team_id,
      provisioningProfiles: {
        "com.xmartlabsinc.xmartlabs": "Xmartlabs Distribution",
        "com.xmartlabsinc.xmartlabs.xmartlabs-notification-content-extension": "Xmartlabs Notification Content Distribution",
        "com.xmartlabsinc.xmartlabs.xmartlabs-notification-service-extension": "Xmartlabs Notification Service Distribution",
      }
    }
  )

  #deliver uploads screenshots, metadata and binaries to App Store Connect. Use deliver to submit your app for App Store review.
  deliver(skip_screenshots: true, skip_metadata: true, skip_app_version_update: true)

end
Let's see what each release_appstore's lane action does:
automatic_code_signing allows us to configure how we are going to sign the binary.
cocoapods installs cocoapods dependencies by running pod install.
build_ios_app builds and signs our app.
deliver uploads the build to app store, we are actually sharing the app with TestFlight beta testers.
Explaining each parameter and details of each fastlane action is out of the scope of this blogpost. Please visit specific fastlane action documentation references if needed.
Now a new TestFlight app version will be released each time we create a new tag named version_<number>.
Although we could have accomplished the same result with Bitrise tasks alone, we prefer to do so in combination with Fastlane due to the following reasons:
- Anyone in the team can run Fastlane lanes locally without the need of having CI/CD as a service.
- We have more freedom to change our CI/CD platform at any time. In the real world, each customer has its own CI/CD preference. Migrating to another CI/CD platform like GitHub Actions or TravisCI should be very straightforward since we just need to run the fastlane lane.
Well, hope you now have a better idea of how to use automation to optimize your development workflow. We promise the benefits are worth it!
Are you doing CI with Bitrise and Fastlane in your iOS projects and have learned something not covered in this post? Let me know in the comments. I'd be interested to get your perspective.
Have questions about CI, Bitrise, Fastlane? I'd be happy to answer those in the comments if I can.
