


At Xmartlabs we have been closely involved in the nascent field of on-device Machine Learning.
Our main focus has been Machine Learning on iOS and we have been exploring different use cases including style-transfer, human body pose detection and medical imaging classification.
Not only have we built some cool almost magical apps, but we have also rolled our sleeves up to create first of its kind development tools: we released Bender a few days before WWDC 17, and launched Litio.ai earlier this year.
Bender is an open source iOS framework built on top of Metal that allows developers to run ML models with unmatched flexibility and performance. Litio.ai brings the power of Bender to the masses by providing a higher level, cross-platform solution for on-device Machine Learning.
Unsurprisingly, Apple and Google have joined the party as well. In this blog post we will introduce and compare their offerings by going through an example project that you can follow step-by-step. Apple introduced CoreML, an on-device ML framework for iOS, during WWDC17. It has recently announced an upgrade in the latest edition of their annual developer's conference. Google released ML Kit last month at its I/O 2018, a high-level solution for cross-platform ML deployment.
ML Kit, which is part of Firebase, allows developers to run machine learning models both on Android and iOS using TensorFlow Lite as framework. It includes Machine Learning models for common use cases like recognizing text, detecting faces, labeling images and more. You can use these models out of the box, no Machine Learning background required. For some of these models you can also choose to run them on the device, for more privacy and speed, or in the cloud for higher accuracy. The others will either run only on the device or in the cloud. But you can also easily deploy your own models and run them on iOS and Android without worrying about the specific formats and implementations for each one of them.
Another feature of ML Kit is that it lets you update your model on the fly, without recompiling your app. This is very helpful if you want to keep improving your model and update it frequently.
A disadvantage of ML Kit is that it only supports TensorFlow Lite which on iOS has no GPU support up to now, which can affect the performance of your models. So, we decided to try it out and see how it really works. You can find the code used here with an example on GitHub.
Image Classification
In this blog post we will focus on image classification, although you can do many other tasks using ML Kit. We will try to do something like this:
Image classification models have improved considerably in recent years as neural networks have been used and constantly improved. One of the main image classification competitions is ImageNet Large Scale Visual Recognition Competition (ILSVRC). This competition challenges algorithms to classify images into 1000 categories and success is often measured as having the lowest top-5 error rate, this means predicting the correct category with the first 5 predictions. Since 2011, this top-5 error rate has decreased from 26% to less than 4% thanks to Convolutional Neural Networks (CNN) and the vast research that has gone into them in recent years. Some of the most successful convolutional neural networks are quite computationally expensive but there are also others like MobileNet which achieves an error rate of about 8% but is still small enough to be run on a mobile device in real time. We will run MobileNet on an iPhone in this post.
Running ML Kit on iOS
To get started with ML Kit on iOS you need to have Cocoapods installed and add the following lines to your Podfile:
pod 'Firebase/Core'
pod 'Firebase/MLVision'
pod 'Firebase/MLVisionLabelModel'
Note: You need to add
MLVisionLabelModelonly if you want to run your model on the device
Then run pod install to install these dependencies.
You can then start using one of ML Kit's default models. We will use the image labeling model.
For this purpose, we create a UIViewController as follows:
import FirebaseMLVision
import UIKit

class ViewController: UIViewController {

    @IBOutlet weak var videoView: UIView!
    @IBOutlet weak var resultLabel: UILabel!

    let options = VisionLabelDetectorOptions(
        confidenceThreshold: 0.3
    )
    lazy var vision = Vision.vision()
    var labelDetector: VisionLabelDetector!

    override func viewDidLoad() {
        super.viewDidLoad()
        labelDetector = vision.labelDetector(options: options)
    }

}
The view controller has a videoView, where we will show what the camera is recording, and a resultsLabel which will show the predictions.
We then create an image detector using Vision and specify a confidence threshold of 0.3 which means that we want all the predictions whose probability is at least 0.3 or 30%.
Next, we have to connect the camera's output to our model. I will not show the code for the camera setup here but you can see it in the full example code.
What we have to add to our controller is a function that will be called for each camera frame.
It will receive a CMSampleBuffer, run the model and display the results in the resultLabel:
func run(buffer: CMSampleBuffer?) {
    if let buffer = buffer {
        // We create an image for Vision
        let image = VisionImage(buffer: buffer)

        // We can specify the orientation for this image. This should depend on the phone's orientation.
        // Here we suppose the phone is always in portrait mode.
        let metadata = VisionImageMetadata()
        metadata.orientation = .topLeft
        image.metadata = metadata

        // And we run the detector
        labelDetector.detect(in: image) { (labels, error) in
            guard error == nil, let labels = labels, !labels.isEmpty else {
                // Error.
                self.resultLabel.text = "No idea"
                return
            }
            self.resultLabel.text = labels.reduce("") { $0 + "\($1.label) (\($1.confidence))\n" }
        }
    }
}
This is all we need to run one of the out-of-the-box models of ML Kit. We can now start classifying images.
It will use the on-device model which is faster and does not depend on the internet connection but is also less accurate than the cloud model. If you want to use the cloud model, you first need to upgrade your Firebase project to a Blaze plan (pay as you go) and enable the Cloud Vision API. The first 1000 requests per task are free but if your app surpasses that amount you will have to pay.
Then, in your code it is enough to change the labelDetector we created in viewDidLoad:
override func viewDidLoad() {
    super.viewDidLoad()

    // Replace labelDetector = vision.labelDetector(options: options) with:
    let labelDetector = vision.cloudLabelDetector()
}
You can also specify how many predictions you want to get and if the Cloud API should use the latest model or the last stable model.
Running a custom model
To run a custom model you first need a TensorFlow Lite model which you have to upload to the Firebase console of your project. For this, go to ML Kit -> Custom in the console.
This is where you can easily update your models afterwards as well.
In our case, we will use MobileNet v2 as our custom model.
The second step is to add the following pod to your Podfile:
pod 'Firebase/MLModelInterpreter'Next, we will create a view controller to run our model.
import FirebaseMLModelInterpreter
import UIKit

class CustomModelViewController: UIViewController {

    @IBOutlet weak var videoView: UIView!
    @IBOutlet weak var resultLabel: UILabel!

    // models
    var interpreter: ModelInterpreter!
    var labels: [String]!

    override func viewDidLoad() {
        super.viewDidLoad()
        labels = readClassLabels("mobilenet_labels")

        setupInterpreter()
    }

}
This is again very similar to our first view controller. In this case we have a list of labels that we will read in a helper function readClassLabels from a file "mobilenet_labels".
We also have a ModelInterpreter which we will set up in the function setupInterpreter.
To run a custom model you can either specify a local file which contains the model or the name you gave the model in the Firebase console.
In this case we will use both, which means the app will start with our local file and then update it as soon as we upload new versions to the Firebase console.
Here is the function:
func setupInterpreter() {
    // We define conditions for model update
    let conditions = ModelDownloadConditions(wiFiRequired: true, idleRequired: false)
    let cloudModelSource = CloudModelSource(
        modelName: "cloud_mobilenet",
        enableModelUpdates: true,
        initialConditions: conditions,
        updateConditions: conditions
    )

    // And then register our cloud version of the model.
    _ = ModelManager.modelManager().register(cloudModelSource)

    // Next we register our local model stored in 'mobilenet.tflite'.
    guard let modelPath = Bundle.main.path(forResource: "mobilenet", ofType: "tflite") else {
        return
    }
    let localModelSource = LocalModelSource(modelName: "local_mobilenet",
                                            path: modelPath)
    ModelManager.modelManager().register(localModelSource)

    // Finally, we create the interpreter using both the local and the cloud model.
    let options = ModelOptions(
        cloudModelName: "cloud_mobilenet",
        localModelName: "local_mobilenet"
    )
    interpreter = ModelInterpreter(options: options)
}
We will again need the camera to provide the images to our model. For each frame of the camera we will call a function that will resize the image and run the model:
func run(buffer: CMSampleBuffer?) {
    guard let buffer = buffer else {
        return
    }

    // Specify the input and output options of the model:
    let ioOptions = ModelInputOutputOptions()
    do {
        try ioOptions.setInputFormat(index: 0, type: .uInt8, dimensions: [1, 224, 224, 3])
        try ioOptions.setOutputFormat(index: 0, type: .uInt8, dimensions: [1, NSNumber(value: 1001)])
    } catch let error as NSError {
        print("Failed to set input or output format with error: \(error.localizedDescription)")
    }

    // Add the buffer as input of the model. The `toData` function is responsible for
    // getting the buffer's bytes and resizing it to fit our model
    let input = ModelInputs()
    do {
        try input.addInput(buffer.toData(size: 224))
    } catch let error as NSError {
        print("Failed to add input: \(error.localizedDescription)")
    }

    // Finally, we run the model and show the predictions
    interpreter.run(inputs: input, options: ioOptions) { [weak self] outputs, error in
        guard error == nil, let `self` = self, let outputs = outputs,
            let predictions = (try! outputs.output(index: 0) as? NSArray)?[0] as? [UInt8] else { return }
        let maximum = predictions.max()!
        DispatchQueue.main.async {
            self.resultLabel.text = self.labels[predictions.index(of: maximum)!]
        }
    }
We can now run the model and it will tell us what we are seeing at more or less 30 frames per second (FPS).
It is crucial to set the input and output sizes of the model correctly. If not then the app will crash when running the model without telling you the reason.
The next step is to see how this performs if we change a few parameters and how it compares to Core ML, Apple's default machine learning framework.
ML Kit vs Core ML
Core ML has a few pros and cons when we compare it to ML Kit. First, it supports GPU which is a big advantage. On the other hand, it is much easier to update a ML Kit model on the fly than to update a Core ML model. Also, Core ML is an Apple framework and therefore only works on iOS and not on Android whereas ML Kit supports both.
We modified the example to support changing between ML Kit and Core ML running the same MobileNet model. All the tests were made on an iPhone 7. We also tried running the camera at 30 or 60 FPS, while enqueueing one or two frames at the same time, and compared the performance of both models.
Run time with simple buffering
In this and the following test case we measured the time before invoking the run call and immediately after getting the result of the neural network. This means that other times, such as the time spent resizing the image, were not included. Therefore it does not reflect the total amount of frames actually processed in one second.
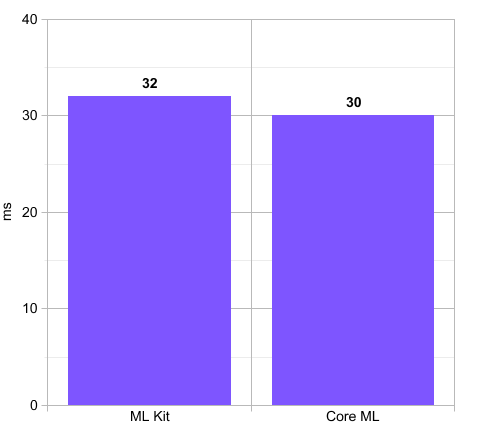
Inference time in milliseconds for each framework model. Lower is better.
We tried processing only one frame at any given time (and dropping frames when busy) with both models and found Core ML slightly faster than ML Kit. Core ML takes an average of 30 ms to process each frame while ML Kit takes 32 ms. This small difference comes because Core ML uses the GPU, which ML Kit doesn't. We would expect the difference to be bigger but we have noted that Core ML sometimes does not run as fast as other solutions which use Metal directly. With other models this difference could also be bigger.
Double buffering
When we allow up to two frames to be run at the same time we can see the per frame performance of these models change. In this test we show the results separately for the cases where the camera is set to 30 or 60 FPS.
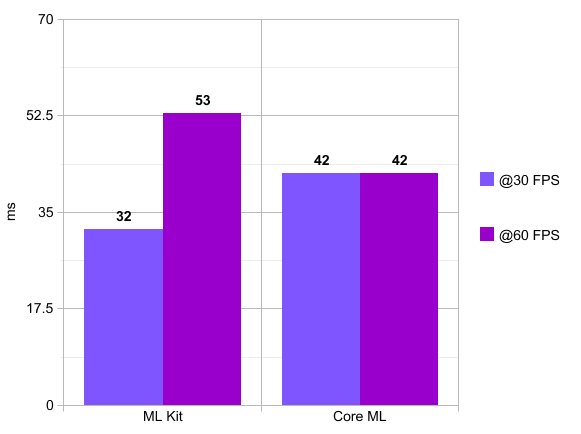
This chart shows the inference time of the models in milliseconds per frame, so lower is better. It also compares different camera frame rates.
This chart shows how much time it takes to process one frame. We see in this chart that Core ML takes 42 ms on average no matter if the camera runs at 30 or 60 FPS, which is to be expected as the heavy workload of the model is on the GPU. However, when running it at 60 FPS, we sometimes get periods where it only takes 33 ms to process a frame. There is however also an increase in CPU usage, which we saw in the Xcode Debug window, which is related to the increased number of frames being handled and resized.
On the other hand we see that with ML Kit there is a bigger difference between having the camera at 30 FPS or 60 FPS. If we run at 60 FPS, then each frame takes longer to process as there is more overlapping between the process times of the frames, and because everything is done in the CPU. However it is to be noted that both end in the same number of processed frames per second.
The real frames per second
Here we compare the wall time, i.e. how many frames the model really processes per second. This includes the time needed to resize the image frames from the camera as well as the time the GPU and CPU are idle in between frames.
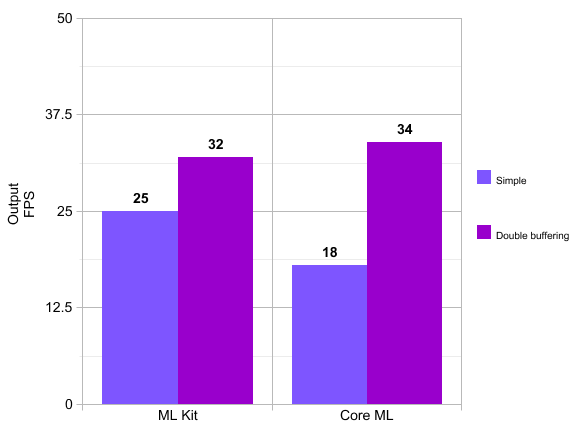
FPS comparison by framework. Higher is better.
Note: These numbers are averages. We had periods were Core ML ran at 48 FPS.
We can see that it is beneficial to use double buffering as it increases overall performance for both ML Kit and Core ML as it leaves the GPU and CPU with less idle time.
Also we note a very small advantage for Core ML here.
Another factor which might influence a decision between these two frameworks is the energy consumption. In the tests we made, we could see that Core ML consumes more energy than ML Kit. You can see that in the following image, where Core ML is running during the first half and ML Kit during the second:
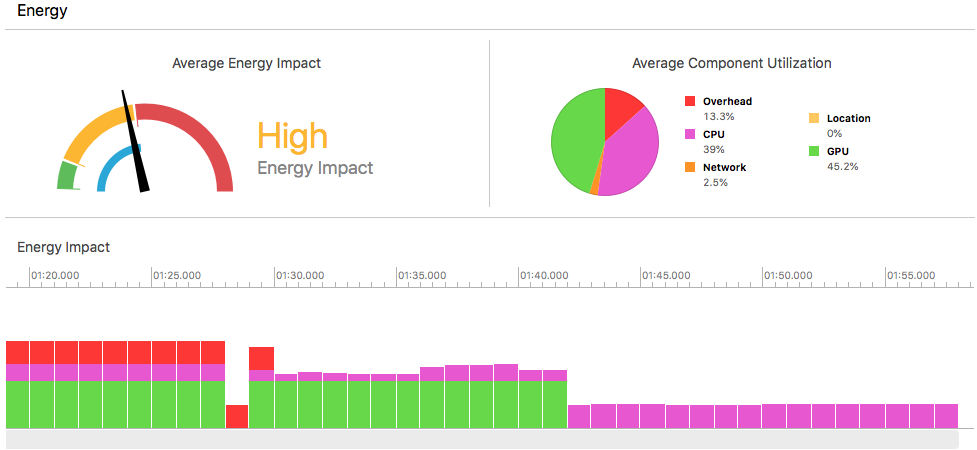
Energy consumption while running inference. Core ML is run during the first half and ML Kit during the second. You can see how energy consumption is higher during the first half.
Conclusions
We saw that it is quite easy to get set up with ML Kit on iOS and while it is still in Beta, and there are some green parts like the error handling, it is very helpful if you want to add machine learning to your apps on iOS and Android. It is also very helpful that it comes with some models out of the box.
We saw that there was a small difference in performance between ML Kit and Core ML, which did not significantly impact this model (MobileNet). It is possible that for other models this difference might be more significant but it seems reasonable to use ML Kit if the real time performance is not critical.
All the code for this post can be found on GitHub. If you have any comment or question, or need help implementing a breakthrough use case of on-device Machine Learning, don't hesitate to contact us!

