

In this blog post we're going to present the main issues we ran into implementing complex animations in React Native at Xmartlabs. We'll show how Reanimated helps achieving smooth animations and at which cost. After reading this blog post you will be able to determine if react native is a proper choice to create your app considering its animations requirements.
So let's start with a little introduction to the matter.
“When speaking of animations, the key to success is to avoid frame drops”
What makes React Native so special regarding this topic of avoiding frame drops?
To answer this question, first we need to get deep into React Native architecture that is shown in the image below. As we can see React Native has two main threads.
- UI Thread - Where all the native code runs
- JavaScript Thread - Where all the JavaScript code runs.
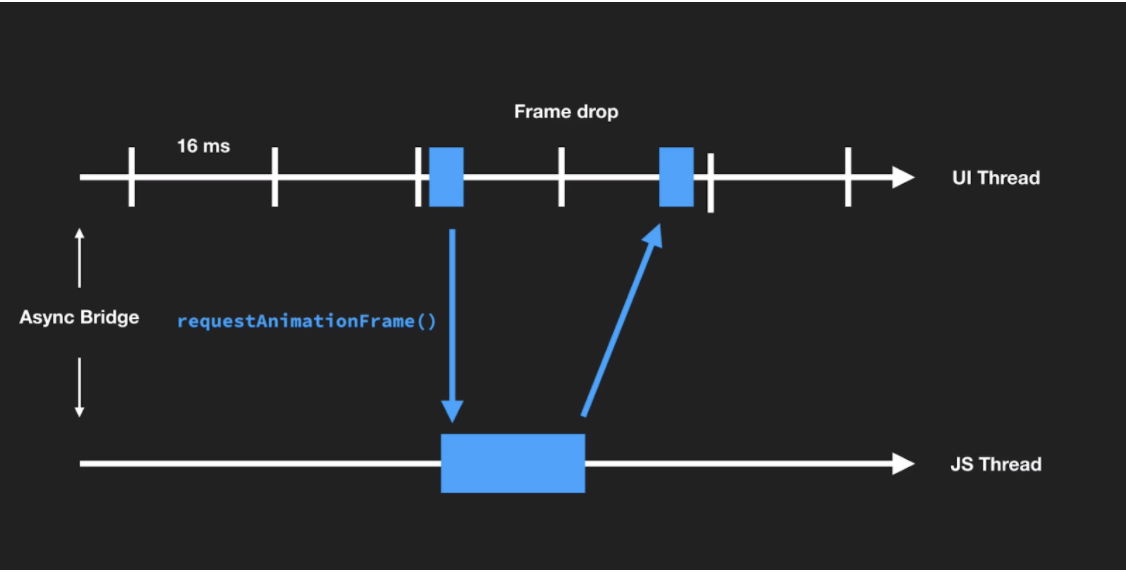
These two threads communicate between each other through JSON messages that are sent and received asynchronously from which is called the React Native Asynchronous Bridge and all interactions between JavaScript and the UI are made in this way.
What does this have to do with animations?
Well, since we want to have an awesome user experience, we would need animations to run at 60fps. This means there's only ~16ms to calculate an animation and we have to render each animation frame within this 16ms otherwise we are going to lose frames. This is when the Bridge comes in the way of animations, the asynchronous communication between the two threads makes it difficult to guarantee that the next frame is calculated in such limited amount of time, JS thread might be busy working on another task or device CPU might be too slow.
What impact does this have in React Native?
It’s really huge, because if we have JavaScript driven animation using the requestAnimationFrame() we have no guarantees that we could achieve the frame calculation, especially in low-grade Android devices, and taking into account that we also use the JavaScript Thread to do all the things in our React Native app, such as API requests, storage updates, etc. So it's very likely we're going to lose some frames and experience some animation freeze.
How can we solve this?
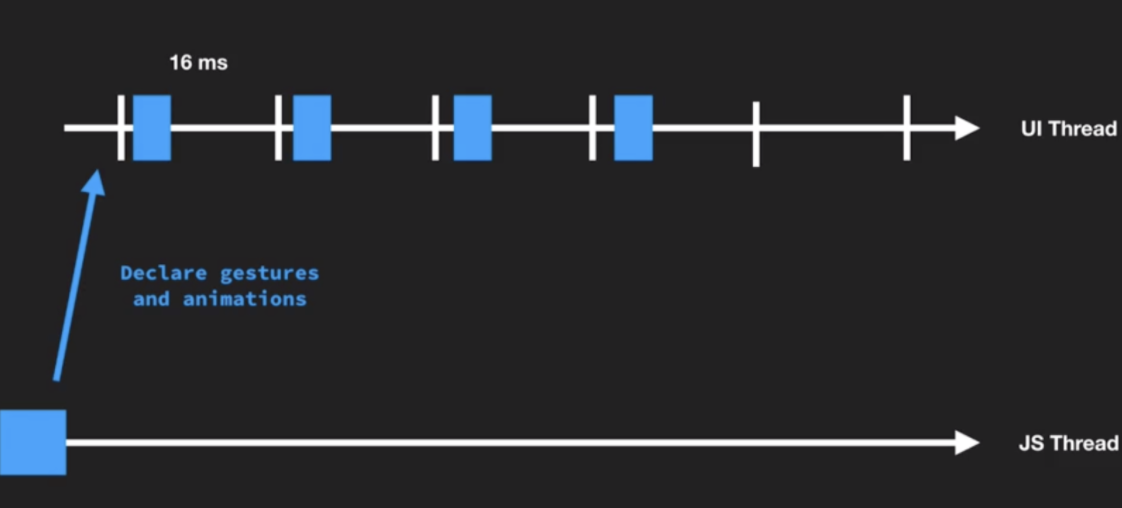
So if the bridge is our major "trade-off", how we can get rid of this? Well, there is a solution by using react-native-reanimated library which uses a declarative animations approach.
What is the advantage of this?
If we do our animations in a declarative way, when we interact with the device through UI gestures everything is executed in the UI Native thread and with this we can achieve the magic number of 60fps and avoid the losing frames.
Write animations in a declarative way, how can we achieve this in React Native?
React Native by default provides two API’s, one for gestures and one for animations, but please don’t ever use this because both rely on imperative code and on the communication between the JavaScript thread and the UI thread through the bridge.
As we mentioned before in order to do it declarative we are going to use these two libraries:
- React-Native-Reanimated, for animations.
- React-Native-Gesture-Handler, for gestures.
First of all, our code needs to be written with the Reanimated.API, what does this mean?
We cannot use if-else, Views neither the + * == operators because they live in the JavaScript thread, we need to use the auxiliary functions that are provided by the Reanimated.API, let's see some examples of these auxiliary functions:
Explaining each parameter and details of each
Reanimated APIis out of the scope of this blogpost.
| Javascript Thread | UI Thread/Reanimated API |
|---|---|
| render() | Frame |
| View | Animated.View |
| setState() | set() |
| if() | cond() |
| Statement1;Statement2;Statement3 | block([Statement1,Statement2,Statement3]) |
| Statement1;Statement2;Statement3 | block([Statement1,Statement2,Statement3]) |
| +, *, ==, ... | add(), multiply(), eq(), ... |
| Math.sin(), Math.pow(), Math.floor() | sin(), pow(), floor() |
So if we apply this in a simple example this is how it looks.
    import React, { useState } from "react";
    import { View, SafeAreaView, Text, StyleSheet } from "react-native";
    import Animated from "react-native-reanimated";
    import { useMemoOne } from "use-memo-one";
    import { RectButton } from "react-native-gesture-handler";

    export const Example = () => {
      const { Value, useCode, block, cond, Clock, not, clockRunning, startClock, set, interpolate, Extrapolate, add, eq, stopClock } = Animated;
      const animationDuration = 500;
      const [show, updateShow] = useState<boolean>(true);
      const { time, clock, progress } = useMemoOne(
        () => ({
          time: new Value(0),
          clock: new Clock(),
          progress: new Value(0)
        }),
        []
      );
      const opacity = interpolate(progress, {
        inputRange: [0, 1],
        outputRange: show ? [0, 1] : [1, 0],
        extrapolate: Extrapolate.CLAMP
      });

      useCode(
        block([
          cond(not(clockRunning(clock)), [startClock(clock), set(time, clock)]),
          set(
            progress,
            interpolate(clock, {
              inputRange: [time, add(time, animationDuration)],
              outputRange: [0, 1],
              extrapolate: Extrapolate.CLAMP
            })
          ),
          cond(eq(progress, 1), stopClock(clock))
        ]),
        [show]
      );

      return (
        <View style={styles.container}>
          <View style={styles.mainContent}>
            <Animated.View style={{ opacity }}>
              <View style={styles.card} />
            </Animated.View>
          </View>
          <RectButton onPress={() => updateShow(!show)}>
            <SafeAreaView style={styles.button} accessible>
              <View style={styles.button}>
                <Text style={styles.label}>{show ? "Hide" : "Show"}</Text>
              </View>
            </SafeAreaView>
          </RectButton>
        </View>
      );
    };
Conclusions
As we can see in the example above it's easier to write, understand, and maintain the animation using the default Animated.API. For simple animations it could work like a charm but when the animations get more complex and we need to guarantee they always run smoothly we're not able to achieve that by just using Animated.API.
In that cases reanimated could be like water in the desert but don't forget that nothing comes without a cost and with reanimated the cost is the code complexity and the increase in the development time. At first, it might feel a bit awful and kind of antinatural, but when you get accustomed to it you will be able to create powerful animations.
In conclusion, we can achieve powerful animations in React Native but it comes with a little trade-off in complexity. So if you are looking to make an App that has simple animations and just few complex ones, maybe with React Native + Reanimated you could get a nice looking app but if you want to make an app in which the animations are a core aspect of the product, React Native may not be the best choice for you.
Well, I hope you now have a better idea of how to implement powerful animations in React Native!
Are you doing something regarding animations in your RN projects and have learned something not covered in this post? Let me know in the comments. I'd be interested to get your perspective.
Have questions about Reanimated? I'd be happy to answer those in the comments if I can.
