
Have you ever considered integrating data from a wearable device into your app, only to be overwhelmed by the maze of wearables, each with its unique implementations? I've been there. In fact, it made me briefly contemplate quitting software engineering for good. But instead of trading my keyboard for a paintbrush I found a solution, a way to integrate wearables without the agony of being tied to a specific one. Sounds too good to be true, right? Let me show you how it works.
Our problem
I've been working on developing a platform that enables doctors to monitor patients' conditions and create personalized treatment plans. This approach based on model-informed precision dosing, requires vast amounts of patient data to accurately simulate the concentration in the bloodstream of medication doses over time. To achieve that, we needed to integrate a wide variety of real-time patient health data into our app.
Developing software for just a select group of wearables wasn’t an option. Our models rely on everything from basic metrics like heart rate (easily measured by a smartwatch) to more complex metrics, like blood glucose levels.
Letting other apps do the heavy lifting
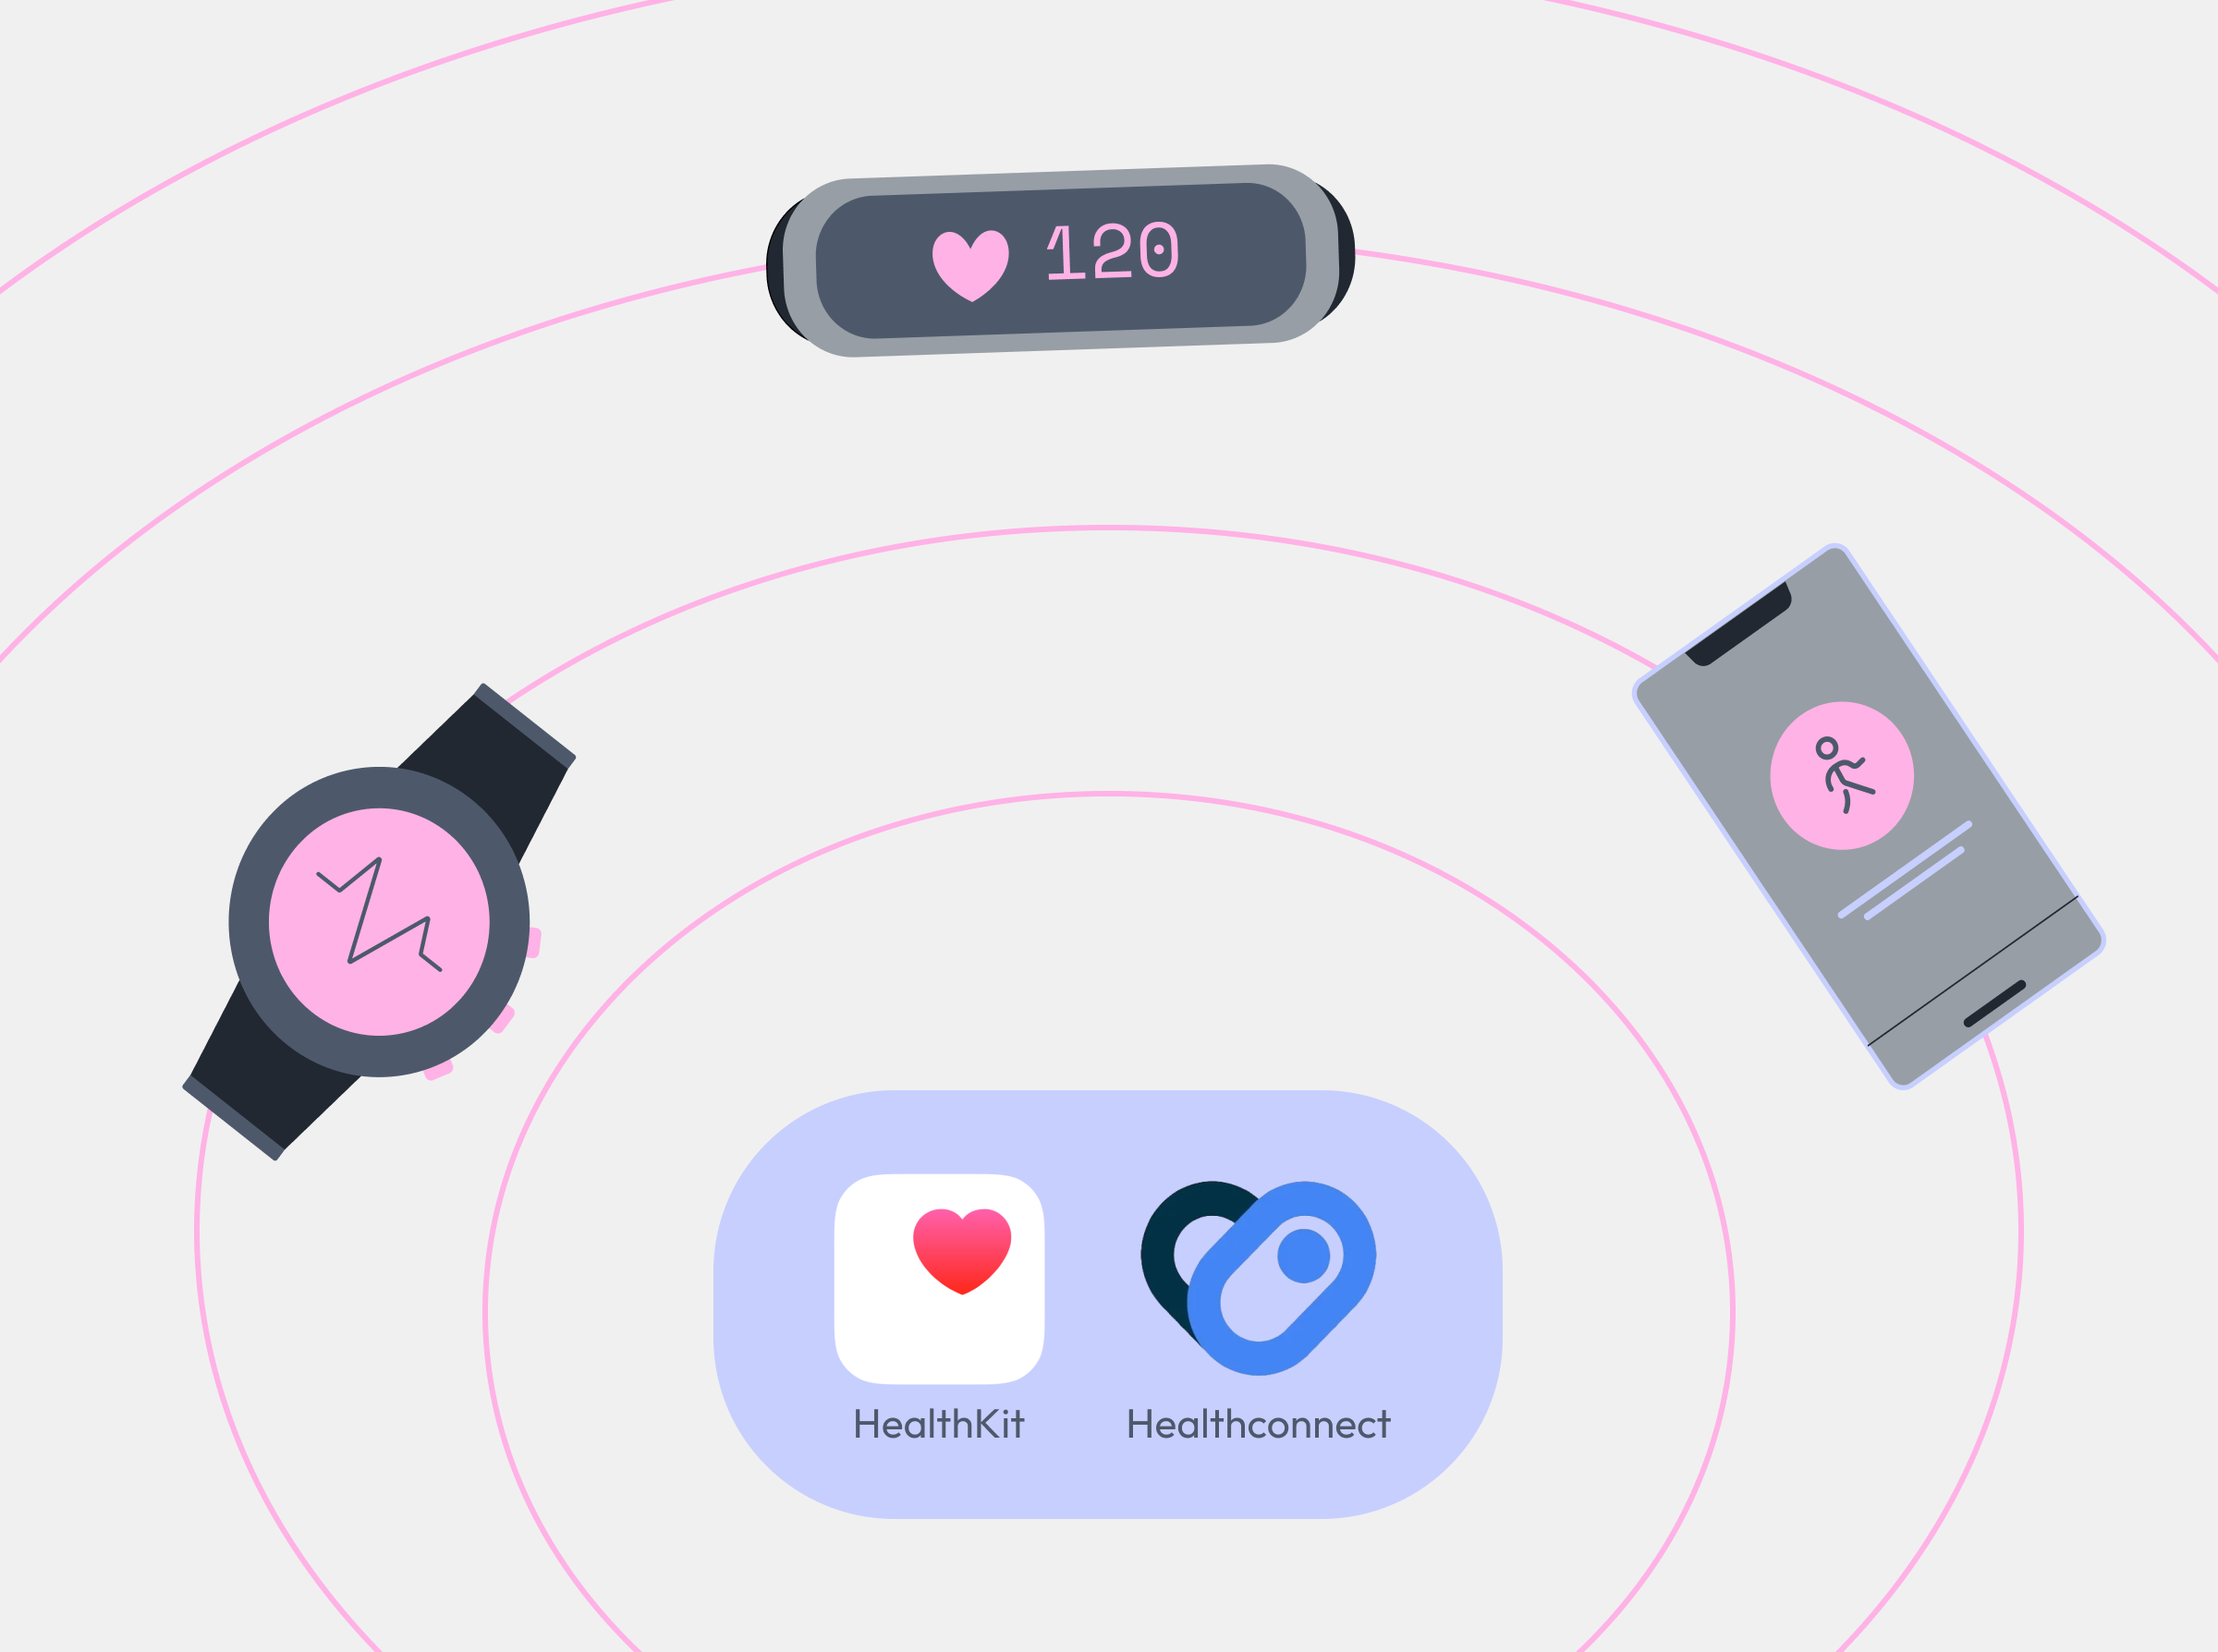
What if there were a way to avoid communicating directly with each wearable and navigating through the nightmare of endless different protocol support? Imagine letting each manufacturer handle the hard work, while your app simply consumes data from a perfectly consistent API? Good news: there's a way. Presenting: HealthKit and Health Connect!
HealthKit & Health Connect
HealthKit and Health Connect are services that create a central repository for fitness and health data. While both tools serve the same purpose, HealthKit was developed by Apple for iOS while Health Connect is Android's alternative.
The purpose of these tools? Offering a secure, centralized, and consistent way to store and access user health data, allowing users to control which apps have access to their information. Let’s say your user has a specific wearable that measures something that you need (eg. a continuous glucose monitoring device that controls the patient’s blood glucose) but the wearable’s software is proprietary and the communication with the wearable can only be achieved by using the manufacturer’s app.
If the app is integrated with HealthKit or Health Connect, this shouldn't be a problem since the glucose monitoring device app would write the data to the shared repository, and other apps could access the measurements (with the user’s permission, of course). The data is stored locally on the user's device, which is excellent for security.
Security Considerations
When handling health data, you must keep security and privacy in mind. Both HealthKit and Health Connect take several measures to protect data, but it's essential for developers to handle the data responsibly as well. Here's what you need to remember:
Data Privacy and User Consent
Health data is highly sensitive, meaning user consent to handle it is crucial. Both HealthKit and Health Connect require apps to ask for user permissions to read or write any health data. However, beyond technical implementation, you should consider clearly communicating why the data is requested, how it will be used and who will access it. Apart from building user trust, this can also help prevent your app from being rejected by the app stores.
Keep in mind that you can be as granular as you like with these tools. Try to ask only for permissions over the data types you absolutely need, in order to minimize the risk in case of data breaches.
Compliance with Regulations
When working with health data, your app may need to comply with local or international regulations, like the Health Insurance Portability and Accountability Act (HIPAA) in the U.S.
This often depends on how your app uses the data, but there are some recommended practices. It's important to provide users with the ability to view, delete, or export their data, and to let them revoke permissions and ask to delete all their data from the server. Establishing clear data retention policies is also good: avoid storing health data indefinitely. Last but not least, keeping an audit trail of data access and modifications can ensure compliance with regulations and provide accountability in case of breaches or disputes.
Backend Security
Not all mobile developers have access to the implementation of the server, but securing the mobile app is pointless if the data is sent to an insecure backend. It's essential that both the app and server maintain high security standards to protect user data effectively. Encryption and proper user role management can go a long way. Another good practice would be to anonymize the data, so that in the event of a breach, the health information cannot be traced back to an individual.
Implementation
As an example implementation of how these tools can be used in a React Native app, we will read the blood glucose information using both tools, and then let the user choose whether they want to share it with their doctor to improve their treatment. You can check my health-poc repository, which contains all the code examples for HealthKit and Health Connect mentioned in this article.
There are many other data types that can be integrated apart from blood glucose. A full list of those can be found here for HealthKit and here for Health Connect.
Installation
To use HealthKit and Health Connect in your React Native app, you need to install the following libraries:
react-native-health
react-native-health-connect
And follow the installation instructions for react-native-health and react-native-health-connect.
Getting the blood glucose data
Always ask for permission
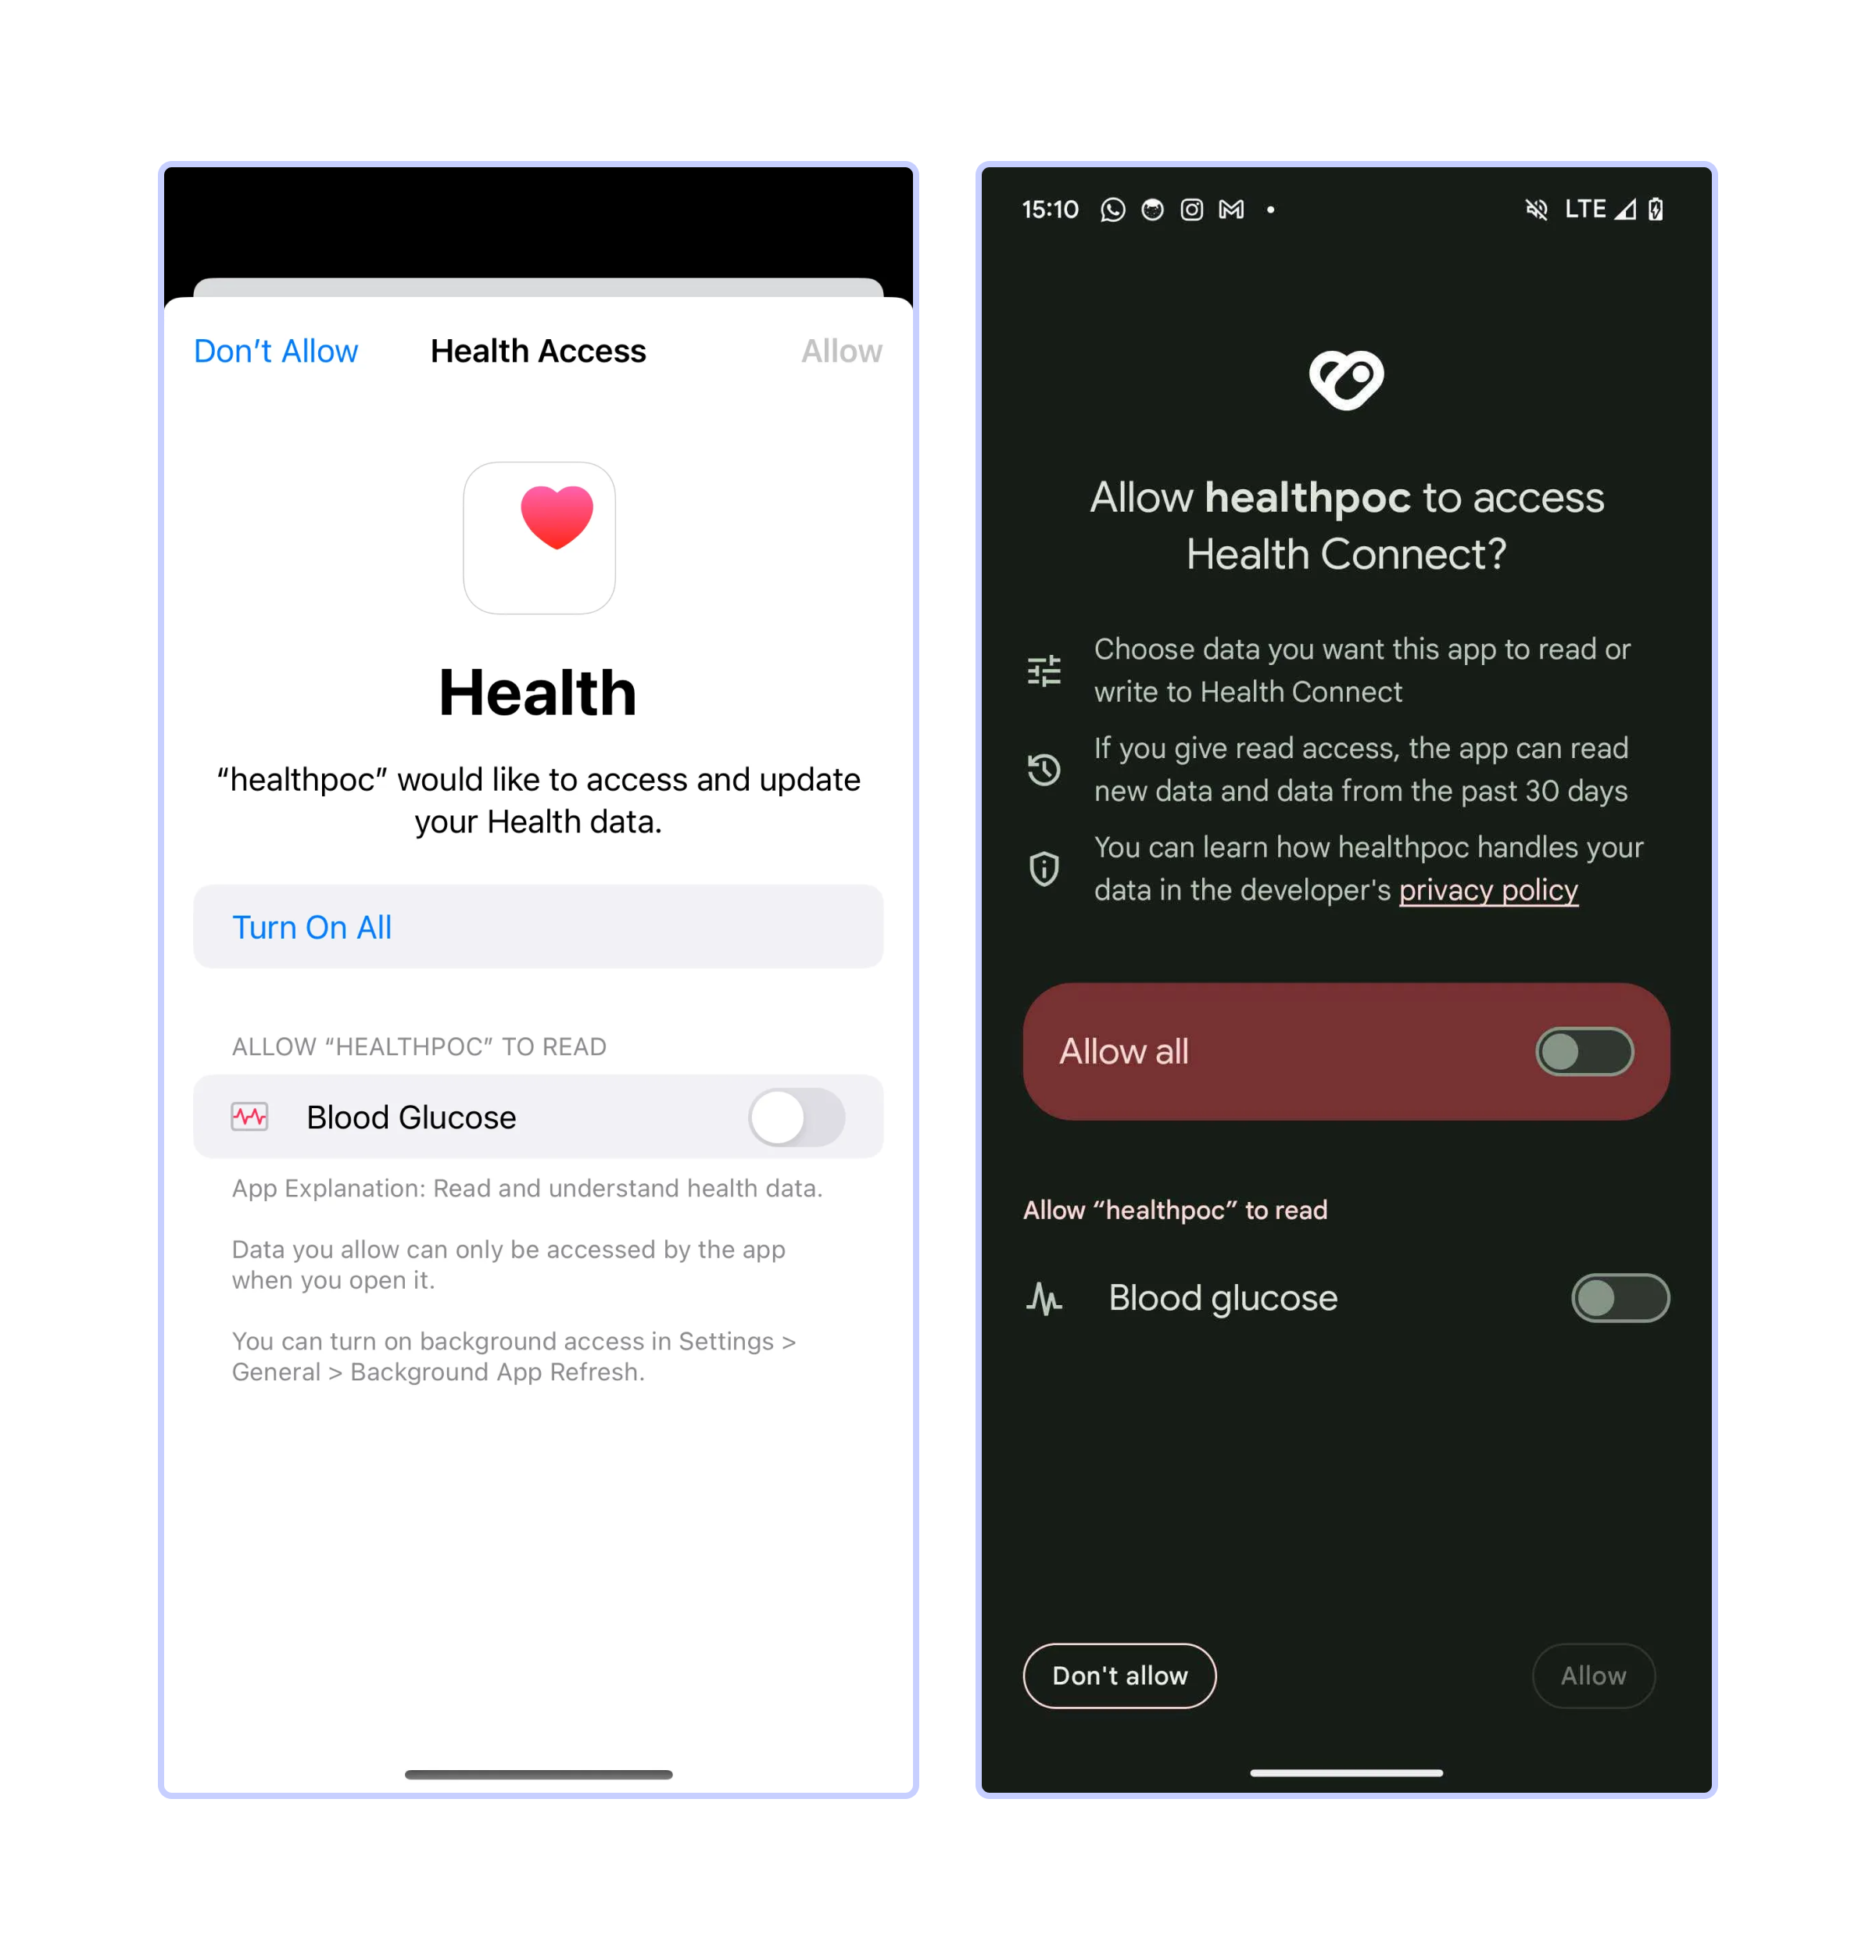
The first thing we need to do is to get the user’s permission to read the data type that we want to use. This must be done on both iOS and Android, and it's a crucial aspect of protecting user privacy.
On iOS, we need to initialize the service with the specific permissions we plan to request:
 import AppleHealthKit, { HealthKitPermissions } from 'react-native-health';

 //iOS
 const permissionsToAsk: HealthKitPermissions = {
          permissions: {
            read: [AppleHealthKit.Constants.Permissions.BloodGlucose],
            write: [],
          },
        };
        AppleHealthKit.initHealthKit(permissionsToAsk, (error: string) => {
          console.log(error);
        });
While on Android, we first need to initialize Health Connect and then ask for permissions:
        import {
  initialize,
  readRecords,
  requestPermission,
} from 'react-native-health-connect';

 //Android
  await initialize();
  await requestPermission([
    {accessType: 'read', recordType: 'BloodGlucose'},
  ]);
We can create a function to initialize both services at the same time. When you put it all together, it looks like this:
import {
  initialize,
  readRecords,
  requestPermission,
} from 'react-native-health-connect';

import AppleHealthKit, { HealthKitPermissions } from 'react-native-health';

  const initializeHealth = async () => {
     if (Platform.OS === 'ios') {
      const permissionsToAsk: HealthKitPermissions = {
        permissions: {
          read: [AppleHealthKit.Constants.Permissions.BloodGlucose],
          write: [],
        },
      };
      AppleHealthKit.initHealthKit(permissionsToAsk, (error: string) => {
        console.log(error);
      });
    } else if (Platform.OS === 'android') {
      await initialize();
      await requestPermission([
        {accessType: 'read', recordType: 'BloodGlucose'},
      ]);
    }
  };
This will take the user to this screen, where they can select which permissions they want to grant the app. In this case, we are asking for the BloodGlucose information.
Obtaining the blood glucose value
The next step, after configuring permissions, is to read the data. To do this, we need to specify a time interval for the data we want to retrieve. In this example, we will get today’s data:
    //set up the time range for the query
    const dayStart = new Date();
    const dayEnd = new Date();
    dayStart.setHours(0, 0, 0, 405);
    dayEnd.setHours(23, 59, 15, 405);
The data provided by both services and how to get it is structured differently. Let’s break it down for blood glucose.
In HealthKit (iOS), some options need to be set before getting the object, like the desired unit of measurement.
  //iOS
  unit: string; // default: 'mmolPerL'
  startDate: string;
  endDate?: string;
  ascending?: boolean;
  limit?: number;
Meanwhile, on Android, the object retrieved by the library contains all the available units, and you can select which one to use with keys such as inMillimolesPerLiter. However, you can still set some of the options beforehand:
  //Android
  timeRangeFilter: {
	    operator: 'between' | 'before' | 'after';
      startTime?: string;
      endTime?: string;
  };
  dataOriginFilter?: string[];
  ascendingOrder?: boolean;
  pageSize?: number;
  pageToken?: string;
Then, to actually get the blood glucose information from iOS, we're going to use the function getBloodGlucoseSamples from AppleHealthKit:
 //iOS
 AppleHealthKit.getBloodGlucoseSamples(
        {
          startDate: dayStart.toISOString(),
          endDate: dayEnd.toISOString(),
          ascending: false,
        },
        (err, results) => {
          if (err) {
            console.error(err);
            return;
          }
          //this will return the last result
          return results[0]?.value;
        },
      );
Similarly, we can get the data from Health Connect for Android using the function readRecords:
    //Android
    const result = await readRecords('BloodGlucose', {
        timeRangeFilter: {
          operator: 'between',
          startTime: dayStart.toISOString(),
          endTime: dayEnd.toISOString(),
        },
        ascendingOrder: false,
      });
      //this will return the last result
      return result[0]?.level?.inMillimolesPerLiter;
And then put it all together in a function called readBloodGlucose :
 const readBloodGlucose = async () => {
    //set up the time range for the query
    const dayStart = new Date();
    const dayEnd = new Date();
    dayStart.setHours(0, 0, 0, 405);
    dayEnd.setHours(23, 59, 15, 405);

    if (Platform.OS === 'ios') {
      AppleHealthKit.getBloodGlucoseSamples(
        {
          startDate: dayStart.toISOString(),
          endDate: dayEnd.toISOString(),
          ascending: false,
        },
        (err, results) => {
          if (err) {
            console.error(err);
            return;
          }
          //this will return the last result
          return results[0]?.value;
        },
      );
    } else if (Platform.OS === 'android') {
      const results = await readRecords('BloodGlucose', {
        timeRangeFilter: {
          operator: 'between',
          startTime: dayStart.toISOString(),
          endTime: dayEnd.toISOString(),
        },
        ascendingOrder: false,
      });
      //this will return the last result
      return results[0]?.level?.inMillimolesPerLiter;
    }
  };
There is more information in the object retrieved by each library, like the exact time the measure was taken. I encourage you to explore the response and find the specific information your app needs.
Testing the Integration
You may not have a wearable device that measures blood glucose, but you can still test the integration using the Health app on iOS and the Google Fit app on Android.
iOS
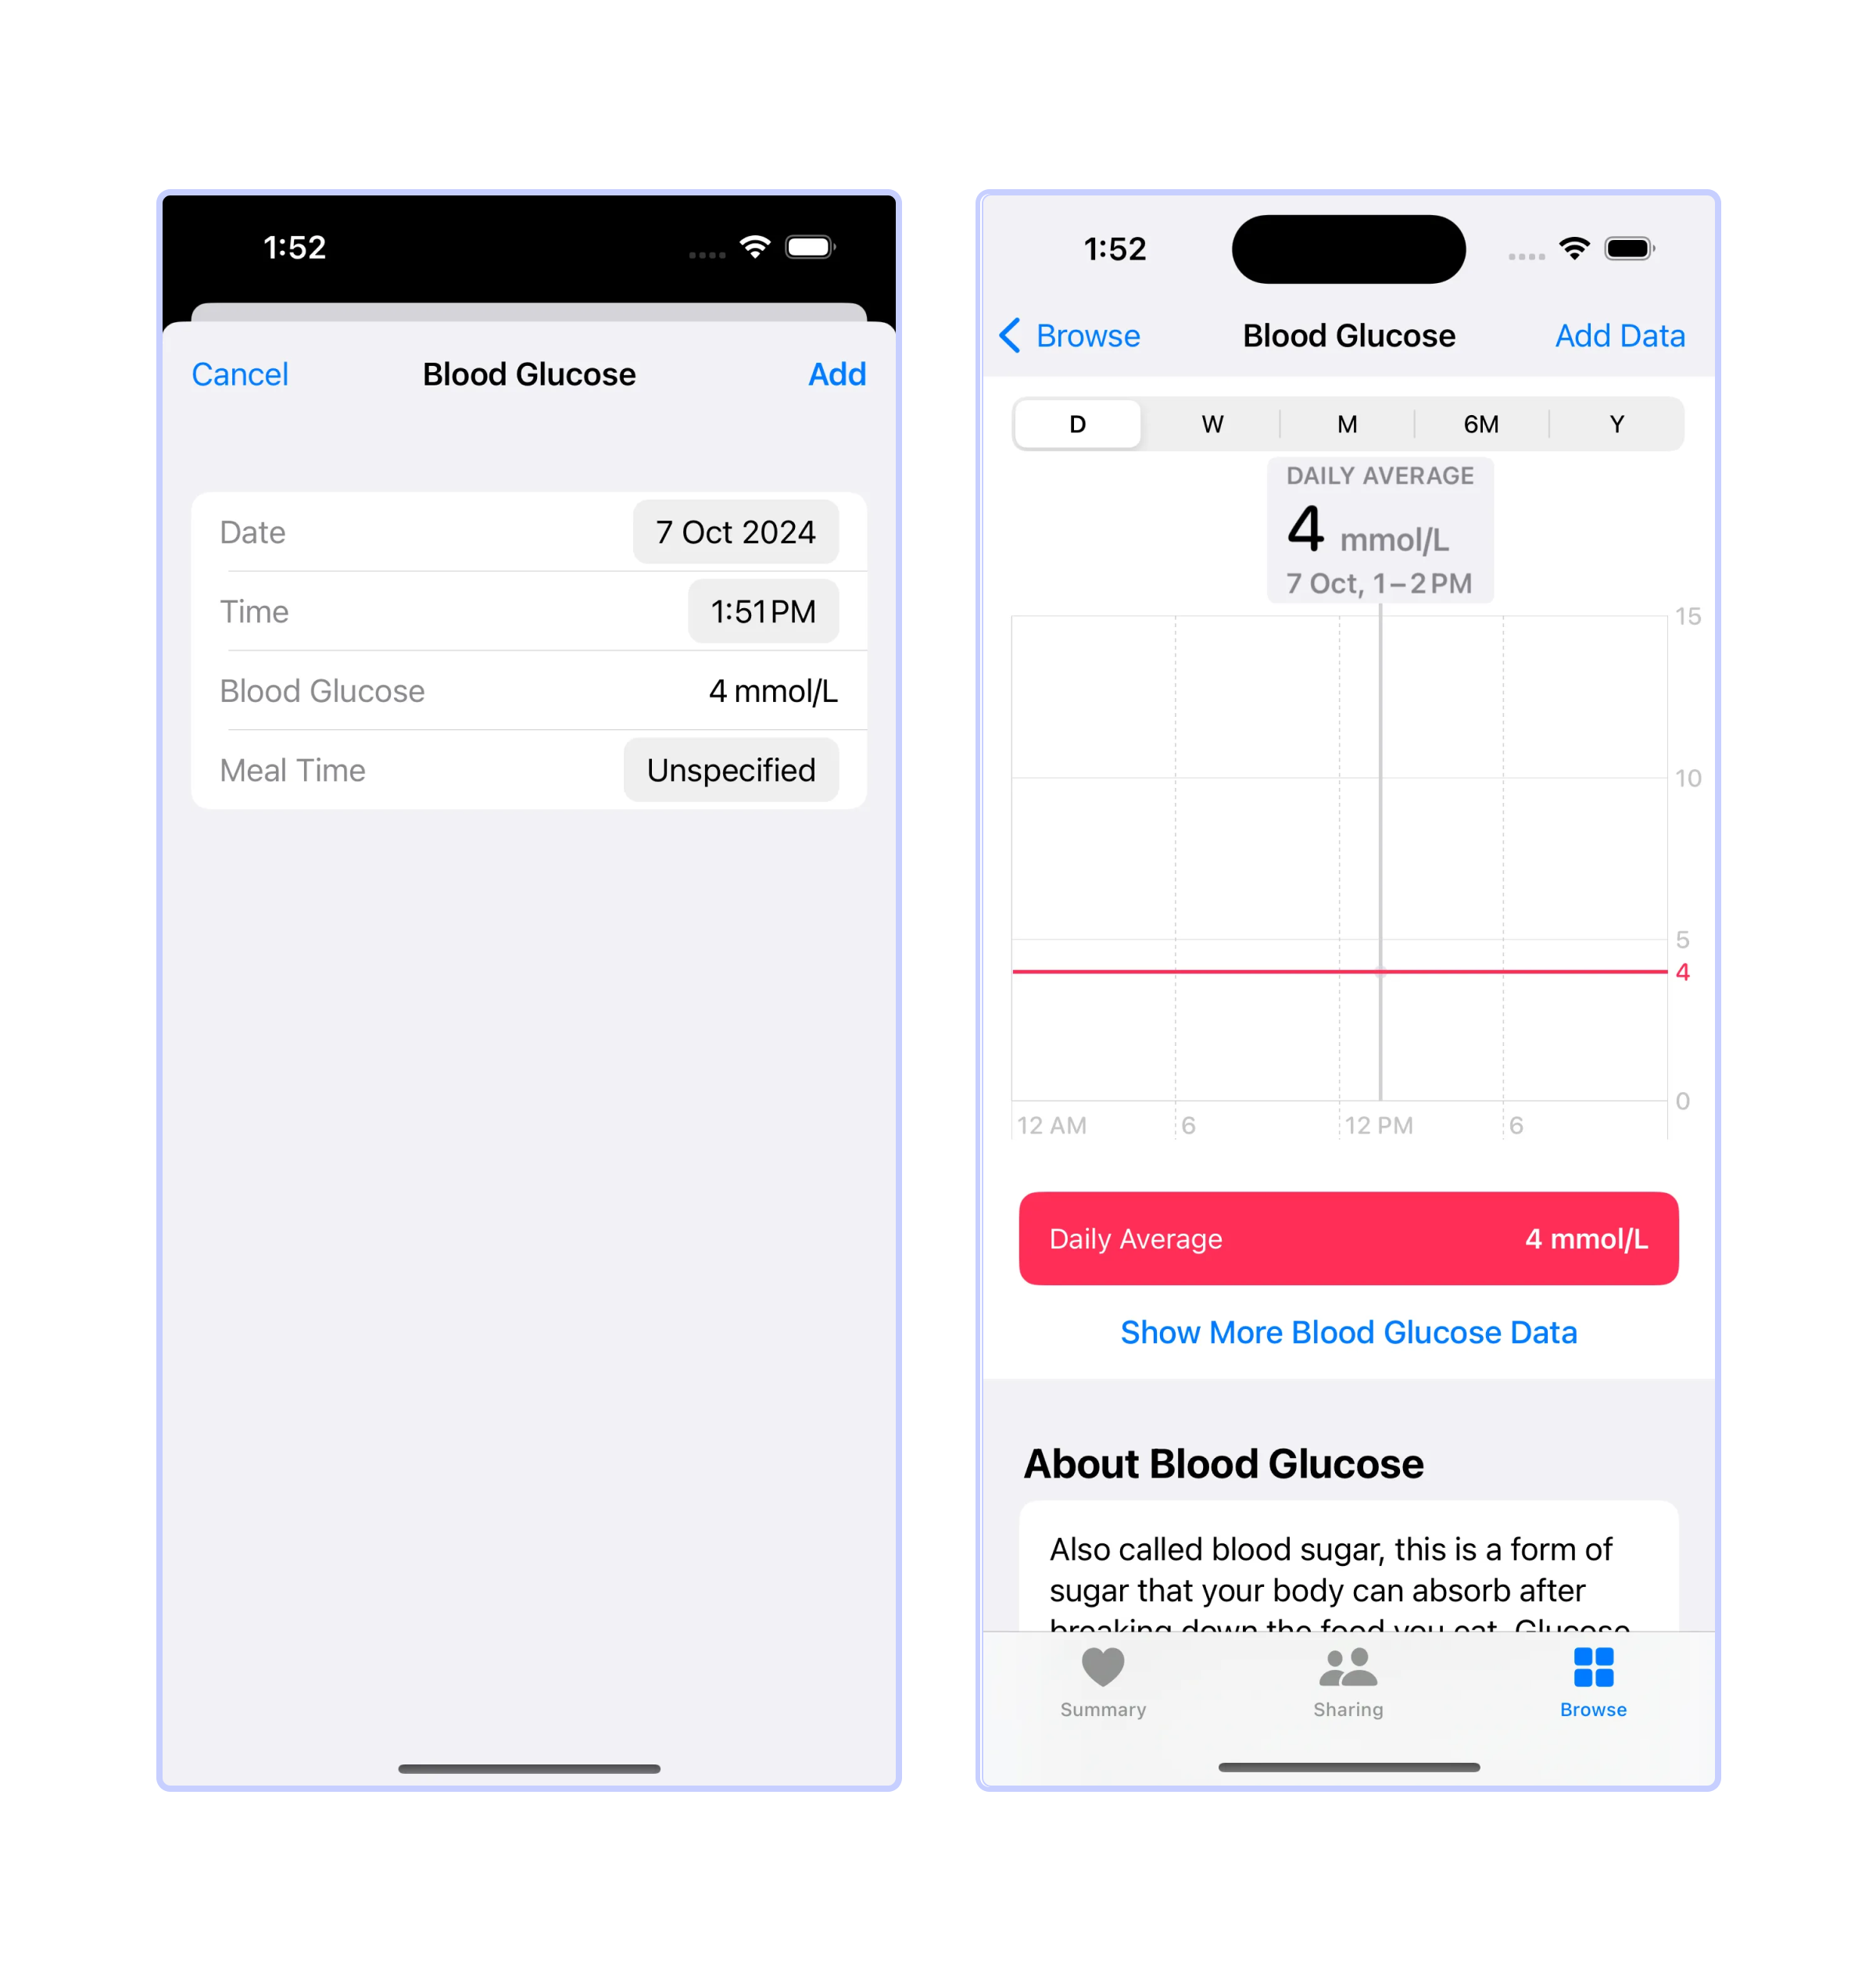
To add a blood glucose sample, you can use the Health app. Simply go to the Browse section and search for the data type you want to add, in our case, blood glucose:
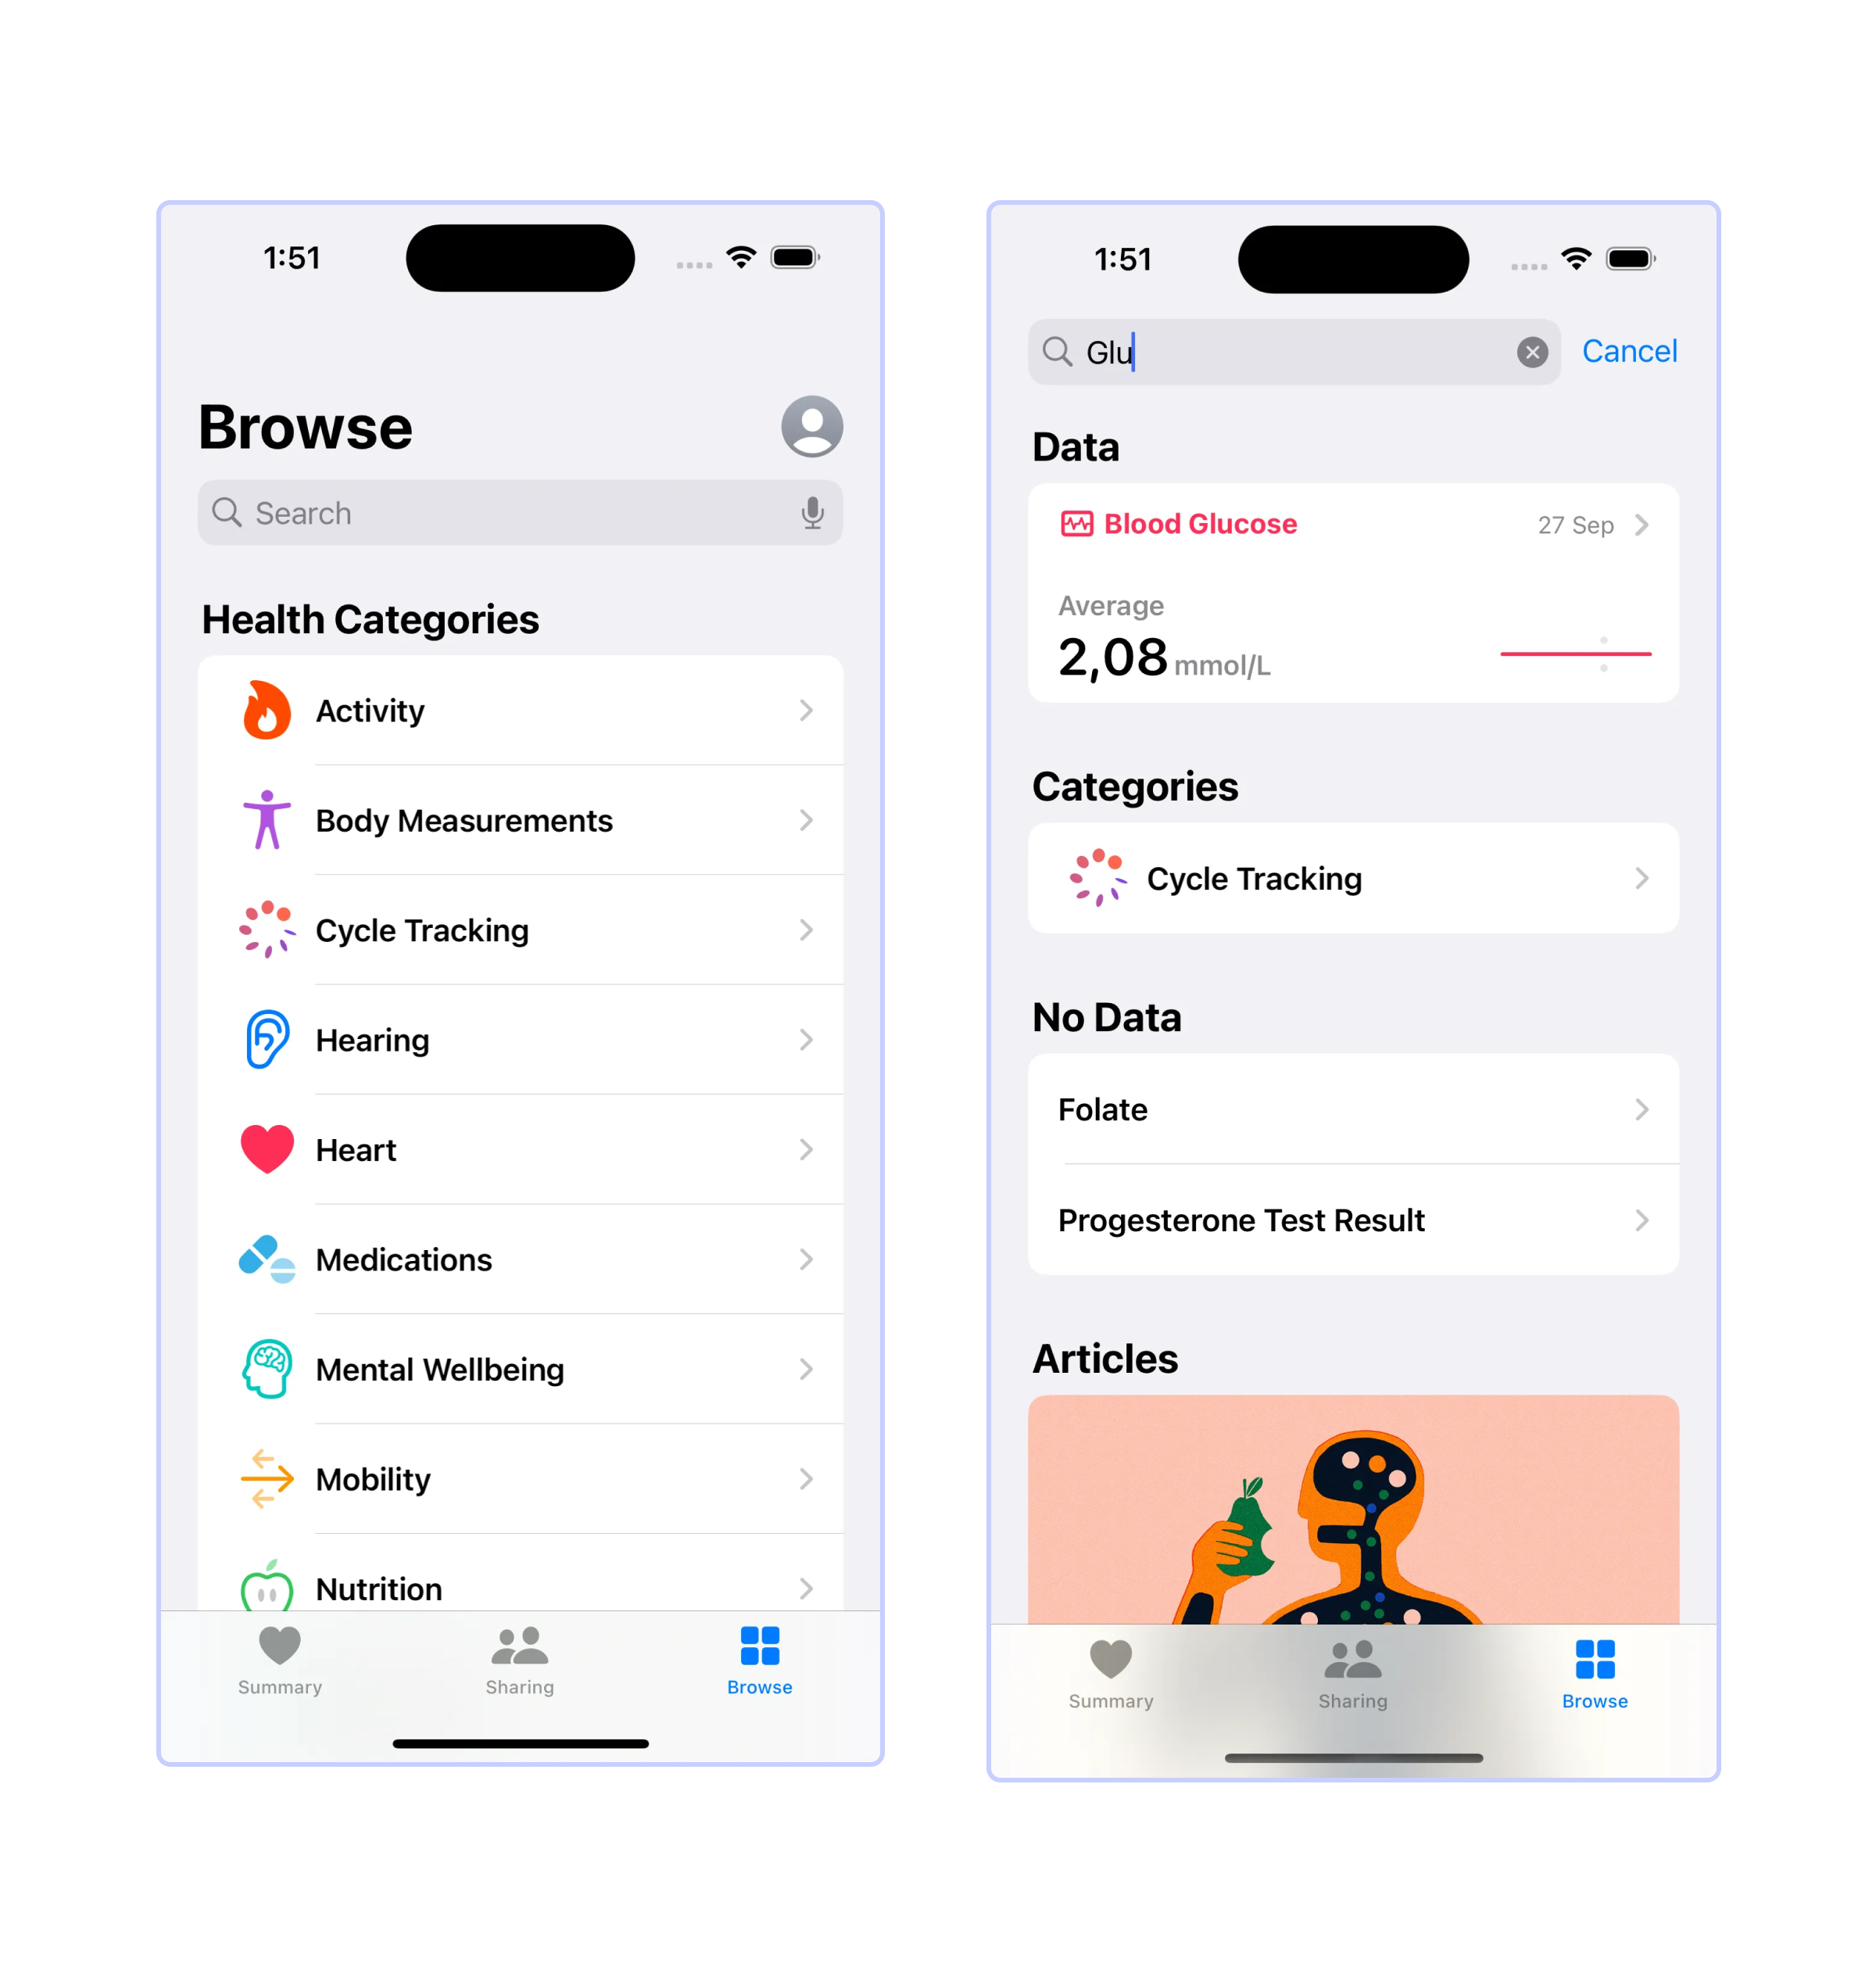
Then, you can add a sample value for testing:
Android
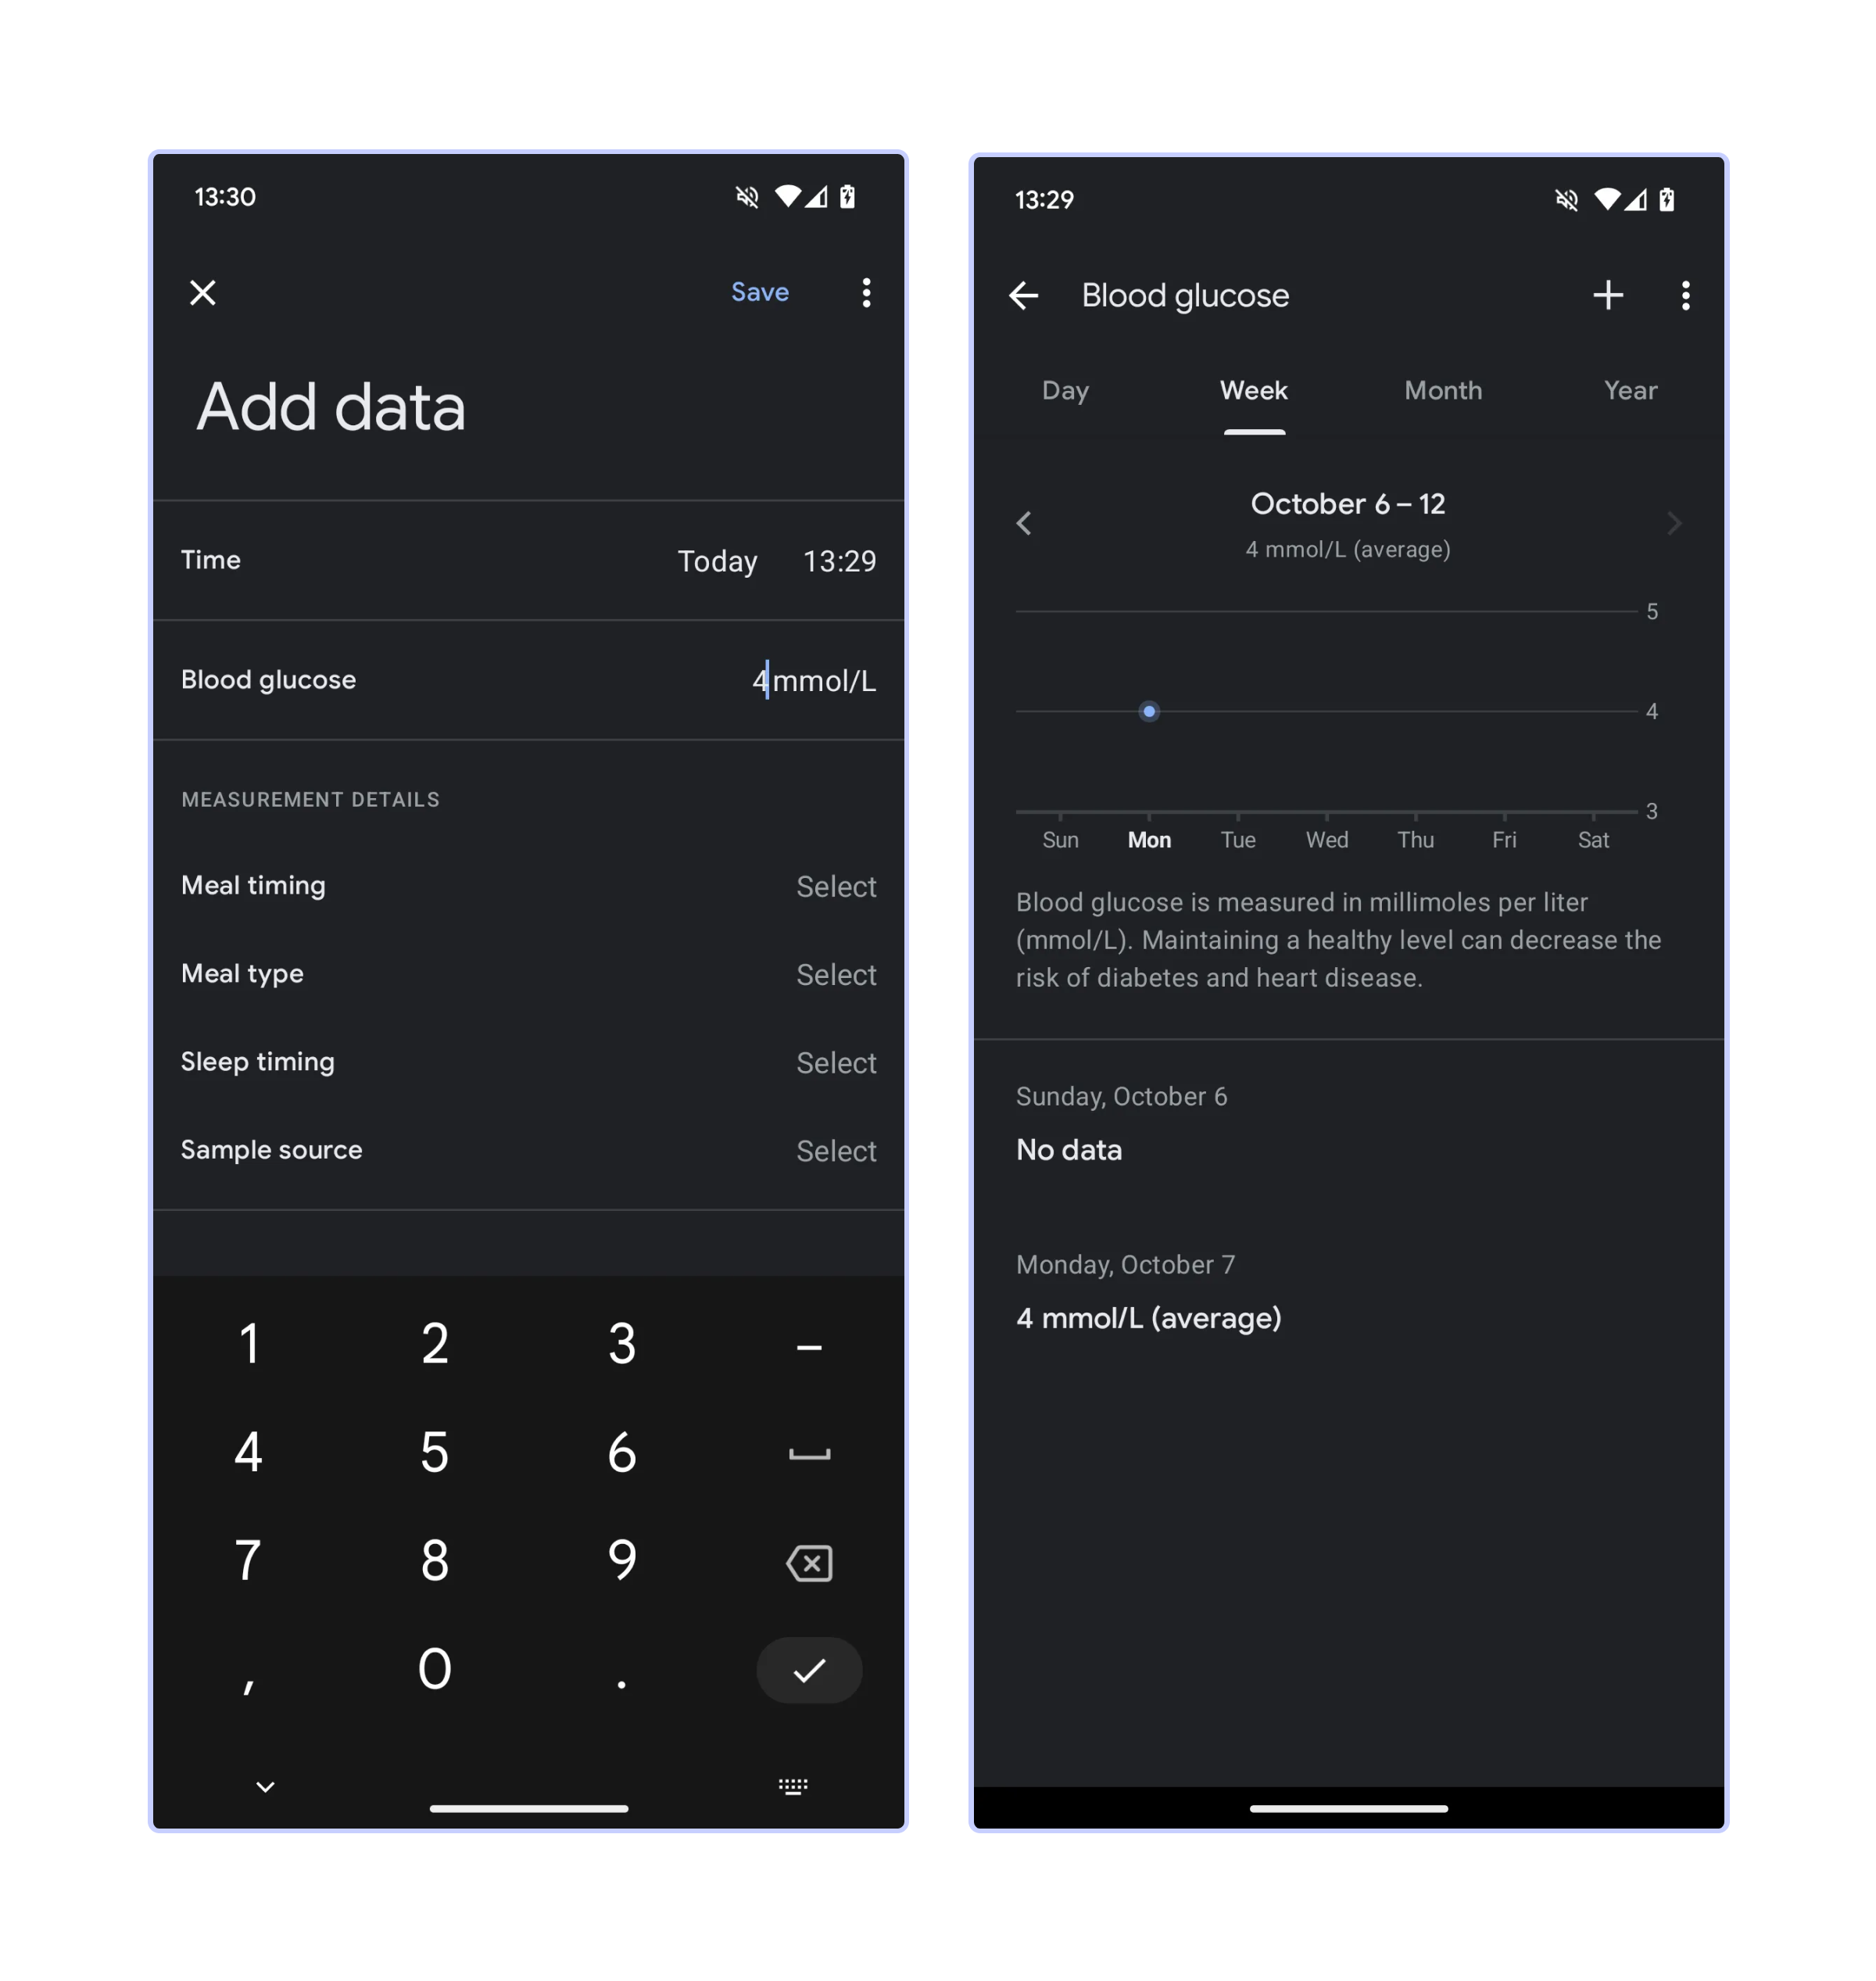
You can use the Google Fit app to add a blood glucose sample. Similarly to iOS, go to the Browse section and search for the data type you want to add:
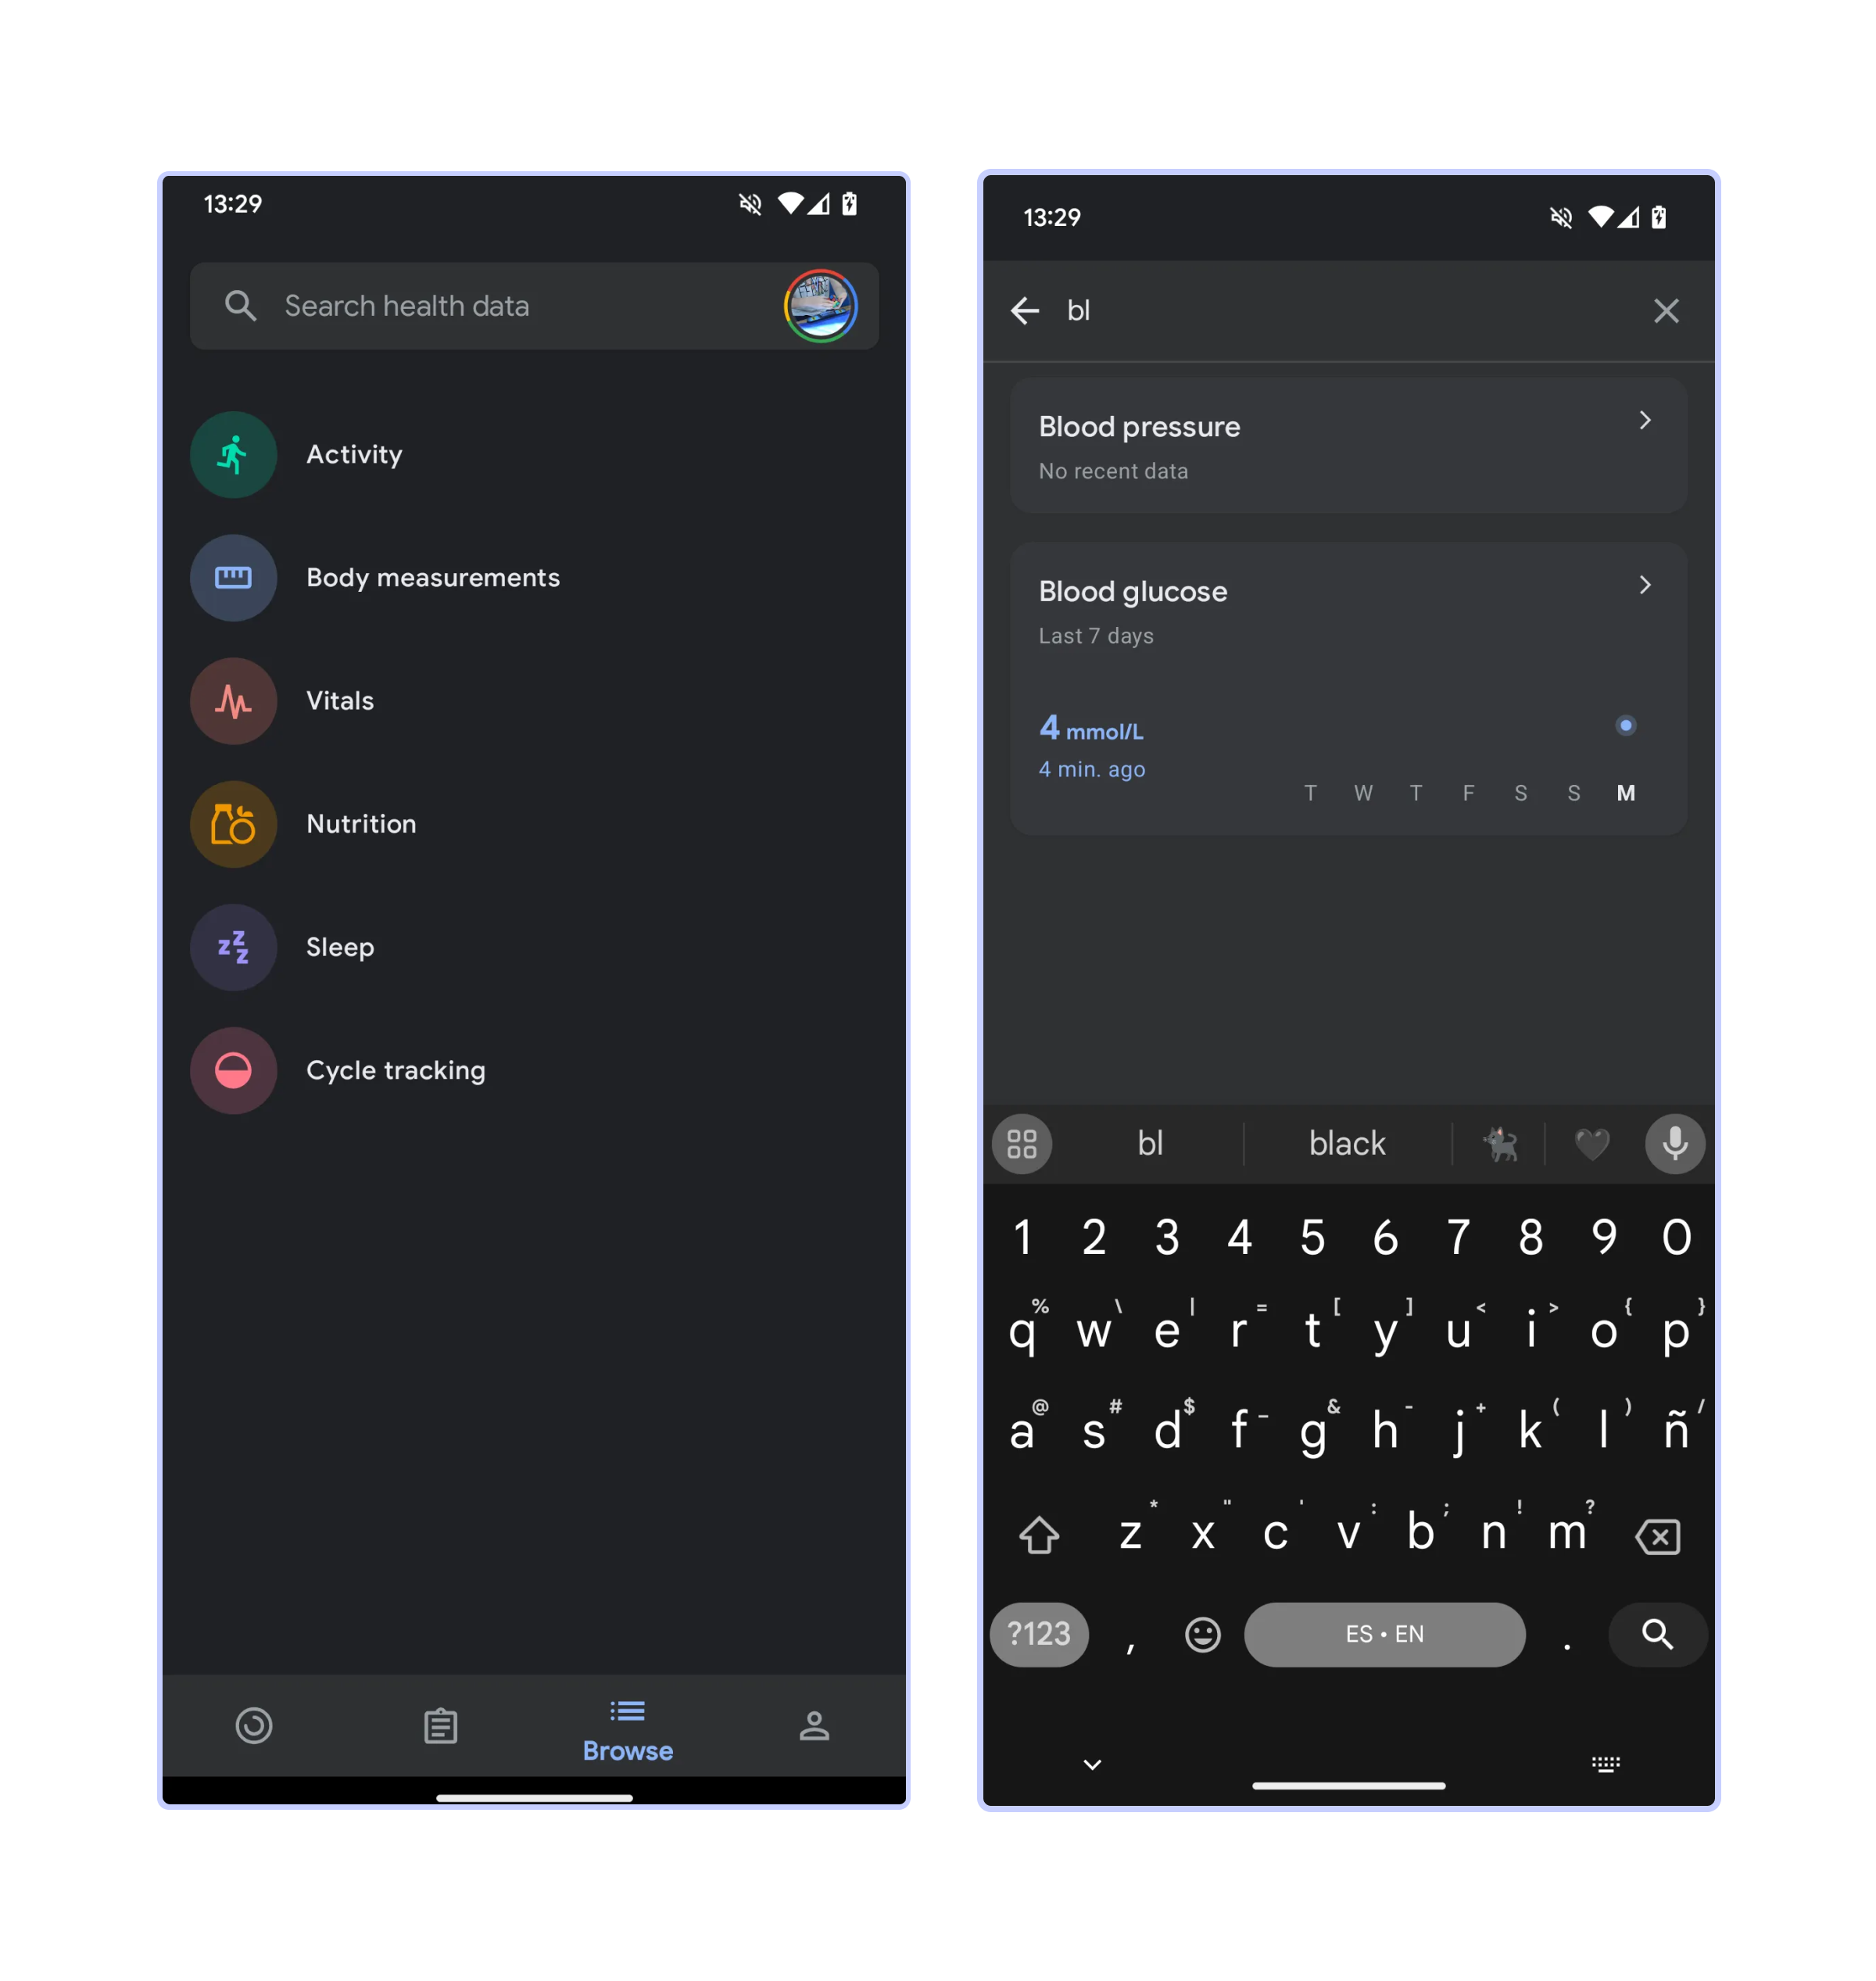
Then, you can add a sample value for testing:
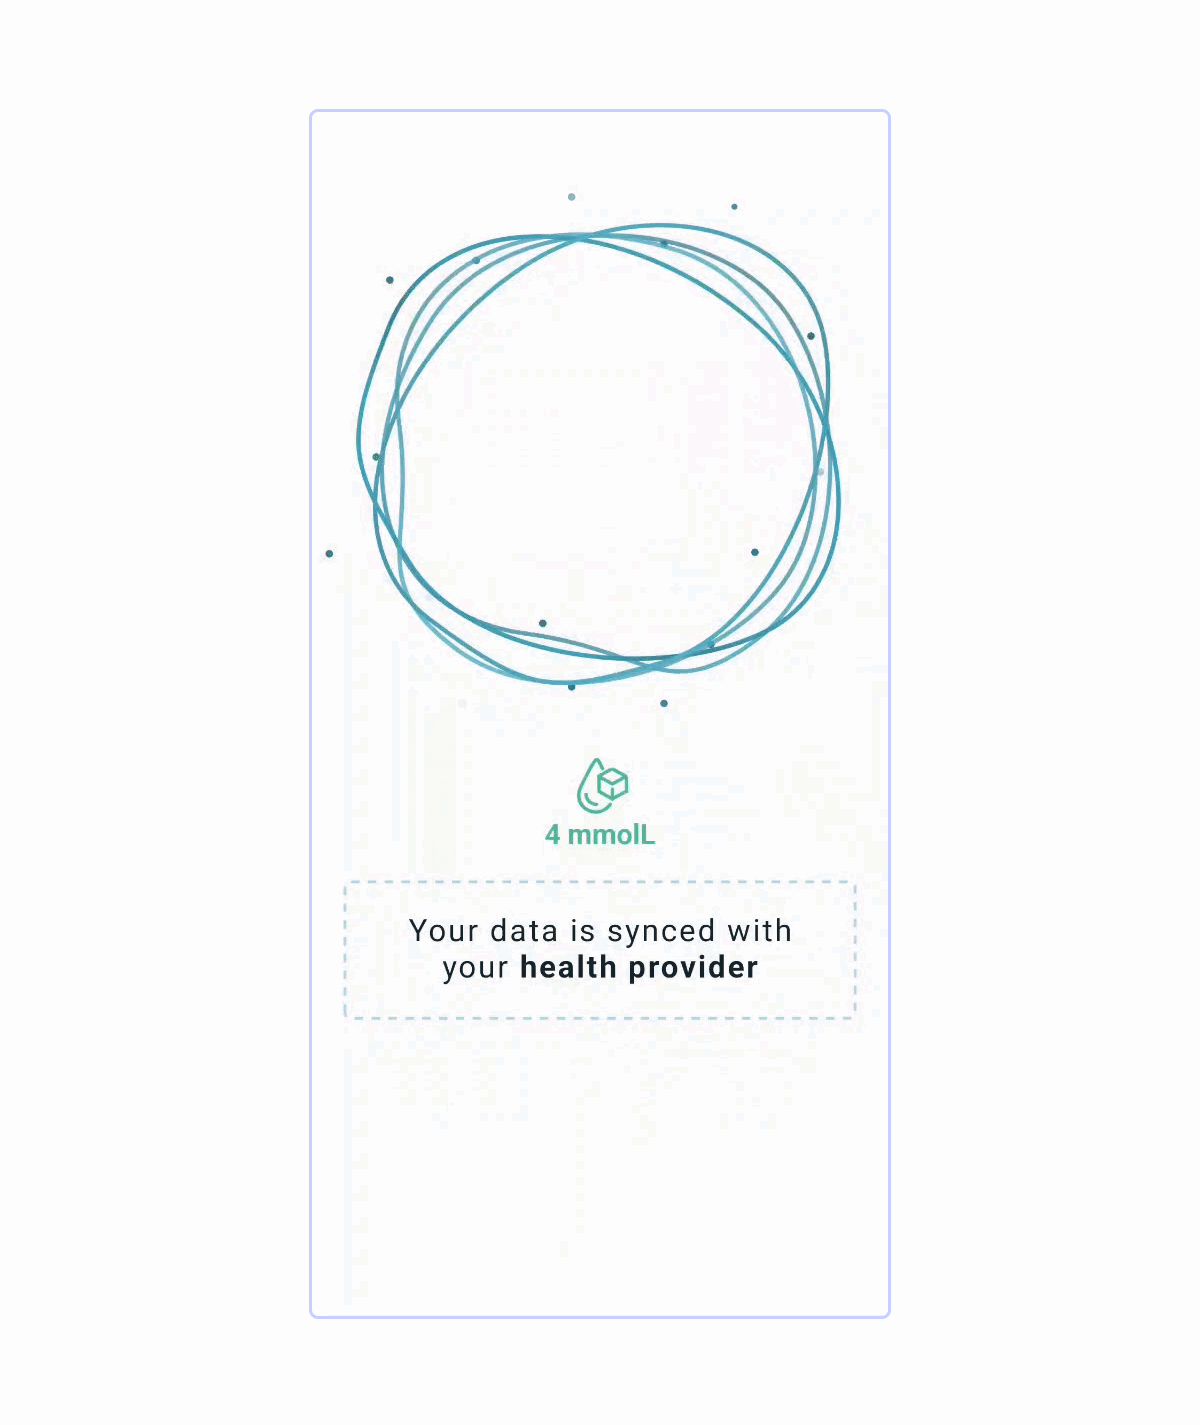
Displaying Results
Once we tested the integration and decided that it was working as expected, we could then use the results of the readBloodGlucose function to show the blood glucose in the app UI.
Sending the data to a health provider
Once you have the data in the app, you can process it however you like. For model-informed precision dosing, we periodically checked for updates in the background and sent the data to our server using the MQTT protocol, but that’s beyond the scope of this article. For now, let’s generate a simple Axios request to send the blood glucose data to our backend:
import axios from 'axios';

const sendBloodGlucoseData = async (bloodGlucoseValue) => {
	const bloodGlucoseValue = await readBloodGlucose()
  try {
    const response = await axios.post('https://example-api.com/api/glucose', {
      bloodGlucose: bloodGlucoseValue,
    });
  } catch (error) {
    console.error('Error sending blood glucose data:', error);
  }
};
Conclusion
This approach doesn’t completely eliminate the need to sometimes implement custom watchOS or WearOS software. If your user requires specific functionality on a smartwatch, native development becomes inevitable. However, for many use cases, simply accessing the measurements taken by the device is enough. In those instances, these tools are lifesavers—not only because they can be easily integrated with React Native without the need for native code but also because they enable access to data recorded by specialized wearables using proprietary software.
In our project, this flexibility made all the difference. Instead of implementing a very narrow solution, which would have limited the range of devices and data types, we created a universal solution that can work for any patient with a smartphone.
If you're interested in wearables integration or looking for a partner to help you streamline your healthcare app, we might be a good fit! Feel free to reach out and thanks for reading!
References: Apple Developer Documentation | HealthKit Android Developers | Health Connect