
Every day we have greater incorporation of machine learning tools into the mobile world. Apple knows this and every year it improves its frameworks in different ways, also allowing integrating ML on their platforms to become easier and easier, up to the point that we don't even need to know machine learning fundamentals in order to start using these capabilities. This year was no exception since Apple announced some interesting new features on its machine learning frameworks and that's what we are going to cover in this blog.
At Xmartlabs we have been closely involved in the field of on-device Machine Learning. Our main focus has been Machine Learning on iOS and we have been exploring different use cases including style-transfer, human body pose detection and medical image classification. Not only have we built some cool almost magical apps, but we have also rolled up our sleeves to create first of its kind development tools like Bender a few days before WWDC 17.
So now let's get into what new capabilities were released by Apple at the WWDC 2020.
What's new in Vision Framework?
The Vision framework provides solutions to computer vision challenges by providing a consistent interface. It performs face and face landmark detection, text detection, barcode recognition, image registration, and general feature tracking. Vision also allows the use of custom Core ML models.
Apple added two new capabilities to the Vision framework, both to detect human poses. One that recognizes body poses and another that recognizes the hand and its gestures.
The way Vision works is that you create a VNRequest object, which describes the task you want to perform and then you use a VNImageRequestHandler to execute it, so for these new features, they added two new requests.
VNDetectHumanBodyPoseRequest
To perform a body pose request provides its body pose-detection capabilities through VNDetectHumanBodyPoseRequest.
The result of human body detection, is a struct data with 19 unique body points as shown in the figure below.
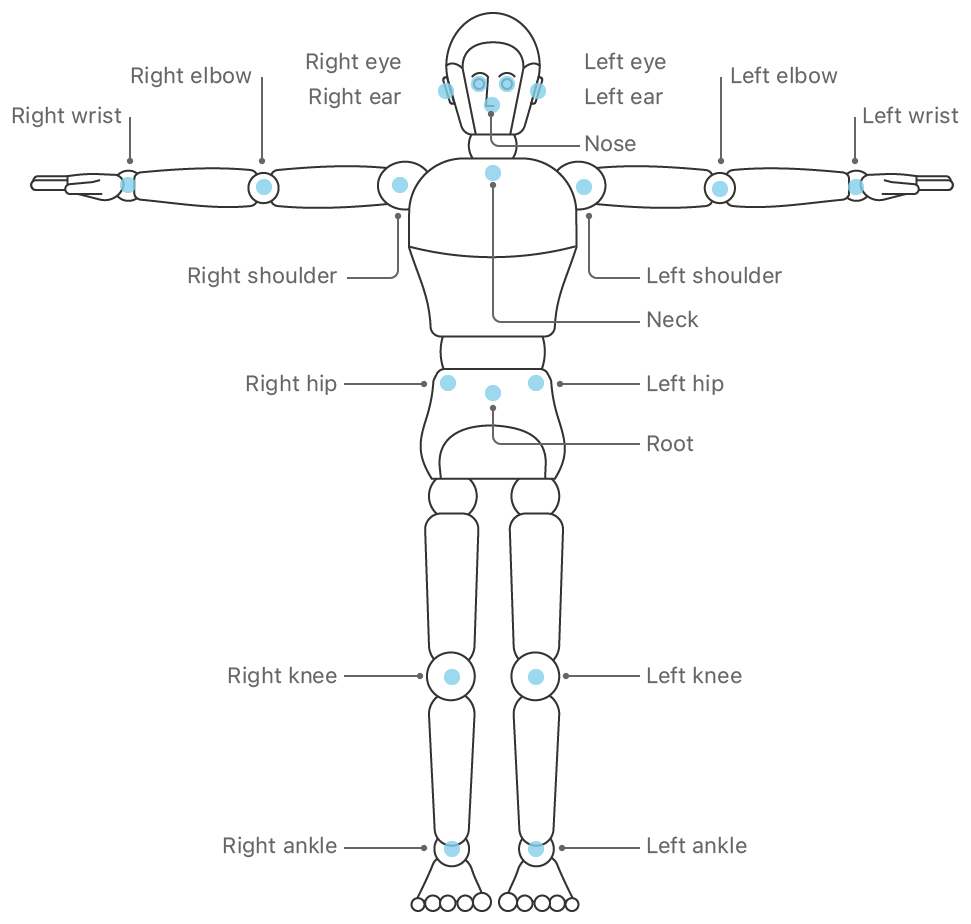
A human body with all the 19 unique body points illustrated.
There are different applications that might be interested in using this data.
For example, in a Swing Profile Golf Analyzer app, you can obtain the form of the person at the exact time of the shot, and then do analysis to rank how well it was, and what suggestions could improve the technique.
Another VNDetectHumanBodyPoseRequest application could be to use the landmark points of a person's body to animate a caricature with its movements giving the possibility to create entertaining content.
The following snippet shows an example of how easy it is to perform the request for an image. So you can have a better sense of how easy it is to incorporate this pose detection ML functionality into your app:
// Get the CGImage on which to perform requests. It could be images from a
// images stream like camera output.
guard let cgImage = UIImage(named: "bodypose")?.cgImage else { return }

// Create a new image-request handler.
let requestHandler = VNImageRequestHandler(cgImage: cgImage)

// Create a new request to recognize a human body pose.
let request = VNDetectHumanBodyPoseRequest(completionHandler: bodyPoseHandler)

// Perform the body pose-detection request.
try? requestHandler.perform([request])
And then we can process the result like this:
func bodyPoseHandler(request: VNRequest, error: Error?) {
    guard let observations =
            request.results as? [VNRecognizedPointsObservation] else { return }

    // Process each observation to find the recognized body pose points.
    observations.forEach { processObservation($0) }
}

private func processObservation(_ observation: VNRecognizedPointsObservation) {

    // Retrieve all torso points.
    guard let recognizedPoints =
            try? observation.recognizedPoints(forGroupKey: .bodyLandmarkRegionKeyTorso) else {
        return
    }

    // Torso point keys in a clockwise ordering.
    let torsoKeys: [VNRecognizedPointKey] = [
        .bodyLandmarkKeyNeck,
        .bodyLandmarkKeyRightShoulder,
        .bodyLandmarkKeyRightHip,
        .bodyLandmarkKeyRoot,
        .bodyLandmarkKeyLeftHip,
        .bodyLandmarkKeyLeftShoulder
    ]

    // Retrieve the CGPoints containing the normalized X and Y coordinates.
    let imagePoints: [CGPoint] = torsoKeys.compactMap {
        guard let point = recognizedPoints[$0], point.confidence > 0 else { return nil }

        // Translate the point from normalized-coordinates to image coordinates.
        return VNImagePointForNormalizedPoint(point.location,
                                              Int(imageSize.width),
                                              Int(imageSize.height))
    }

    // Draw the points onscreen.
    draw(points: imagePoints)
}
VNDetectHumanHandPoseRequest
Similar to the body pose request, you can perform a hand pose-detection through VNDetectHumanHandPoseRequest.
The response provides 21 landmarks in total, four landmarks for each finger and one for the wrist.
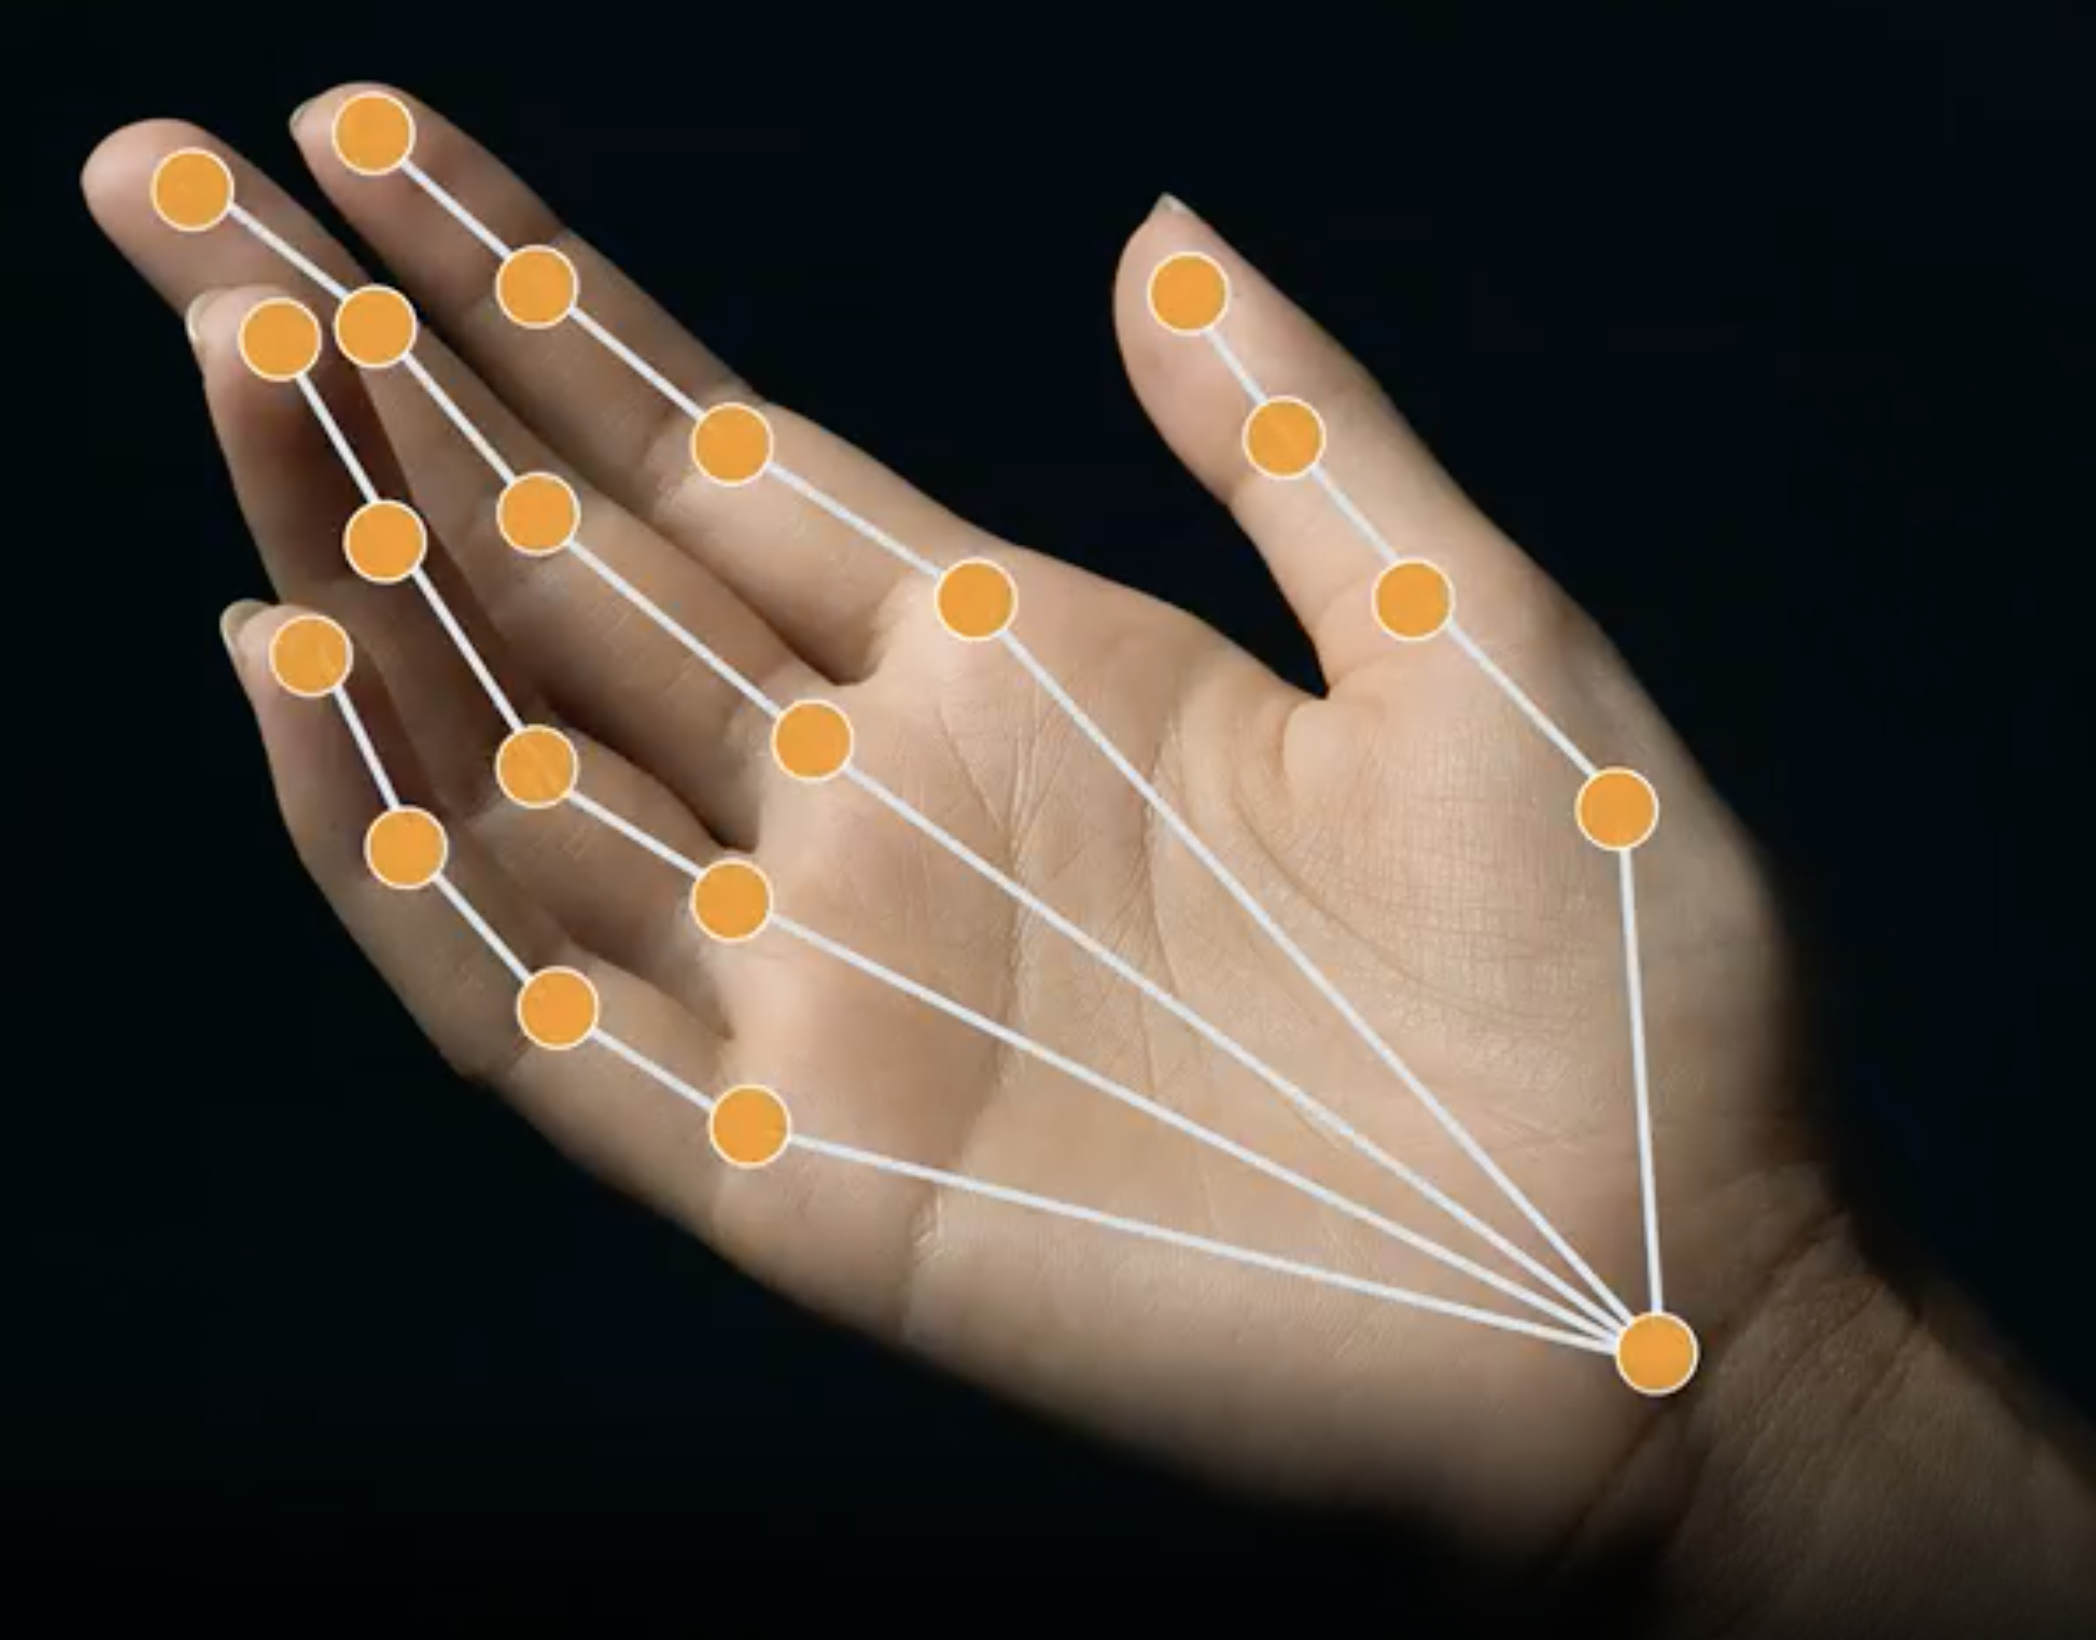
A hand with the 21 landmarks illustrated.
If you'd like to detect more than one hand, you can set the maximumHandCount to the number of hands you wish to detect. Consider that this variable will affect the performance of your app, especially on older devices.
The code to perform a request and process the result data is analog to the body pose detection unlike the name of the request and the body landmarks keys.
Use Model Deployment and Security with Core ML
Model Deployment
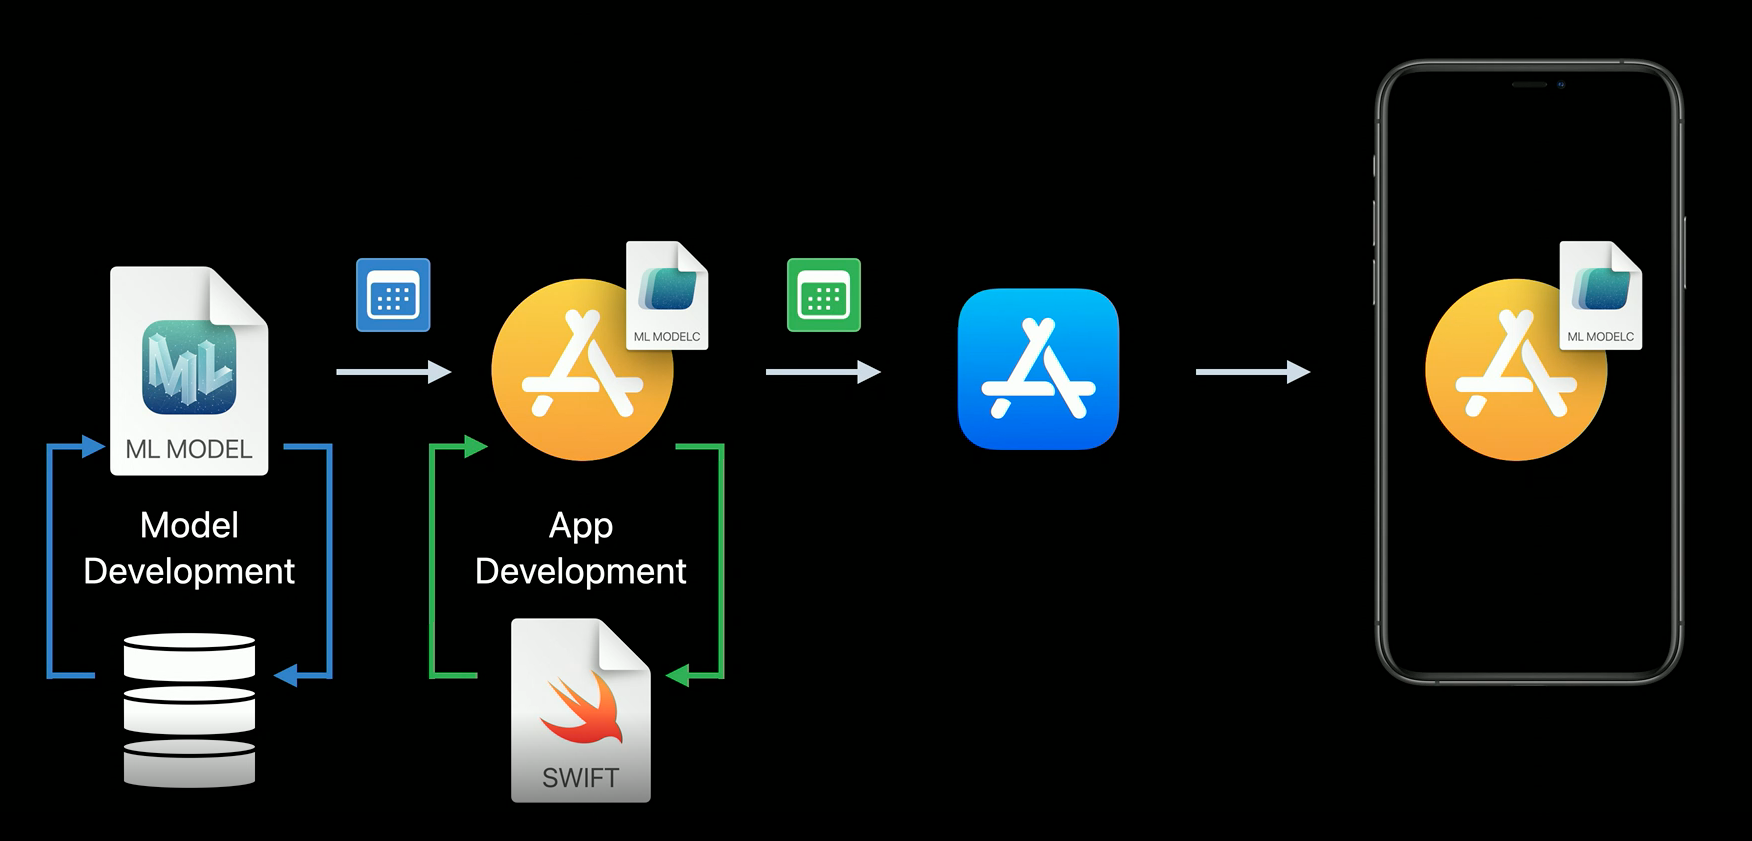
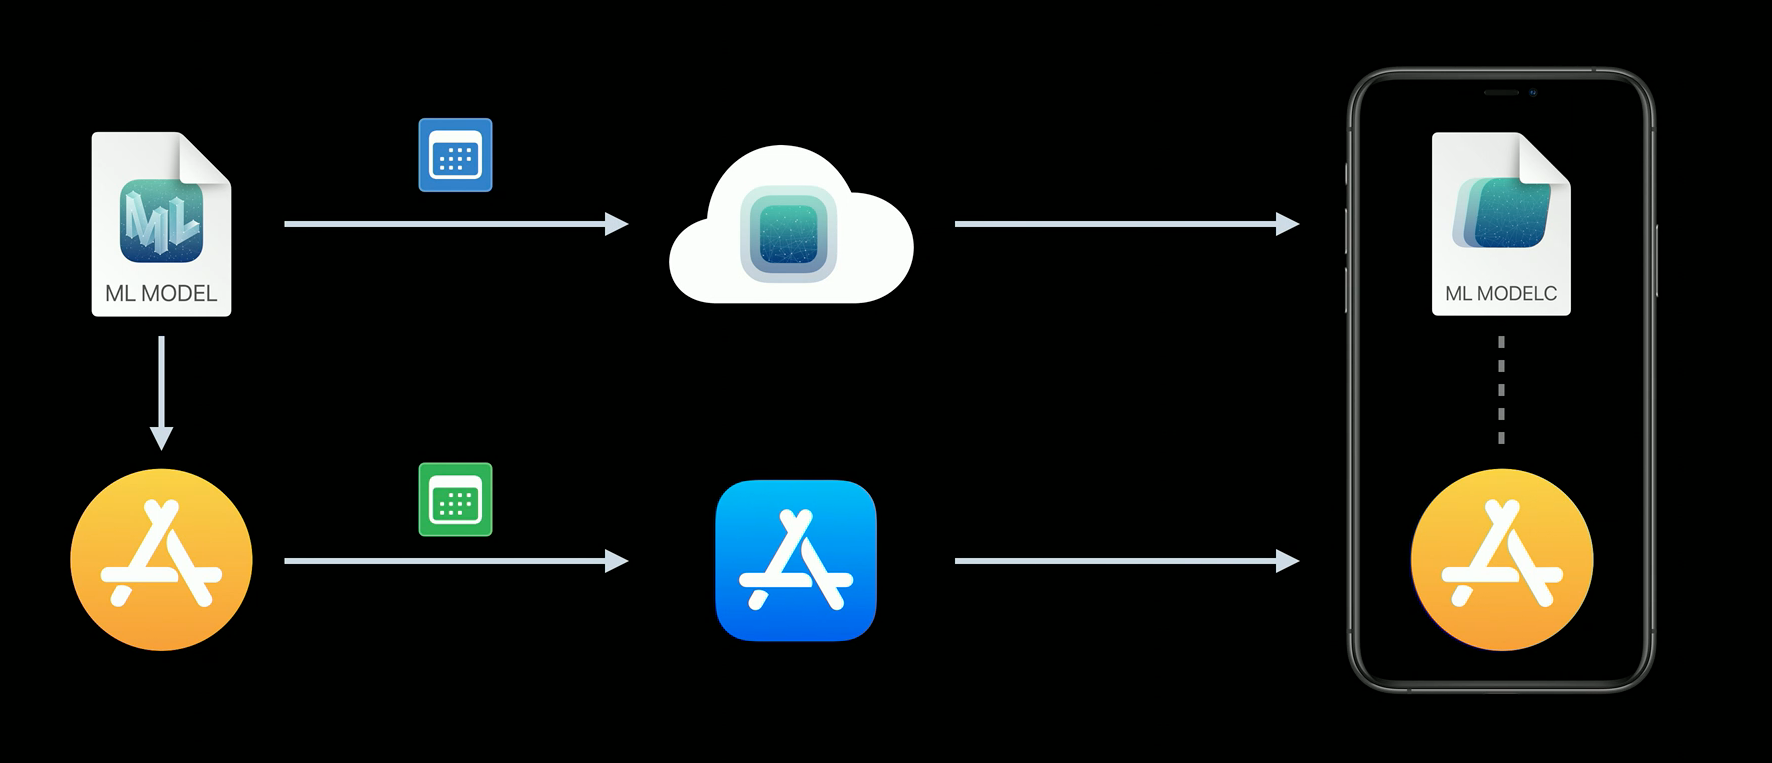
Apple also announced Model Deployment which allows developers to update their CoreML model without the need of updating the app. Before Model Deployment, developers were forced to submit an app update even though the only update was the machine learning model. As you may know, every submit to the App Store requires an Apple review which takes time. Using Model Deployment, machine learning specialists are able to keep improving the model accuracy and not needing to care about when the next app version comes out.
Model Deployment allows you to develop your model, adding new classes or retraining with more data for instance. All this without taking into account any updating plan of your app. You can have two different calendars for updates, which will be independent of each other. As the model is uploaded in the cloud, the first time you try to get it with the new Core ML API, the app will try to download the new model in background. You will have to manage the error if the download fails due to network connection issues, for example, a common solution for this is to use the default bundle model and log the error.
Without Model Deployment.
With Model Deployment.
To prepare your model for Model Deployment Xcode has now an option to create a Model Archive from your CoreML model. Then you only have to upload the archive through the Model Deployment Dashboard. Additionally, before making the deployment you can add some targeting rules to assign different models to specific device class (iPhone / iPad / TV / Watch). For example, the iPad's screen is bigger than the iPhone's one, so if you are working with a model that gets a drawing as an input, you can create two models in order to train them with the correct inputs.
That's good because your app doesn't have to store all the models for the different devices, reducing the app download size from the AppStore.
But what about the security of my models when they are updated?
Security with Core ML
In regards to CoreML models security, Xcode is now able to encrypt your model at build time. With this new feature, you can distribute your models knowing that they are encrypted end to end. The only time where the model is decrypted its when it is loaded on the device's memory to be used by the app.

Model encryption.
But how do we take this new encryption capabilities to our app?
How to encrypt and secure CoreML models in Xcode 12
First, create a key (.mlmodelkey file) for the model in the Utilities section at the model file in Xcode.
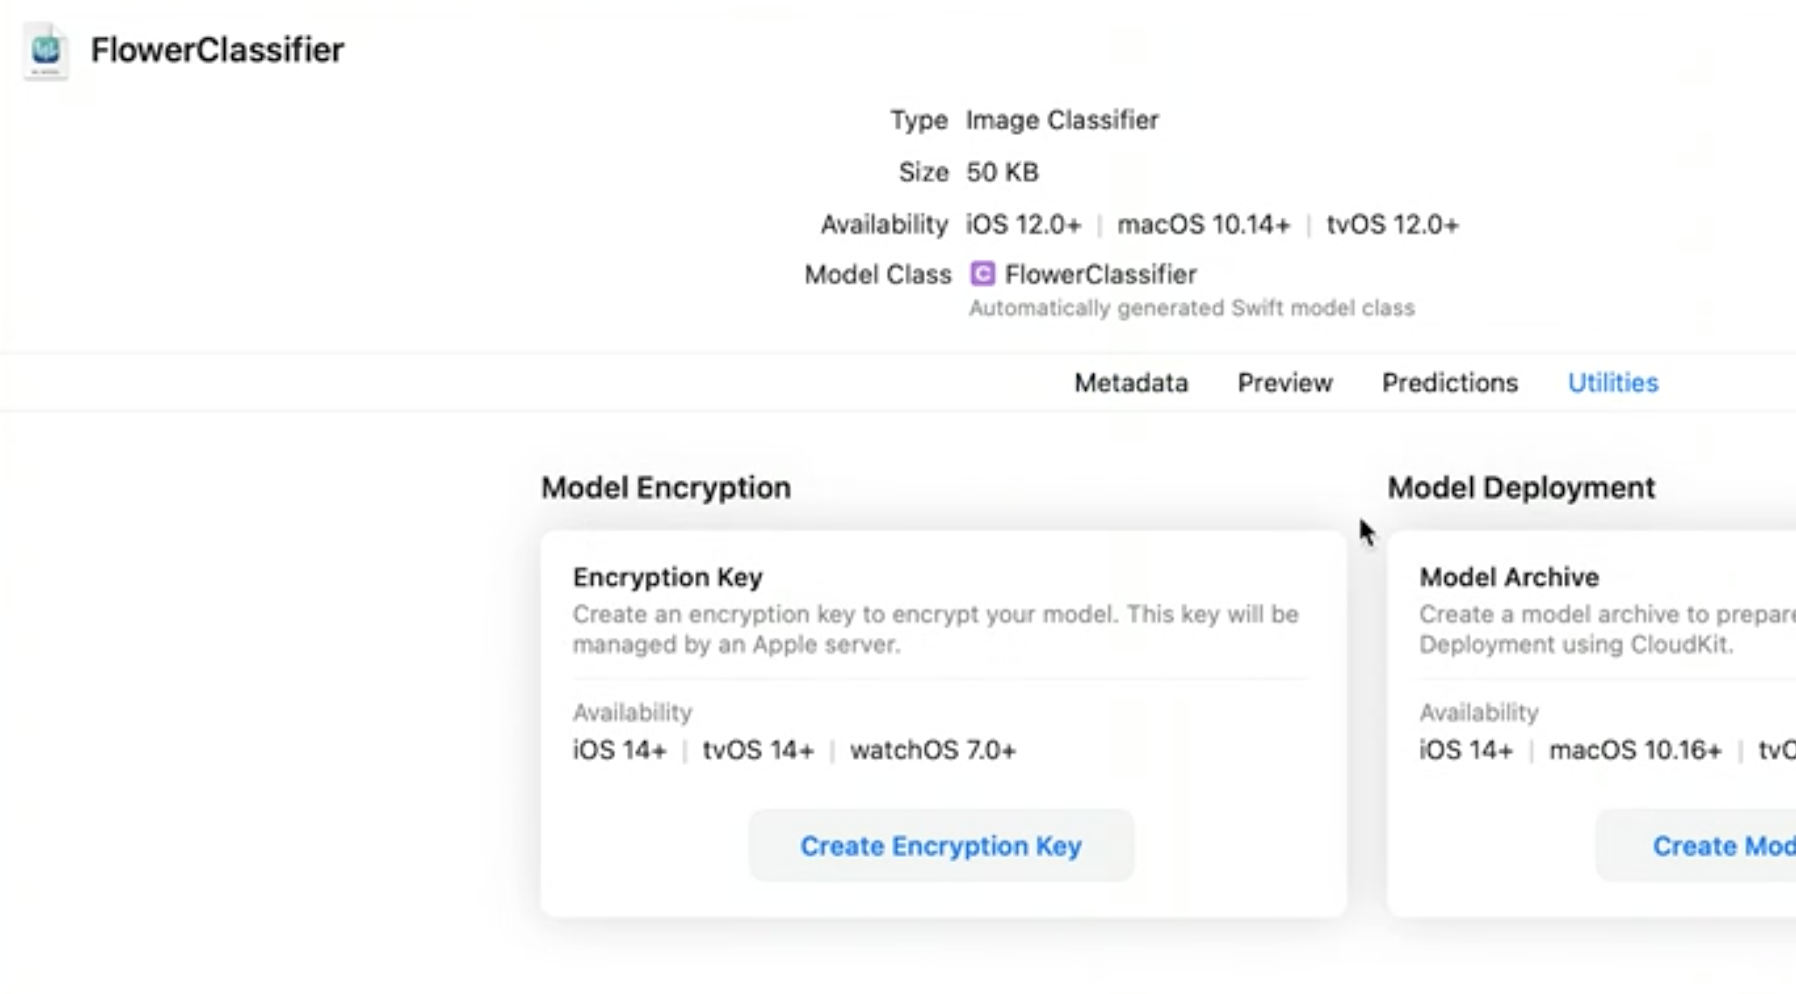
Then, to encrypt your model you can add —encrypt <path to .mlmodelkey> to the model's Compiler Flags, or if you are using the new Model Deployment service, you need to use this key while creating the Model Archive.
In order to get the model key from the Apple servers to decrypt it later, the first time the app loads the model requires an internet connection, so it is highly recommended to use the new async load method shown in the code snippet below, which allows you to handle model errors.
FlowerStylizer.load { [self] result in
    switch result {
    case .success(let model):
        flowerStylizer = model
        DispatchQueue.main.async {
            applySlyledEffect(using: model)
        }
    case failure(let error):
        hanldeFailure(for: error)
    }
}
We learned a bunch from security so far, but what about building our own CoreML models? That's where CreateML (Apple framework designed to easily build machine learning models using Swift and Xcode) comes in...
Build new CoreML models using Create ML
Build an Action Classifier
There are some new models you can train in Create ML, for example, if you want to classify different types of actions from videos now you can do it. This new feature is powered by Vision's body pose estimation, so humans are the target of these actions, not animals or objects.
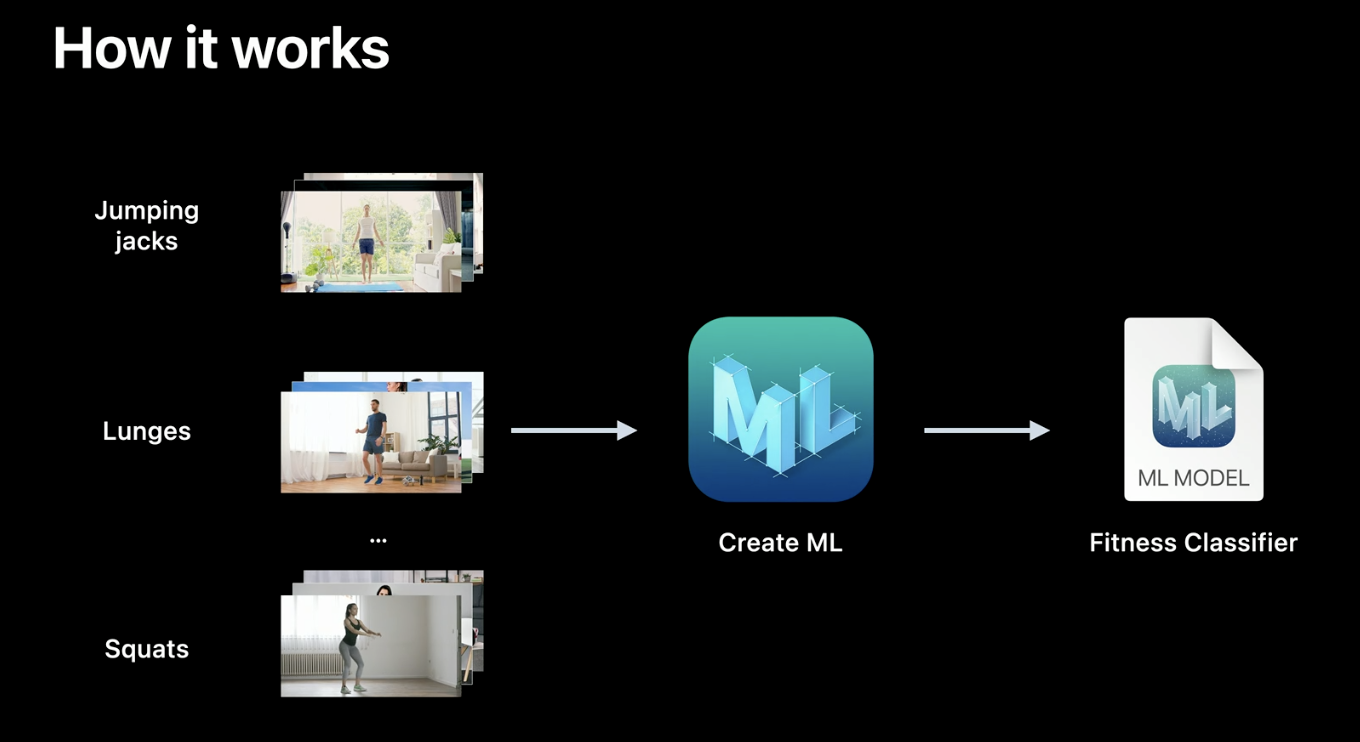
How to create an Action Classifier.
The videos must have one action type per video, several seconds per video and, only one person, and framing the entire body. If you have a video with different types of actions, you can split up the video with a video editor application, or also you can create an annotation file indicating the time of the different actions in the video.
It's a good practice to train the model with an extra class called Other, where you place the videos in which the person is doing nothing and you don't want to recognize the action to prevent obtaining false results (i.e: people walking or just standing).
Before we start training the model, there are few parameters you can tweak. Action duration represents the length of the action you try to recognize. You have to analyze your actions to recognize and set that parameter correctly to obtain better results on your model. Also, there is a horizontal flip option for data augmentation to increase the training data without adding new videos which use the flipped version as a train data apart of the original one.
Since the model takes a prediction window with poses of the frames recorded in the last X seconds set as action duration, as input, you have to make VNDetectHumanBodyPoseRequest, to extract these poses.
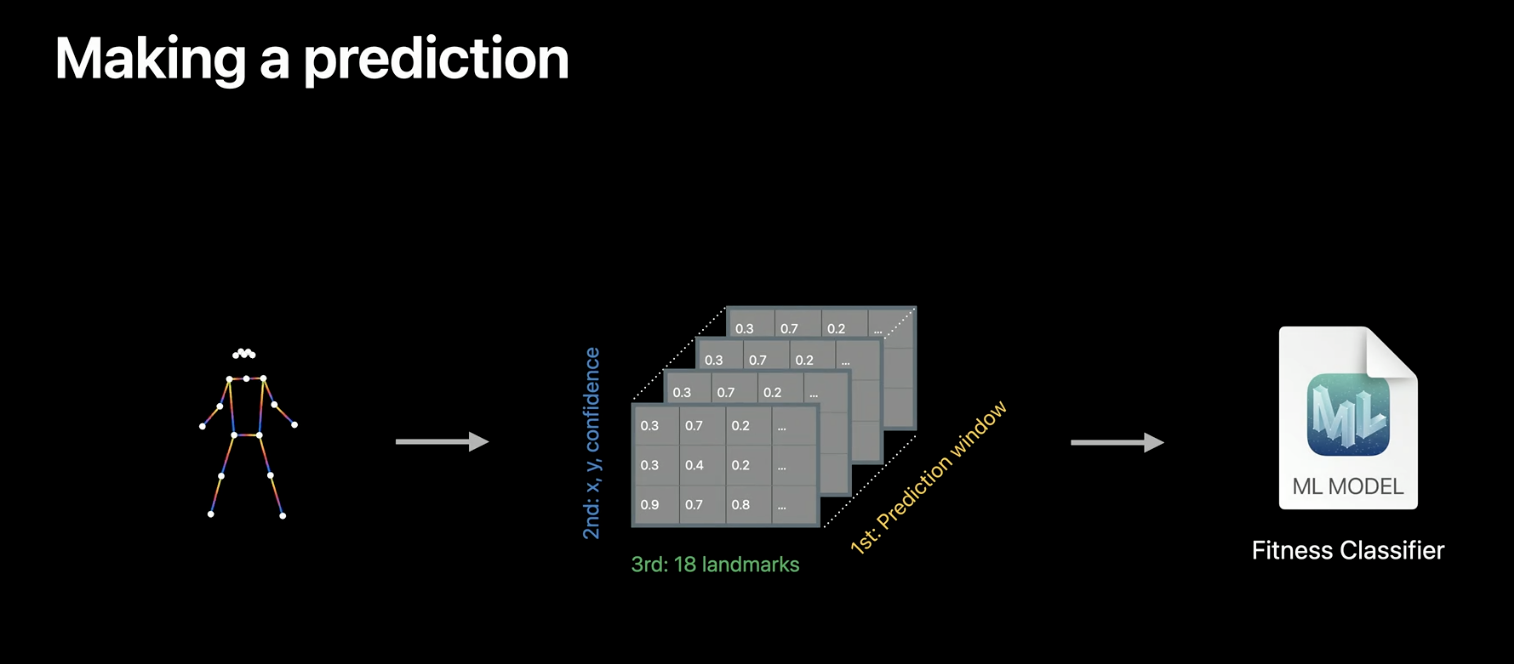
Steps for making a prediction.
Build Image and Video Style Transfer models
Another new type of model is the Image and Video Style Transfer model (a model based on two input images, one that consists of the artistic style, and another that's the content). After selecting the option on Create ML, you only have to set a Training Style Image which provides the style patterns you want to transfer, a Validation Image to validate the transfer while the training is running, and Content Images to train the model with images that represent the type of images you will use in your app.
The default settings work pretty well, but you can improve them. In order to do that you have to select if you will use the model for images or videos, then you can select the number of iterations in the training which has two parameters that will define your model. Style Strength indicates how much style the model will transfer from the image and Style Density determines how much detail of the style the model will transfer.
Style and Stylized result with a high Style Strength and low Style Density.
Control training in Create ML with Swift
Although Create ML provides us with a very straightforward way to create Core ML models, it's very limited for more sophisticated machine learning models. In order to overcome that, Apple adds the possibility to control training through Swift code, in order to save time and obtain better results while creating a new model. The best thing to do is to use Swift Playground where it instantly shows the results of the code that you write. With the new API, you can call a training method that will train the model and return a job. Before doing that, you have to specify the session parameters. These parameters consist of sessionDirectory, reportInterval, checkpointInterval, and iterations. The job returned in the training method, contains progress, checkpoint, and result publishers. It also has a cancel method that allows you to stop the training at any point. Using the result and progress publishers, you can handle success and errors, obtain the resulting model, and also observe how the training process is going.
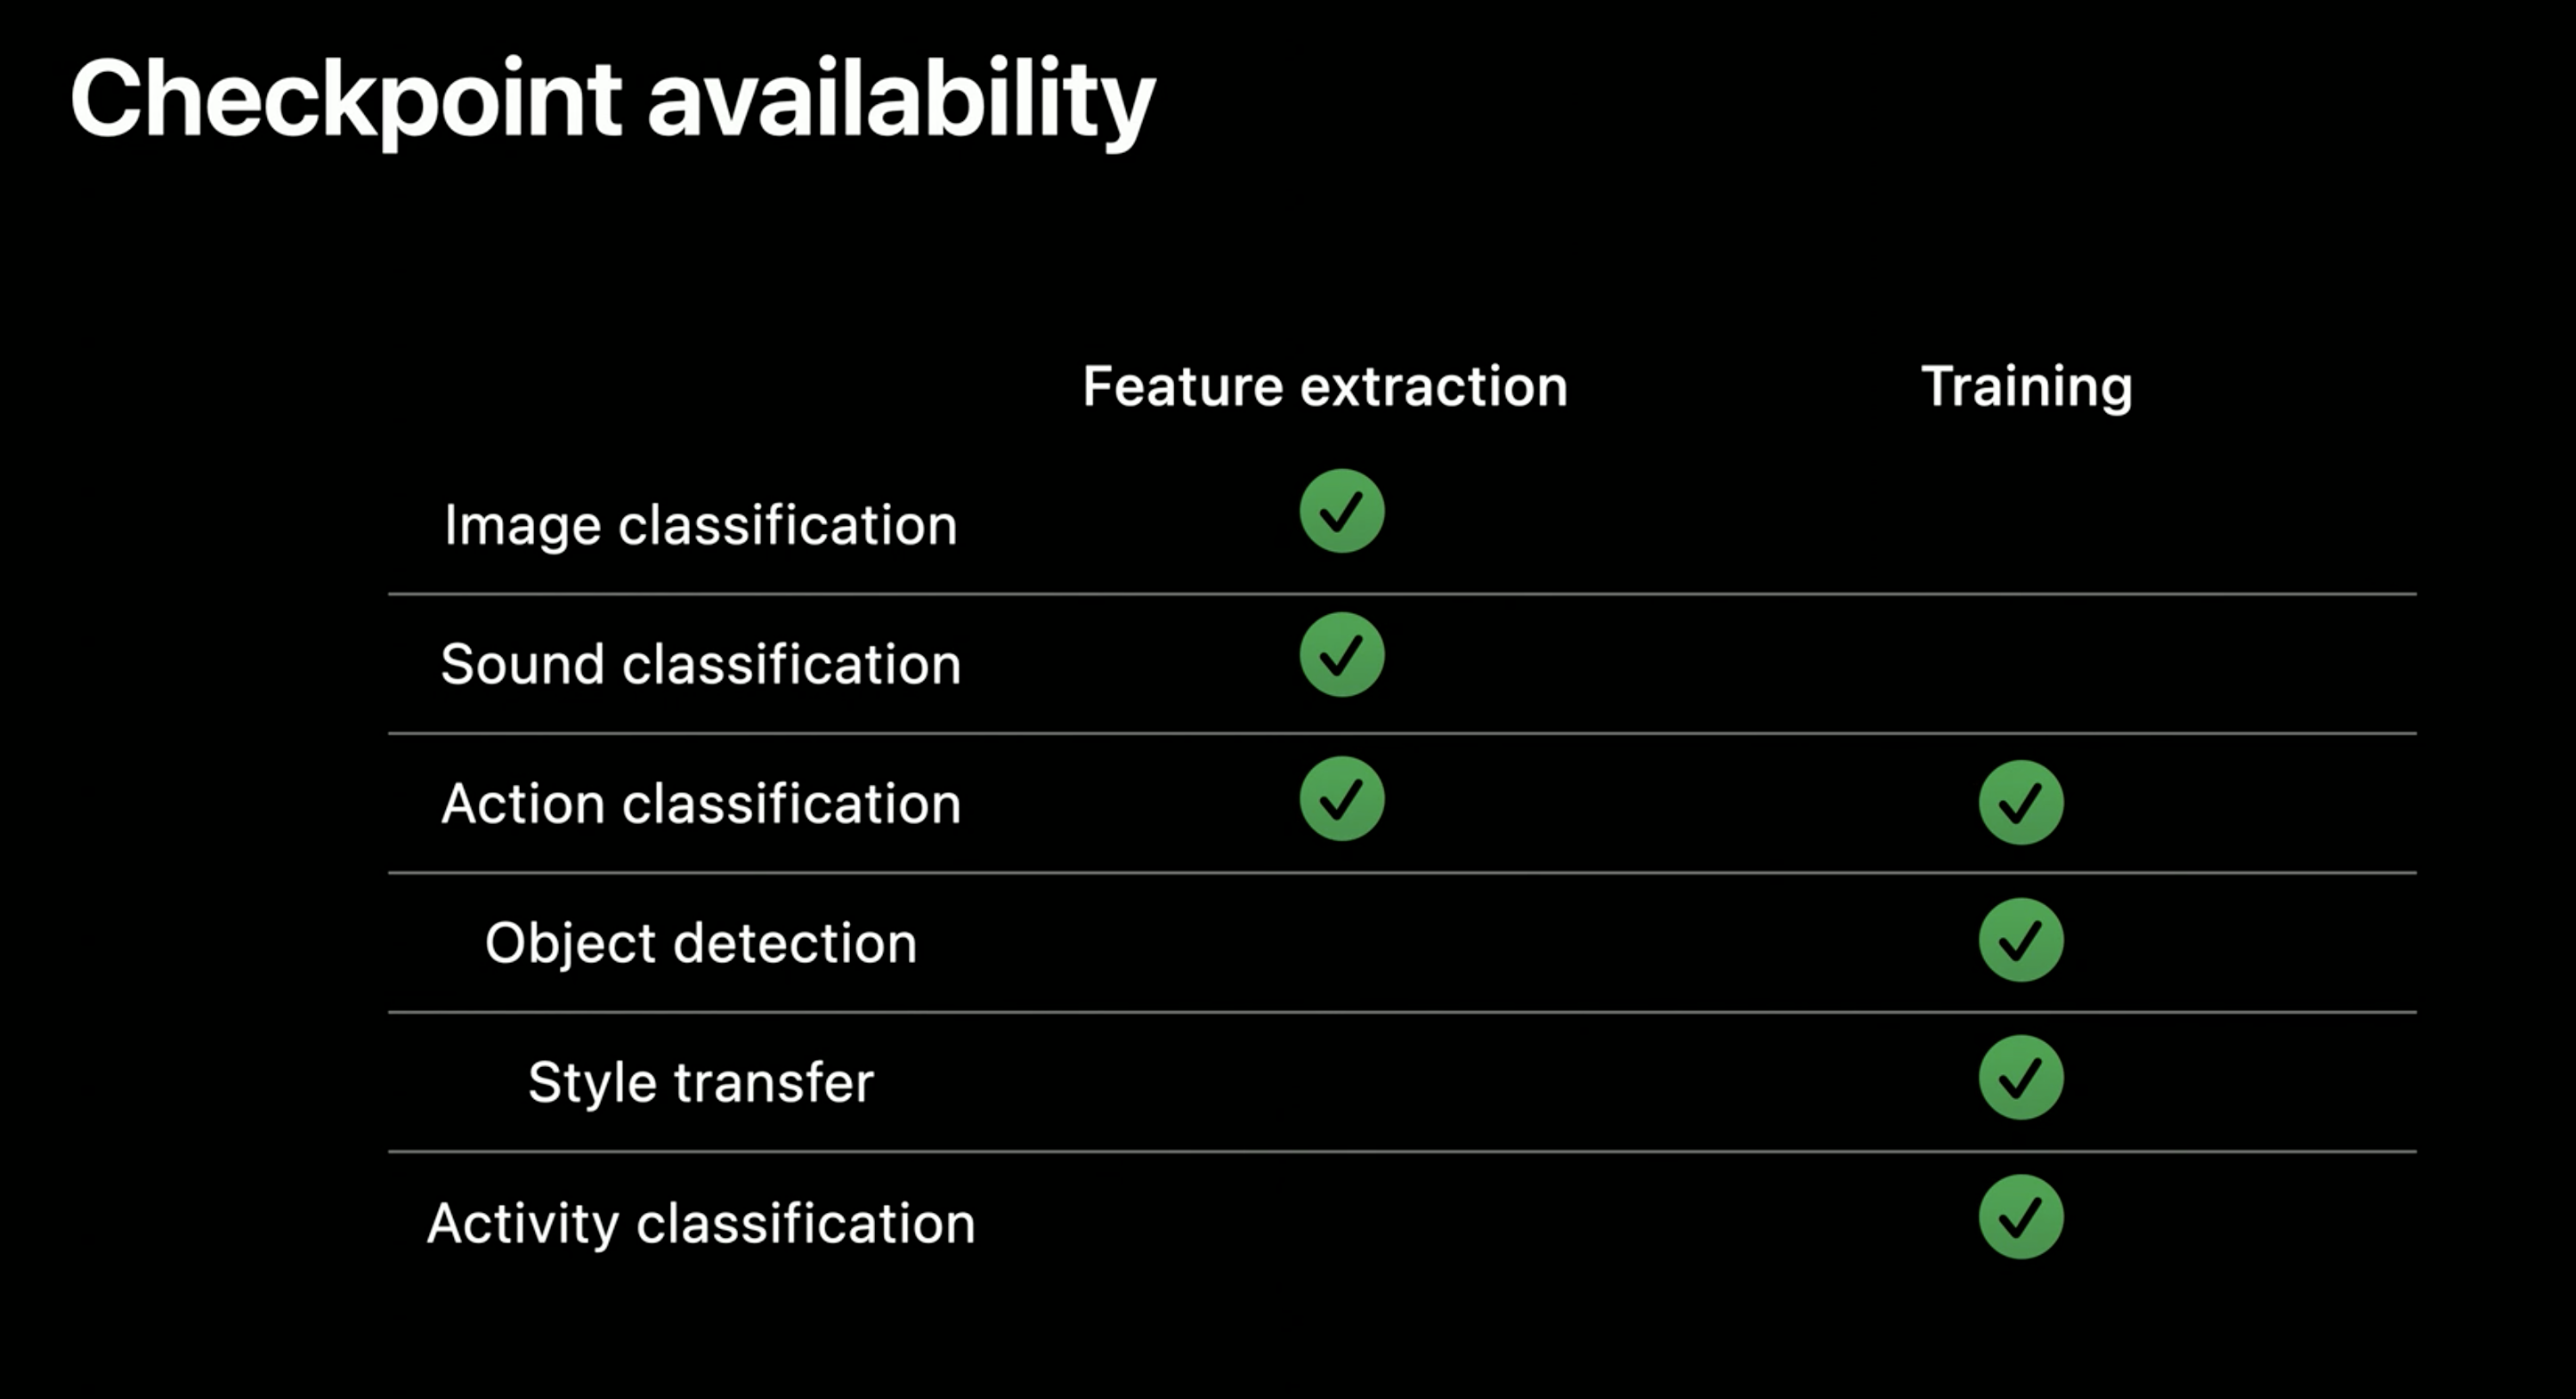
Checkpoint availability on different model types.
Now with checkpoints, you can capture the state of your model over time. One benefit of that is when your model stop training but you notice that the accuracy is still growing up, so you can resume the training increasing the number of iterations without having to re-train the model again from scratch.
Get models on device using Core ML Converters
Create ML is an intuitive and easy tool for training models but doesn't cut it for complex projects with models that are not available on the framework. In these cases, often we use another tool, like TensorFlow or PyTorch, but these tools can't create .mlmodel by themselves to use in Core ML. That's where coremltools (which we previously discussed it in the blog How to convert a NN model from TensorFlow Lite to CoreML) appears, an Apple framework that allows you to export your model in .mlmodel format.
This year Apple focused on the two most commonly used frameworks, TensorFlow and PyTorch. To convert TensorFlow, tf.keras, and PyTorch models, now you have to use the new single conversion API with its new unified interface.
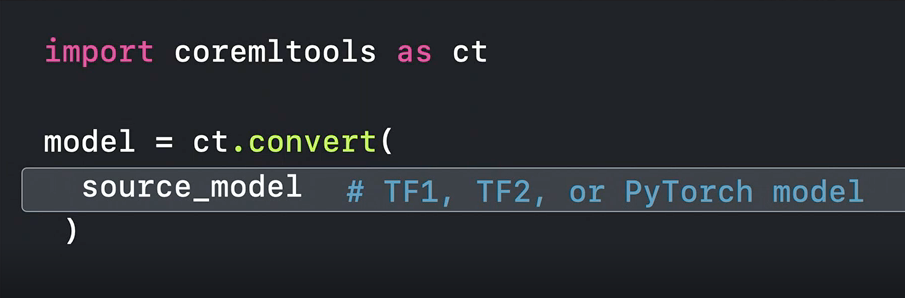
New unified convert() method.
What the new convert function is doing under the hood is to inspect the model format and choose the correct converter for it. Then it converts the model into an intermediate representation called MIL. Having the model in a MIL format gives us the possibility to optimize the model in different ways, for example removing unnecessary operations. The interesting part of MIL is that allows you to deal with layers that are not directly supported by Core ML, you can split it up into more primitive MIL operations, like matrix multiplications, or other arithmetic.
Final thoughts
Apple has done a really great job improving its machine learning frameworks.
Vision with the new body and hand pose detectors brings a huge of possibilities to your app like recognizing different types of gestures and do some cool stuff like taking pictures without pressing a button or analyzing body poses when doing sports in order to improve your form on some technique.
By adding Model Deployment and model encryption, CreateML will make developers feel more comfortable using it. It will help them save time by avoiding to update their app frequently only to modify its models and it will make them feel more secure to use models not available on the machine learning community which has a great value without the risk of being stolen.
Create ML keeps extending the available models with the addition of Action classifier and style transfer models.
And talking about control training and Core ML converters, Create ML is less limited than before, and coremltools with its new version allows developers to convert its customs models created in other tools easier.
To sum up, nowadays having a Machine Learning Expert can be a really nice to have, but by no means a necessity (at least for most basic models), which opens up incredible opportunities for mobile development, considering that adapting ML models requires less effort as time passes, and users are starting to grow accustomed to the topic. There is no doubt Apple will continue introducing more capabilities and lowering the barrier of adoption, which is amazing for developers and Apple device users!
